Howdy! I don’t know about you but the month of March felt more like a week than a month and I cannot believe we are already a quarter of the way through 2024 already. The good news is that the Warlords have been hard at work this month getting some stunning minis painted.
The even better news is that we have added another member to our already stacked writing crew. If we add any more all stars to this crew we will be giving the AP a run for its money. Without further adieu lets get started with our newest member…
Joe
Salutations! I’m new to AToMW crew and generally a novice hobbyist. I’ve been playing Blood Bowl since ~2010 but have recently begun to expand to Necromunda and Kill Team. I’ve been painting for a while, but I’ve never made an effort to push myself to develop past a basecoat + shade. I’ll be using this space to catalogue my experiments and motivate continued hobbying.
The Junktown Jesters – House Escher, Necromunda
I arbitrate a local Necromunda campaign (some of the AToMW also participate), but I don’t currently play. A local one-day event popped up with a fairly low gang rating (600 vs the usual 1000) and that convinced me to make the push to paint up a few Escher. The Escher have access to all sorts of poisons and that enticed me to give them a try.
I had a batch of Escher already assembled from the Necromunda Underhive box from ~2017. I picked the figures with loadouts similar to my desired gang list and primed them with Vallejo white primer from an airbrush. A quick note: I had upped my painting by underpainting and then applying contrast paints (which is my form of Slap Chop). I prime white, cover the miniature in a wash, and then dry brush heavily to restore highlights. I’ve mostly switched back to using true acrylics (you can judge the results yourself), but I still do this to pop details and help with shading. I struggle with shading and highlighting.
I decided to start with a Necromunda base, which I primed white… like an idiot. It still worked, but it required a lot more work than if I had just primed it black. I’ve learned my lesson. However, I was VERY pleased with the results. I even freehanded the hazard stripes (which you can probably tell!).

This “recipe” is not mine. I took it from Brush and Boltgun and use it almost exclusively now. There is certainly more I could do, but this was good enough for me. I ended up painting about 3 more before moving on to the ladies.
I had included a death maiden in my gang, but I didn’t have any death maidens built. I also didn’t really like the poses included in the plastic GW kit. Instead, I used one of my two resin Kira the Huntress models (she’s the OG Death Maiden after all). I’ve never played Escher before and this was an expensive conversion. I decided to protect my investment by magnetizing the possible weapons she could have. In the end, the magnetization wasn’t perfect, but it did work out. I ended up magnetizing 6 different arms (3 left, 3 right) for use but decided to focus first on a needle pistol and stiletto sword.

You can see an example of my underpainting here. The body has been coated in diluted indigo ink (roughly 10:1 glaze medium to ink). I use glaze medium to dilute this wash because I believe it coats the model more smoothly and pools nicely in the recesses. It does dramatically increase the dry time though.
I was pretty excited about how this model was turning out. I had also settled on a theme for this gang. Every member was going to be painted like a member of Batman’s Rogues Gallery. The Death Maiden seemed like a perfect fit for Poison Ivy.
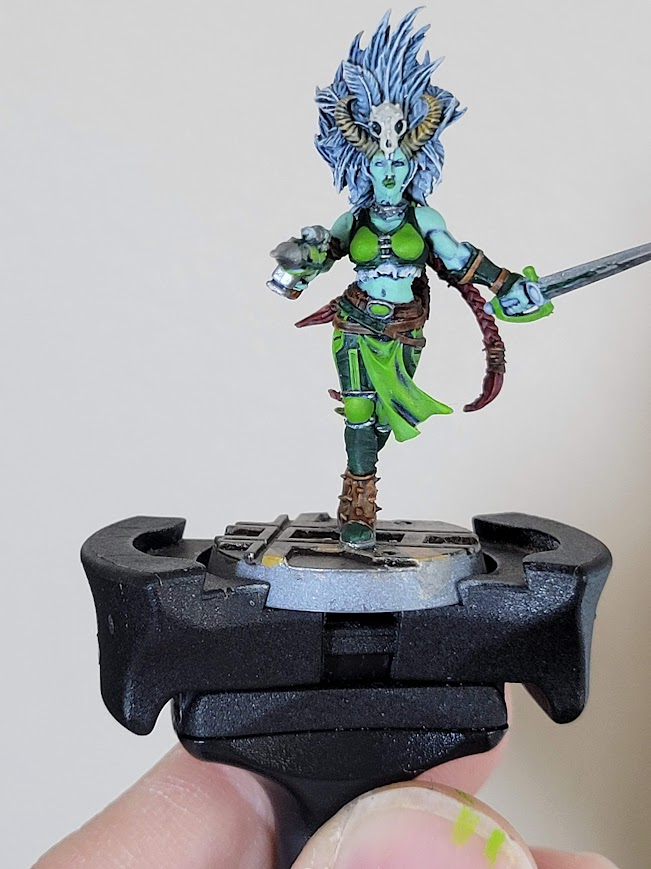
I knew that I wanted to do a dark green/bright green color scheme. I also knew that I wanted her to have an inhuman skin tone (Death Maidens are pumped full of chemicals and brought back to life). The greens are both done with acrylics (Forest Green from Reaper and Moot Green from GW) with special care to leave some of the indigo underpaint showing. I think the skin was Gauss Blaster Green from GW. I used contrast paints for the hair, leather, and horns. Overall, I thought this was a dramatic improvement from some of my previous work. The model had some clear shadows, but still comes across flat due to the lack of highlights.
I really wanted a grenade launcher in my Escher gang. I own nearly every Escher weapon pack. None of them contain grenade launchers. I did happen to have an extra genestealer cult grenade launcher. Now listen, I cannot claim to be a kitbasher. However, I was feeling adventurous. So I cut some stuff up, dremel’d off an extra hand, and made an ostentatious ONE HANDED grenade launcher.

In hindsight, I would make some changes (especially under the barrel). At the time? Oh man, this was like doing cocaine. I made this stupid little thing from parts that didn’t go together! Also, a character with a over-sized gun? I knew just the one…

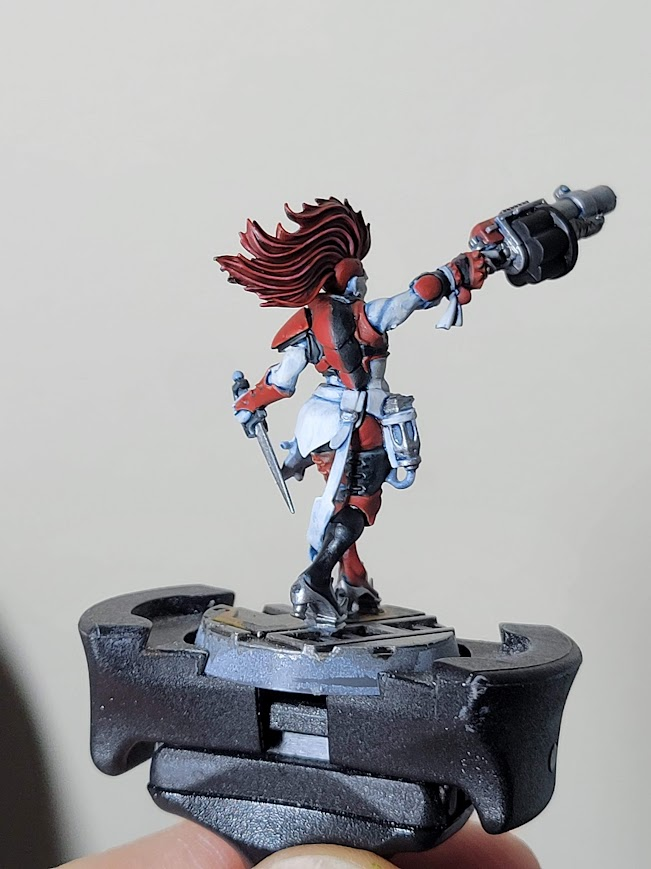
Harley Quinn has that obnoxious popgun in the animated series. I decided this grenade launcher would be its spiritual successor. I challenged myself to do the quartered red/black pattern (first with contrast, then redone with acrylics). I also worked to keep the indigo undercoat on the skin and whites to make them cool whites. I was shooting for a white pleather look with the belts and skirt. I’ll need to go back and find a way to make it stand out a little more from the skin. I also want to add red diamonds to the grenade barrels. This became my favorite model from the bunch.
Just to speed things along, I finished up my leader (represented as the Joker) with quick contrast paints over a slightly modified underpaint job (I added some specific highlights with white before the contrast paints) then painted two Juves, the Dee Dees (from Batman Beyond: Return of the Joker).

You’ll notice I didn’t do anything with the feathers. I still have no idea what to do with them, but I was running out of time and decided I’d come back to them later. I haven’t.
Overall, this was a HUGE hobby project for me. The turnaround was roughly two weeks and I felt like I really pushed myself to try some new things (or revisit things I haven’t done in 5 years… like magnets). I know, dear reader, you have no benchmark for my skills. You’ll just have to trust me that this was a significant step forward for me. I do plan to revisit these ladies, expand the gang, and spend some more time bringing them to life in the future.
The Wynna Dun Warriors – Dwarves, Blood Bowl
My gaming goal this year is to have played every team in Blood Bowl at a tournament. I have 7 teams remaining: dark elves, high elves, elven union, amazons, lizardmen, chaos dwarves, and dwarves. My dwarf team is from the now defunct Star Player Miniatures and was purchased back before GW returned to Blood Bowl. They’ve been assembled and primed for a LONG TIME. I finally decided I was ready to play them. It’s ~12 players total and I’m using them to practice layering and highlighting. Another note: I was terrified of ruining basecoated models with bad highlighting. No more! I’m gonna learn to do this. And generally, I’m quite pleased with the results.
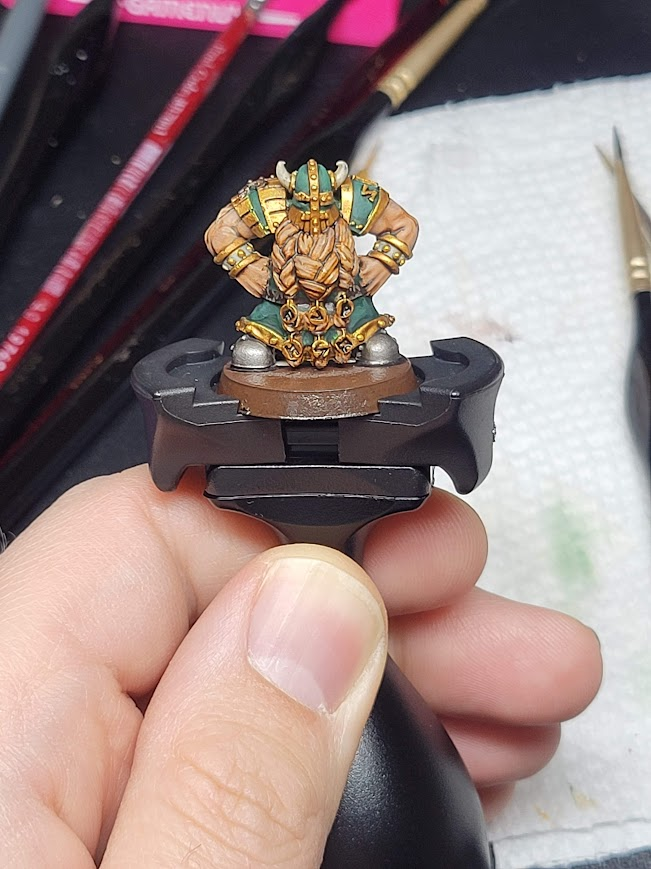
This was my test model for the dwarves painted back in January. I was very pleased with how the skin turned out. I think I did Darkoth Flesh over a basecoat of Tan Skin from Reaper and then did some baby highlighting. I also highlighted the beard and the greens. The beard turned out okay, you can barely tell on the greens. I was still very intimidated here. So I watched a couple videos, notable this one by Vince Venturella, and decide I was never going to get better by being scared. So i adequately thinned my paints and decided to take a crack at another line dwarf.
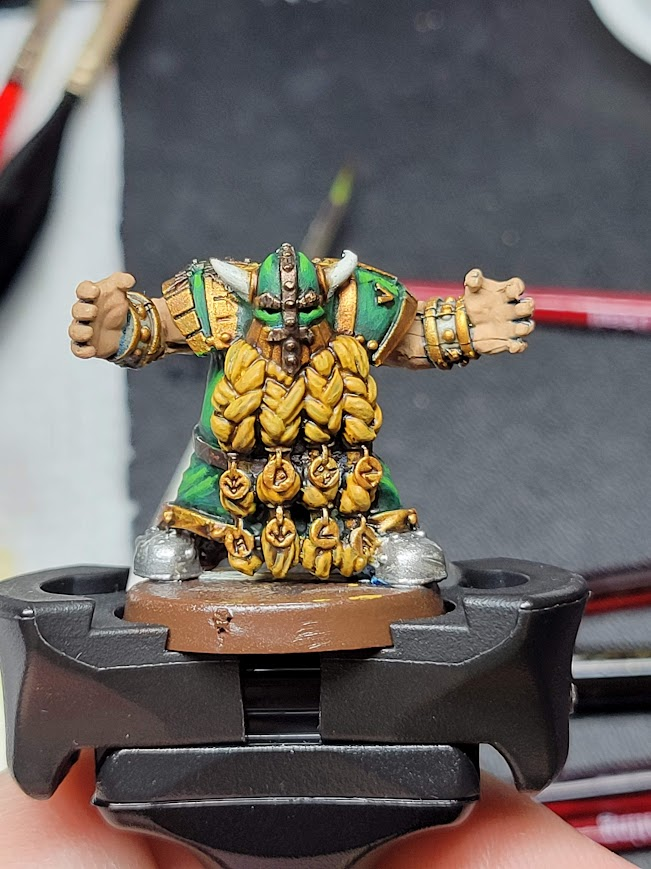
Look at those greens pop baby! Was this perfect? No. I definitely highlighted a few things too much, but I had a blast. It was awesome to mix the colors (I went with 3 colors with a midtone between) and see the model start to come alive. These images don’t show it (I was so psyched about the green I temporarily forgot the rest of the model), but I did go back and work on the rest of the model. The skin and hair didn’t turn out as nice on the model, but I was still very happy with the end result. On the table, no one will ever notice the flaws but they will notice how much his helmet pops.
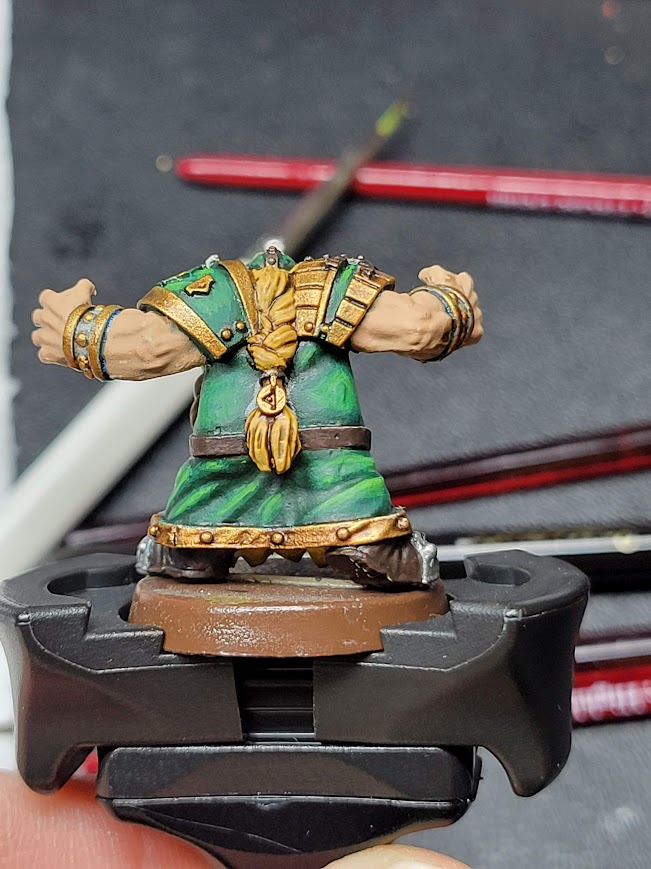
I was able to get one more of these experiments done, this time a Troll Slayer that had been partially basecoated months ago.


Again, I was very happy with the greens on this model. I love the way that the bent knee under the skirt pops. I think I over highlighted on the helm, but again it will still look pretty sweet on the table top. Again, the skin turned out okay. There was a lot of skin here and some miscasting of the metal along the back. I will try some different things in the future.
Heartsdale Hedonists – Chaos Chosen, Blood Bowl
I had to put the dwarves on a brief hold because I needed to paint up a model for the Big Lick Brawl team tournament that happens in Roanoke. Due to the team build requirements, I was unable to play one of my 7 missing teams. This will happen again in June for the Amorical Cup. Ah well.
I paid a fellow named Rawlin to paint my Chaos Chosen team way back. It was my first fully painted Blood Bowl team. I absolutely love it. However, when GW revised the rules for Chaos Chosen in 2020 they gave them access to either a minotaur, ogre, or troll. I have a minotaur, but this time my team includes an ogre.

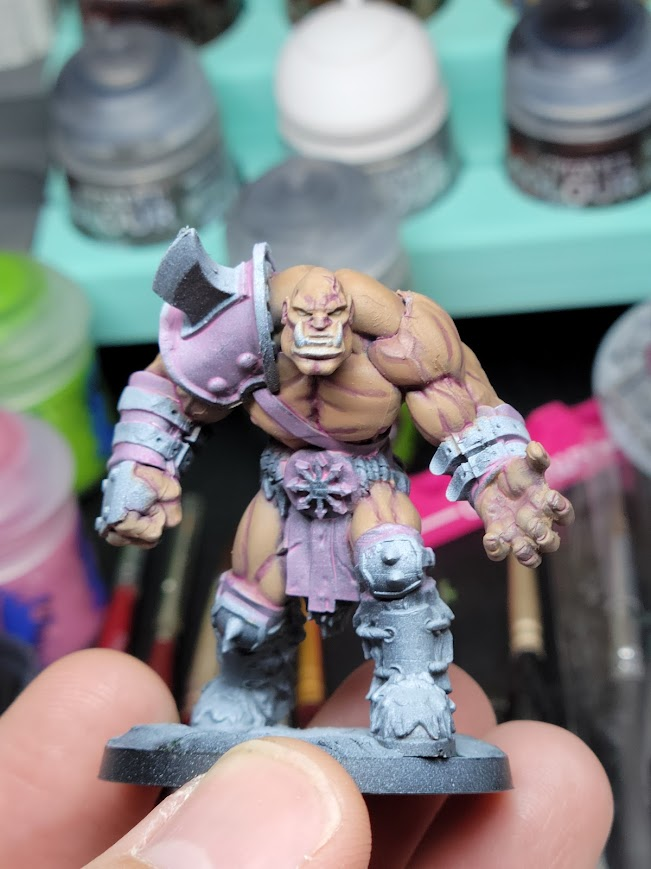
Here is the minotaur from the team, Aurum Barre. I was very hesitant to say “Hey! This mino is an ogre” because folks are gonna forget. Instead, I’ve decided to try and paint up a Chaos Ogre to match this team painted by someone with significantly more skill than me. I decided that this was probably a fool’s errand, so I should probably use this time to keep trying new things. First, I decided to do a zenithal highlight with my airbrush. Second, if I was going to spend the time doing a zenithal I might as well try to glaze to keep those shadows. Oh, and I decided to make my own base using greenstuff to mimic the bases from the painted team.

Here is the ogre post-zenithal. I don’t think this picture really does it justice. I did a three-tone zenithal (black, grey, white) and you can definitely tell where the model has shadows and highlights. I was generally pleased with the result. If I continue to enjoy glazing, I may continue to improve my technique.

Here is my attempt to greenstuff the base to match the rest of the team. Again, this turned out much better than I expected. Applying the primer really made things come to life. We’ll see how it goes.

I started by working on the skin. My friend Joe has been pressing me to try glazing into the recesses to make my skin pop. Well I finally did it! I used Vallejo Red Violet and went to town. You might notice the recesses are quite stark… I definitely needed to dilute my paint some more. Oh well! I’m gonna be glazing some more highlights onto the skin, so we can touch-up as we go. The almost cartoon contrast looks really awesome on the table.
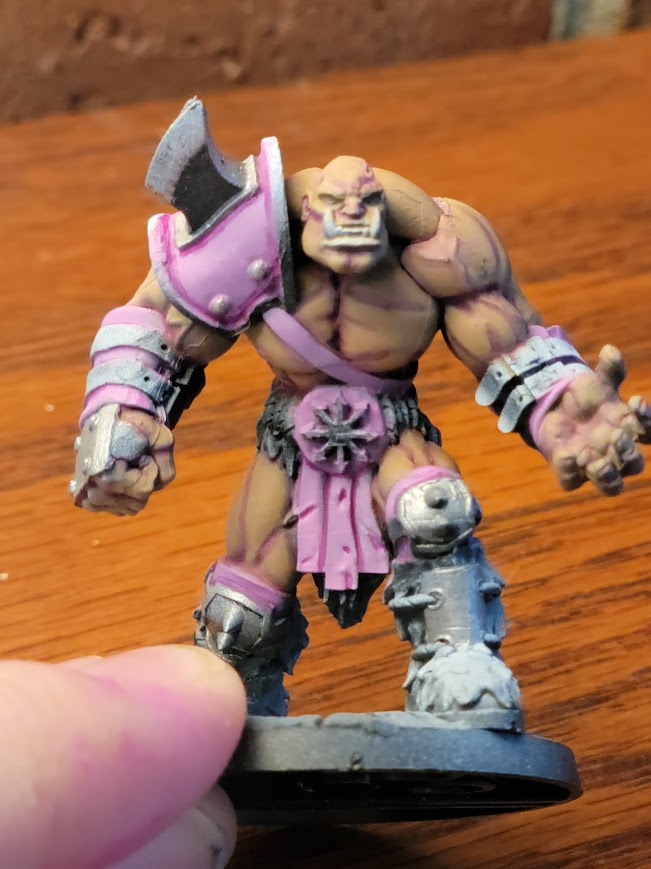
I also decided to glaze some more red violet into the recesses of the pink too. Again, very pleased with the results. I did manage to do some work on the fur and apply to some blacks, but I didn’t get any pictures of those! I’ll finish him up this week. So you’ll have to wait until next month for the finals, dear reader!
Overall, a pretty good month (even if I sneaked a few things from Jan/Feb in here too). Thanks for stopping by!
Michael S.
This month I’ve been working on a few different projects in parallel. My primary focus for the beginning of the month was my heresy-era Death Guard. I’ve enjoyed the game a ton and am excited to get a fully painted army on the table. I got a lot of models basecoated a few months ago, but still had a lot to do.
I finished painting most of the details on a 5-man support squad wielding plasma guns. I had a ton of fun painting some awesome plasma glow on the guns.
In some of the games I’ve played, I’ve felt like I needed a small cheap unit with a little extra punch in taking out heavy infantry. Hopefully these guys will slot in nicely! All I need to do here is paint some lenses, apply a bit of streaking grim to the rest of the unit


Similarly for my Death Guard, my tactical squads had been on hold initially as I was waiting for some legion heads from Forge World. I had two squads of 15 set aside and primed, along with another Heavy Support squad.
I made the least progress on this unit, but still made a big step towards finishing them! I was able to lay down all the base colors, which leaves just a quick wash with Mortarion Grime left. By putting down all the metallics and colors before, I can go over the whole model and achieve some subtle shading/grim all over. This complements some detailed weathering using streaking grime.

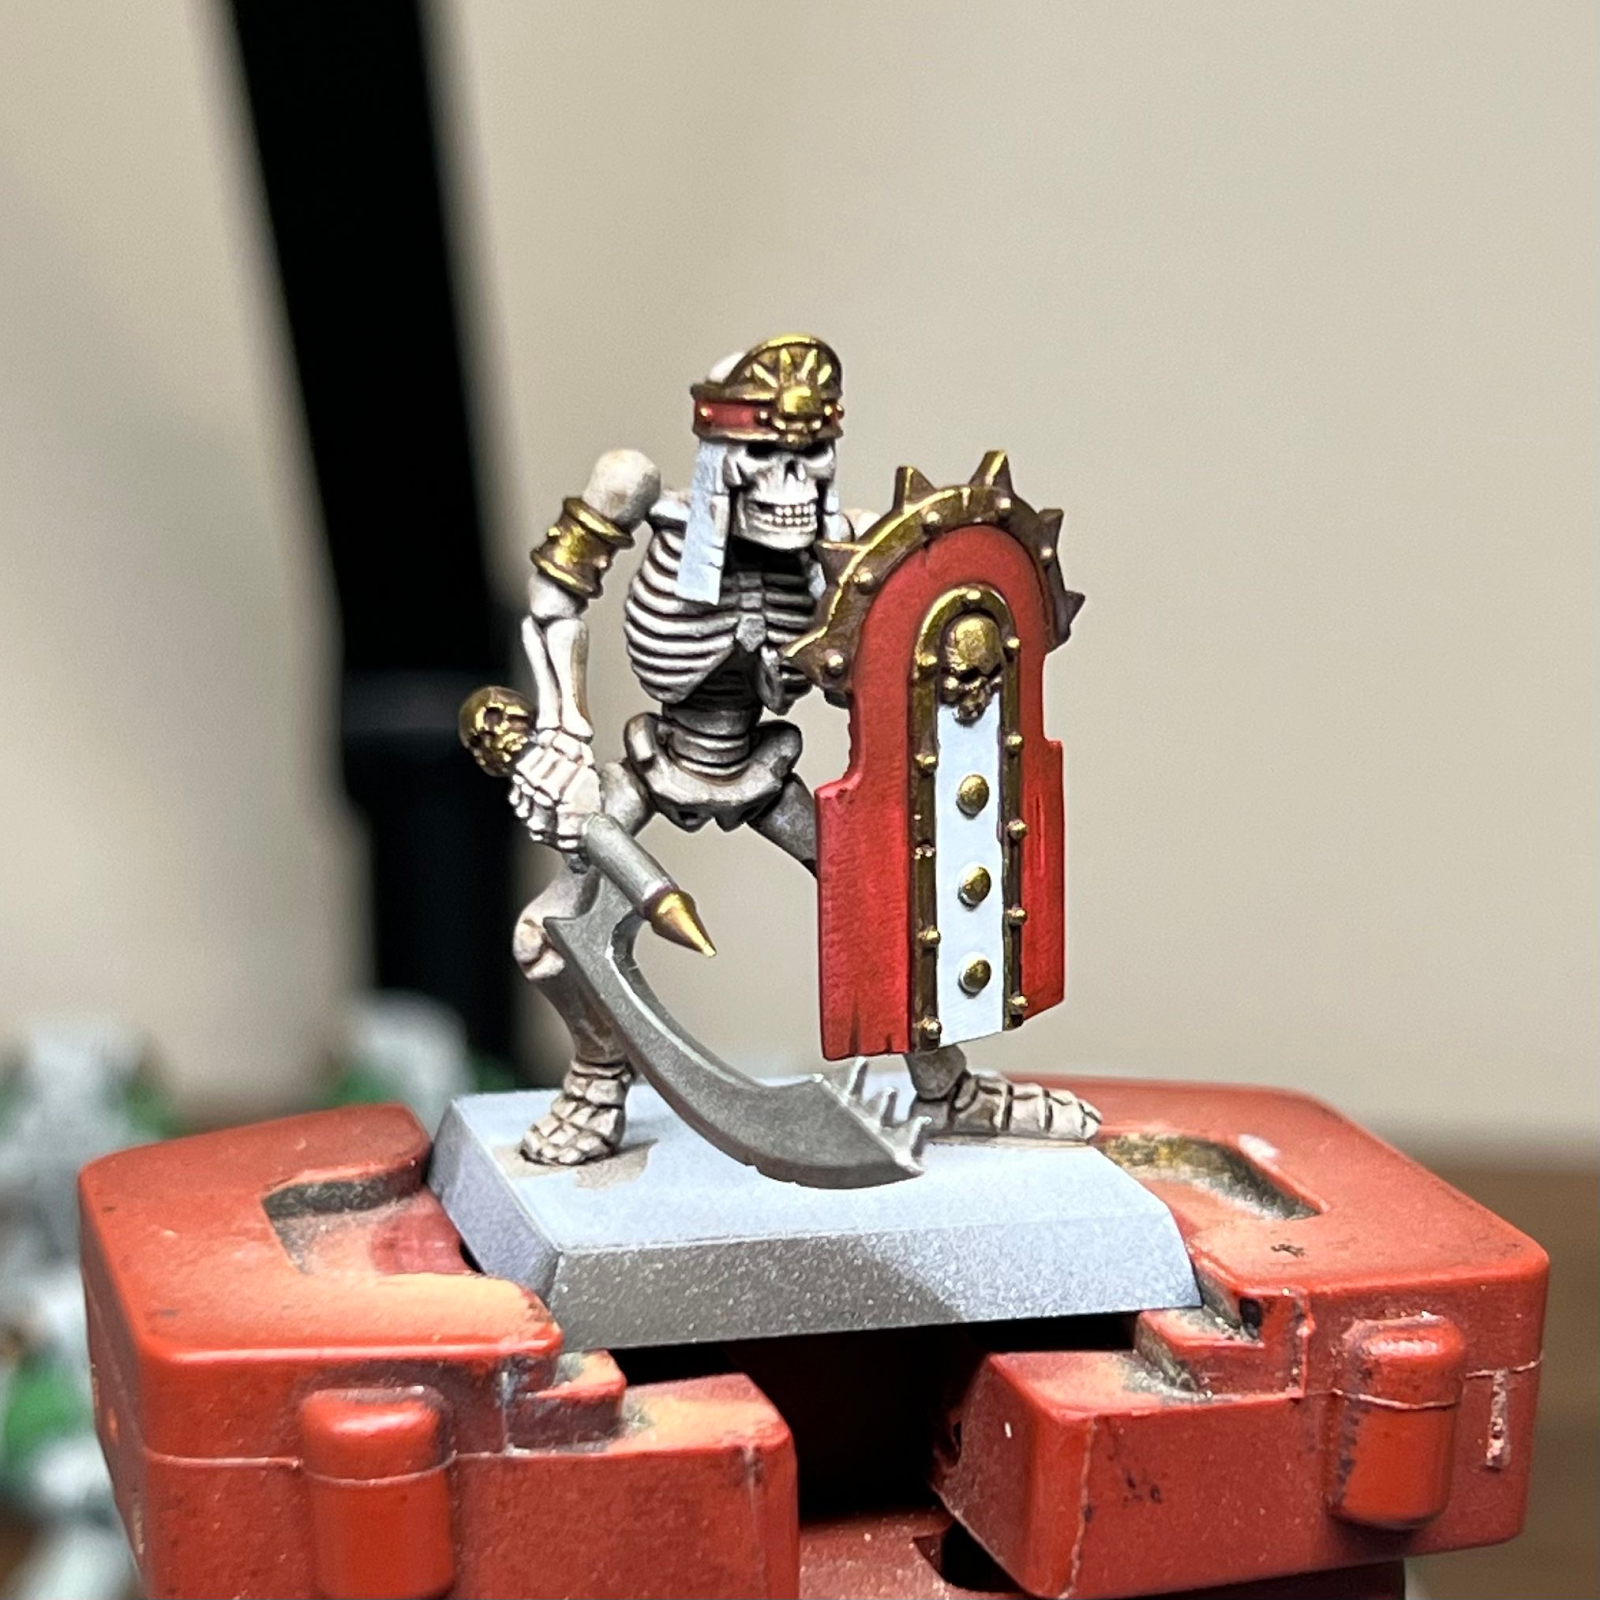
Last on my list of projects is a unit of Skeleton Warriors for my Tomb Kings army. I am super excited about how these came out, and how efficient I was able to make the painting process.
I started out with a zenithal undercoat, which is the norm for me at this point. Zenithal undercoat + contrast is quickly becoming my favorite way to paint line troops, and even some centerpiece models. My only variation is that I dislike using a black undercoat in MOST situations. Instead, I like to work with dark colors that match the overall done of the model. I personally find pure black makes a lot of colors look weirdly washed out as they move into shadow. In this case, I started up from Stynlrez’s dark brown primer.
From there, I layered on a few transparent paints to quickly build up the base of the model. I had fully painted up a test model, just to make sure I knew the direction I would be taking things.

From there I was able to easily assembly line the whole painting process. I managed to get most of the base colors down, and all I have left is some select edge highlights and shading the gold on all the models. For this unit, I opted to go with a slightly cold undertone on the gold. Starting out with a greenish-gold, I washed it all with purple to further push some colors into the shadows.

Thats all for me this month! Next month, I’ll be a bit busy, but my goal is to completely finish all 3 of these units and complete building all the models from my Tomb Kings army.
Austin B.
March Progress
In our last monthly update article, I had mentioned my lack of motivation after recent incidents had left me drained, both physically and mentally. The feeling continued on throughout much of February, leaving me dry on content to post for you all. Even as I pushed through base coating 90 Night Goblins, I wasn’t really feeling it – more just going through the motions. It was all very robotic. This, coupled with a growing dislike for how the Night Goblins play, at least as a pure force, really didn’t give me much reason to keep up work on the madcap maniacs this month, much to my dismay. But a couple of other projects filled the gap for me this month instead, and I have made some impressive progress in regards to them, even with my seemingly dwindling time to spend upon these projects. So what are these projects, you might ask?
Well, my local game store runs game and demo days for a few different games, on a consistent schedule. The last Tuesday of every month, for example, is Bolt Action day, while the first Tuesday of every month is Star Wars Shatterpoint day. This only started in January, but my absence from life for two weeks meant that I missed the inaugural events. Still, I mention those games specifically because they are what all my progress this month will about. We’ll start with Bolt Action
Now, I already played Bolt Action, though not with any regularity. I have a few friends who play, but we switch between games constantly. Meanwhile, the other closest store to me runs their Bolt Action game nights on days in which I am normally working in the office, almost two hours away. So it would be safe to say that any drive I had for painting up my remaining backlog of Bolt Action models was fairly low. And I have quite the backlog! Finally, however, at the end of February, I was able to attend the second Bolt Action day, and I had a lot of fun! It was nice to bust out my armies and terrain, and show things off, and even better to play again after a long time of having not. And with that, I felt my motivation come surging back to me, and I felt the urge to paint up my Bolt Action once again!
I own, at current, three different armies for the game. My initial force, Canadians, are mostly painted, with enough done to play up to 1500 points without any bare plastics (or metal!) in sight – but I have plenty alternate units for varied lists that still need work done on them. I have also been slowly working on Italians (Decima MAS to be specific) as an Axis-aligned force to sit opposite my Canadians, though I still have much to grab (and paint, of course) before I can count them as complete. However, it is my third force that we will be discussing today: the First Special Service Force, or just the Force – or FSSF – for short. Though to the Germans they were known as the Devil’s Brigade…
The Power of Motivation – Or How I Stopped Worrying About The Details And Just Started Painting
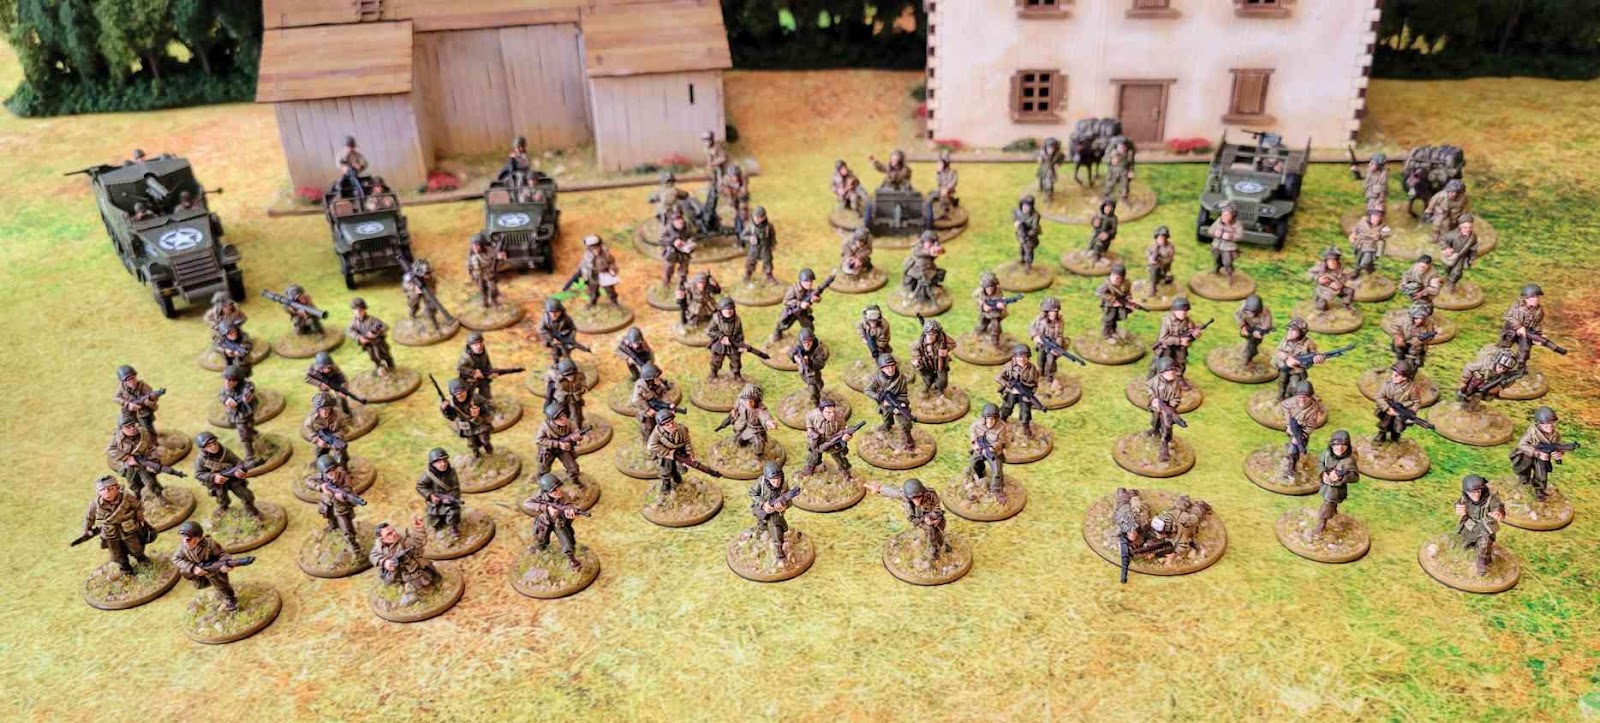
The Force! While I am still missing a few special weapons and vehicles that I would like to add to it, it’s already at a size far above a standard game. And yes, that’s my terrain in the background!
For a brief overview, the FSSF was a joint American-Canadian commando unit, initially conceived and trained for sabotage operations in Axis-occupied Norway. With the operation’s cancellation, they were instead deployed to Italy in late 1943, where they participated in such major battles as Monte la Difensa and Anzio. While short lived – being disbanded in late 1944 – the Force was the model for the future Special Forces Groups and other foreign equivalents. It’s an oft-not discussed unit participating in an oft-not discussed theatre, so I certainly implore those interested to look into this unit – and honestly the whole of the Italian campaign – further. Luckily, Warlord Games has somewhat recently released two campaign books on the subject of the Italian Campaign, which are filled with plenty info, scenarios, and new units and armies specific to that theatre. In-fact, it was the impending release of Soft Underbelly which got me into the game in the first place!
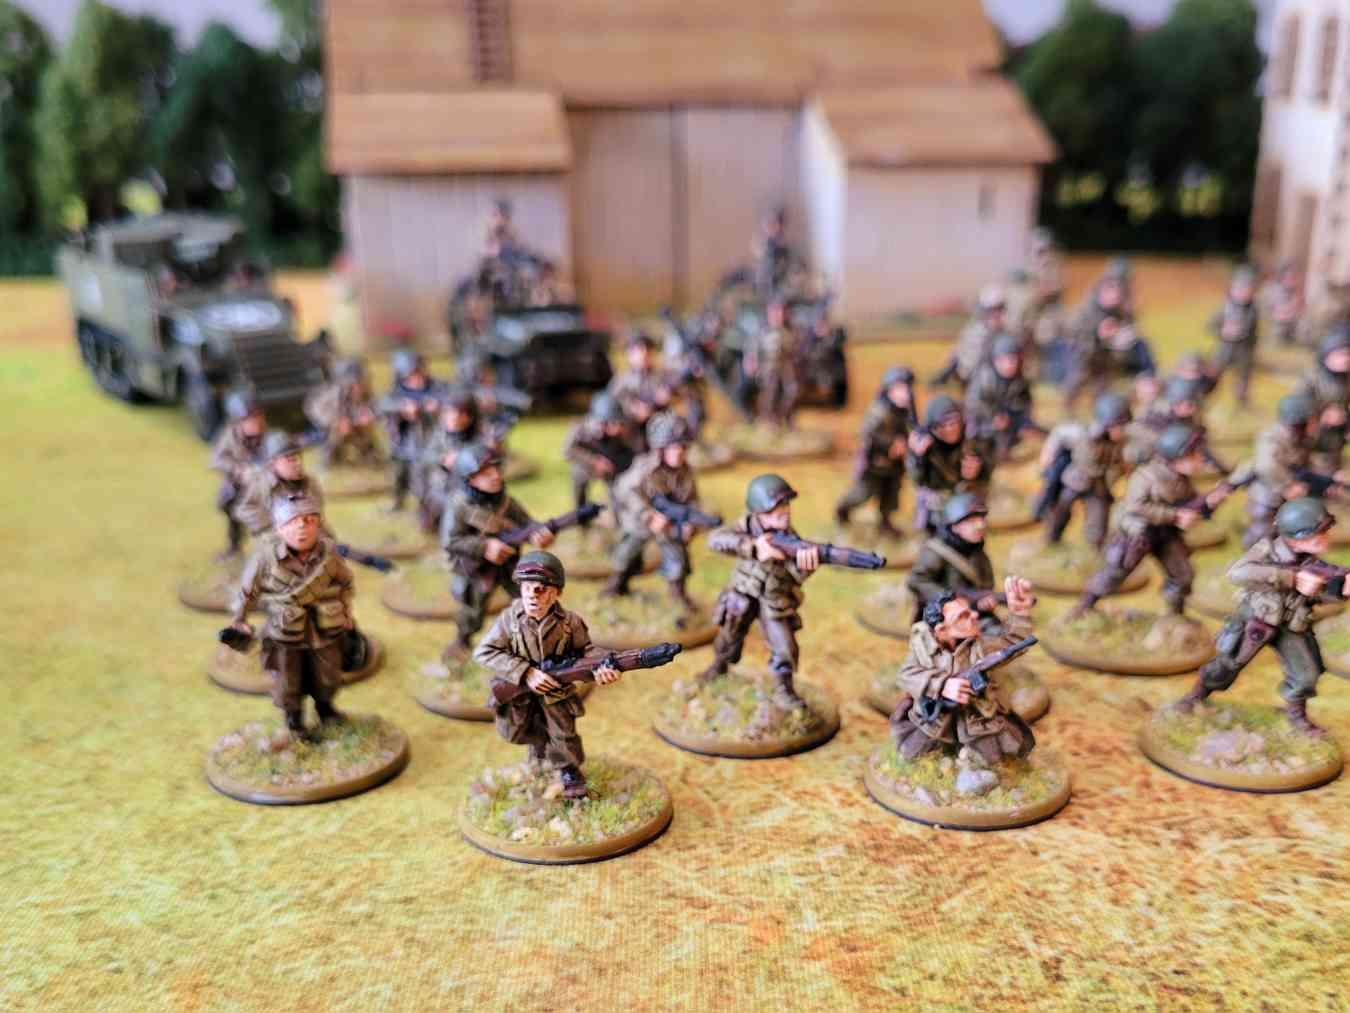


Infantry make up the backbone of any Bolt Action list, and I have a lot of them here! Armed with a mix of rifles, carbines, submachine guns, automatic rifles, and even the forgotten Johnson light machine gun, I have a lot of choice here!
But enough about history, I want to dedicate this little section to the topic of motivation! Motivation is certainly something we mentioned a lot in relation to the hobby, but I do not really see it discussed much beyond that. Yet it is something that affects us all – and our progress – greatly. Highs can really help us push through tough projects, while lows can make those projects even tougher. It can sometimes be hard to motivate yourself, but the communities and people we surround ourselves with can be powerful motivators, which I am sure can be seen above. And if you can harness that motivation when it does come to you, you can achieve great feats… That is, if you can do so before it leaves you once again.

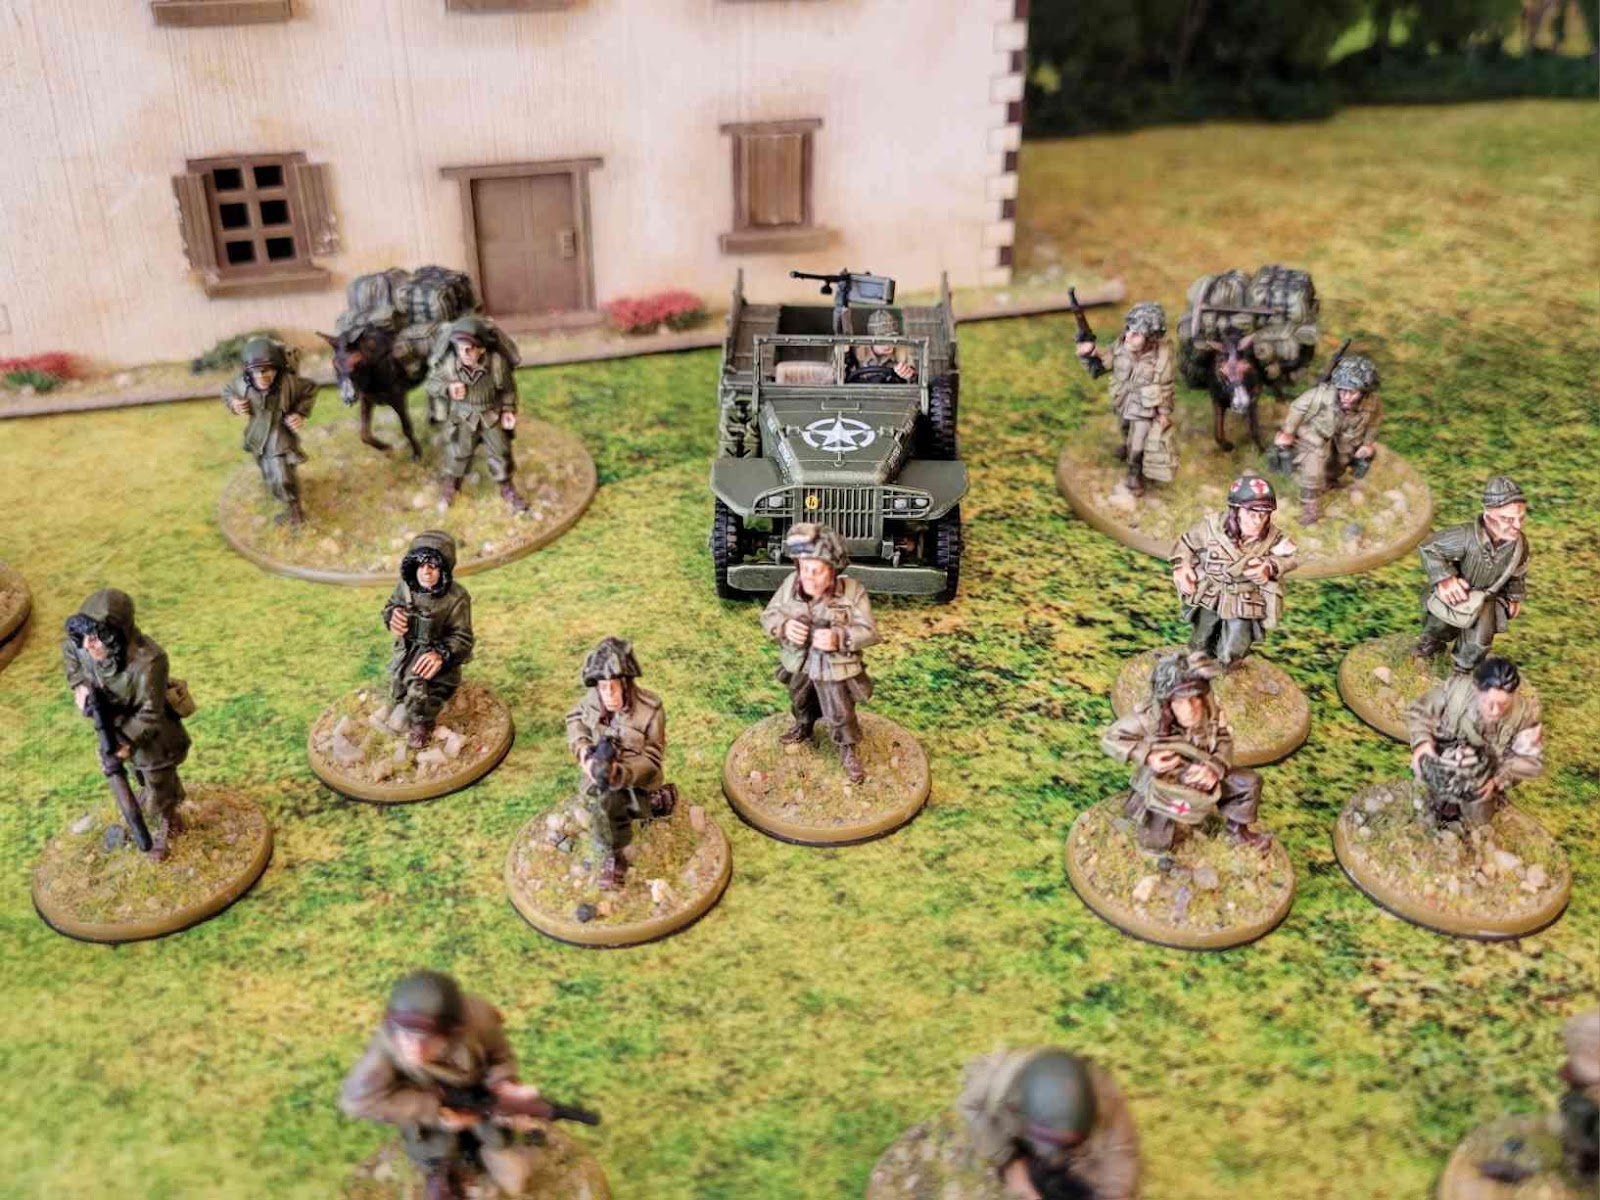
Some commanders, to lead from the front and the back! As well as various weapons teams, and a group of medics. Meanwhile the 456th Parachute Artillery Battalion provides some much needed “heavy” fire support, with towing provided either by the mules, or the Dodge ¾ ton truck. The mules were especially useful to the Force in the rough, mountainous terrain of Italy!
For me in particular, I struggle constantly with the fact that I can be a bit too detail-oriented, and I put a lot of time and effort into my models. This makes for some stunning work but doesn’t necessarily make for timely completion of projects. Even smaller projects such as Blood Bowl teams can take me long periods of time to complete, and I can often find my motivation waning part-way through, especially for longer projects – hence why finishing up some of those incomplete teams are a part of my overall hobby goals for this year! So how did I knock out an army like this in a little over two weeks? Well, just as the title for this section says, I just stopped caring about the details.
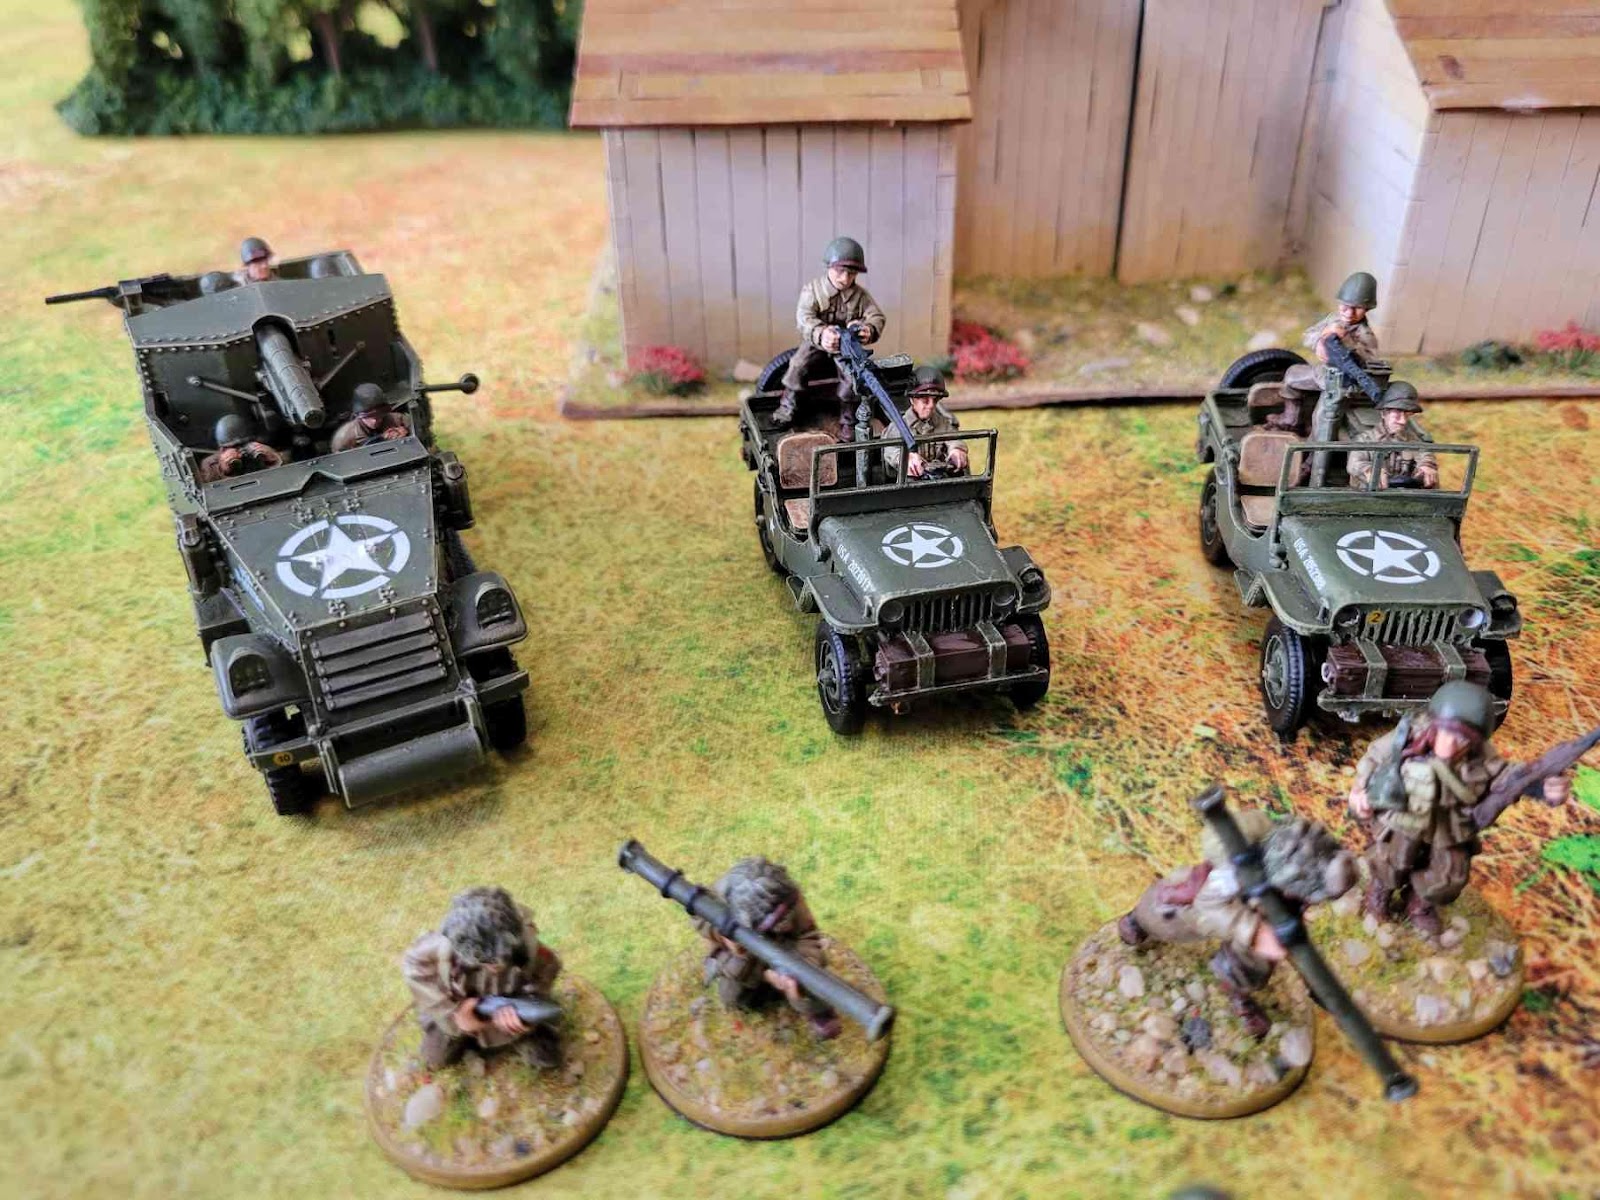
The vehicles are where the majority of the actual detail work was put. Particular care was taken with the placement of transfers to make them look correct – though I did not go so mad as to add the bumper codes!
You’ve probably noticed from the photos so far that these figures aren’t quite up to the same hobby standard as the Night Goblins I have been sharing so far. The idea with this project wasn’t necessarily to produce a truly stunning force, but to simply knock one out as fast as I possibly could. I had a lot of miniatures to paint, having collected all my various options to allow me to build effective forces at various game sizes. The Force here is 82 models (more once you count the mule drivers and vehicle crews amongst those numbers), and I needed to be able to get through it all at once or I knew I was liable to not finish it, ever. Even now I’m still waffling on painting the last pair of vehicles I have for them – though incentive to finish them is low with how much fun the GMC in particular has been to run!
As a last and fun little note, all the infantry models for the Force are metal. Yes, metal! The models are mostly from Artizan’s specific Devil’s Brigade line, or their line of US Paratroopers (due to the similarity in uniform cut). There are a couple of models from Warlord (an MMG team, and both Jeeps) and Brigade Games (a pair of Johnson LMGs). Meanwhile the GMC and ¾ ton truck come from Rubicon Models. And the Mules? Well they’re actually from Wizkids’ Pathfinder Deep Cuts line! I really love the fact that I have my pick of manufacturers in regards to Historical models, and hopefully I’ll be able to show off a few more interesting finds throughout the year as I show off some of my other Historical projects.
I have actually gone back since these pictures and finished the basing on these model, adding flower tufts and clump foliage to really give them some life. I may show some of that off in next month’s update…
May The Motivation Be With You, Always
Now that I have probably talked to death about Bolt Action, let’s move onto Star Wars Shatterpoint! Before this month, I had not played a single game of Shatterpoint. I had an interest in it as it was first coming out, but my friends did not seem as excited. So I held off on getting anything for it. However, seeing that my local store was running a game and demo night, I figured I may as well try it out. And with the recent release of the two Ewok Squad Packs, my interest had already been piqued yet again. So I went to the event, and much as the Bolt Action one I had a ton of fun. The group was very friendly and inviting, and the game was really enjoyable. Not even a week later I was walking out with the two Ewok Squad packs to start my own burgeoning collection… followed by the Fearless and Inventive Squad Pack a week after that! I was fully hooked. And with progress on the Force coming to a close, I was already feeling the draw of another Force…


That said, progress on this front has been slower. I haven’t had the same amount of time in these last few weeks as I did in the first two weeks of this month. As such, only the models in the first image are actually complete – and not even, as their bases have yet to be done! But I still have not decided on how I want to do their bases, anyways, so I am leaving that to the end. Still, I have been chipping away at this little project every day or so, putting paint to brush when I can – when I’m not playing, that is! Hopefully I’ll have this lot done by the time we update next, maybe with some new additions…? I’ll probably talk more then about my experiences with the game too, hopefully then having more than two games under my belt.
Revisiting My Goals
Now, as I had noted earlier on in my part of this post, I have actually not been entirely enjoying the way Night Goblins play as a pure force in The Old World, and the arrival of the Orcs and Goblins Arcane Journal – as well as the returning models – has given me a lot more options to mull over. It is very likely that I will be revising my goals in regards to my Old World army, switching to another list which contains fewer – or maybe even no – Night Goblins. We shall see. I have been mulling over lists for both the Nomadic Waaagh and the Troll Horde Armies of Infamy, as well as just some standard Grand Army lists with more Orcs about. I’ve still got my current focus squarely on Shatterpoint, and I have a few other projects I could turn to in order to consume my time as I think, but hopefully I will have a more concrete idea on what I want to be doing with my Orcs and Goblins come either next month, or the month after, as well as maybe some things to show you to that effect! In any case, that is all for me at this time. Tune in next month to see what entirely different project I decide to do then!
Kevin C.
Now that all my guys have been assembled, based, and primed, it was time to paint. I did attempt a zenithal priming job with these guys. I used a dark primer (either black for the knights or brown for the filthy peasants) over all the miniatures, and using a Wraithbone or Grey Seer primer from the top for a zenithal coat. While it did give me a good lighting on the miniatures, it ended up being mostly a waste of time, since I used several coats on my knights, so the primer made almost no difference.

Heraldry
So, I know that Border Princes Exiles list is all the rage for Net Lists for Bretonnians these days, but honestly I couldn’t imagine doing anything other than an Errantry War list. The entire lore behind Bretonnia just screams going out on a quest, so of course I had to do it. Many people balk at the idea of having to paint several different heraldic devises, but I see that as a feature, not a bug.
However, unlike my previous army from 15 years ago, I decided to be smarter about this army’s heraldry. Real-world French heraldry would generally use five colors (red, blue, black, green, and purple) and two metals (gold/yellow and silver/white). Purple was incredibly rare due to its expensive nature, so it was generally reserved for royalty, leaving us with four regular colors. In-lore Bretonnia tends to shun the idea of using green in heraldry, for two reasons. Green is cheap to produce, so it tends to be worn by peasants, therefore not something that noble knights want to use. Also, green tends to be associated with the Fey (i.e. The Green Knight), which is also not something knights are keen to emphasize. So, that leaves us with black, red, blue, white, and yellow.

Moreover, we should not just use the combinations willy-nilly. According to the Rule of Tinctures (yes, it’s a thing), charges of color should not be on a field of color, and charges of metal should not be on a field of metal. So, one should not have a white emblem on a yellow field, or a black emblem on a red or blue field. This limits your emblem/field tincture combinations considerably.
My Paint Scheme
So, much of my paint scheme was shamelessly stolen from Duncan Rhodes’ great tutorial on YouTube, making changes for the Citadel paints (since there no reliable vendors for Two Thin Coats in my area) and changing up the heraldry. That being said, I think the tutorial worked out great – check it out for yourself.
For the emblems, I was able to find some really great decals on Etsy, since the Bretonnian army set only came with a very limited set of axe decals (not anticipating people using multiple heraldries for their knights).
https://www.etsy.com/listing/1611494612/decals-fantasy-knights-mixed-heraldry
I managed to get all 12 knights, two lances worth, painted before the end of the month, and I’m pretty pleased with the results.


I am hopeful that I can complete the last four knights (the three Pegasus knights and the Duke on Royal Pegasus) by the end of next month – in between my kids’ Spring Break and a planned trip to Texas.
What Else I’ve Been Working On
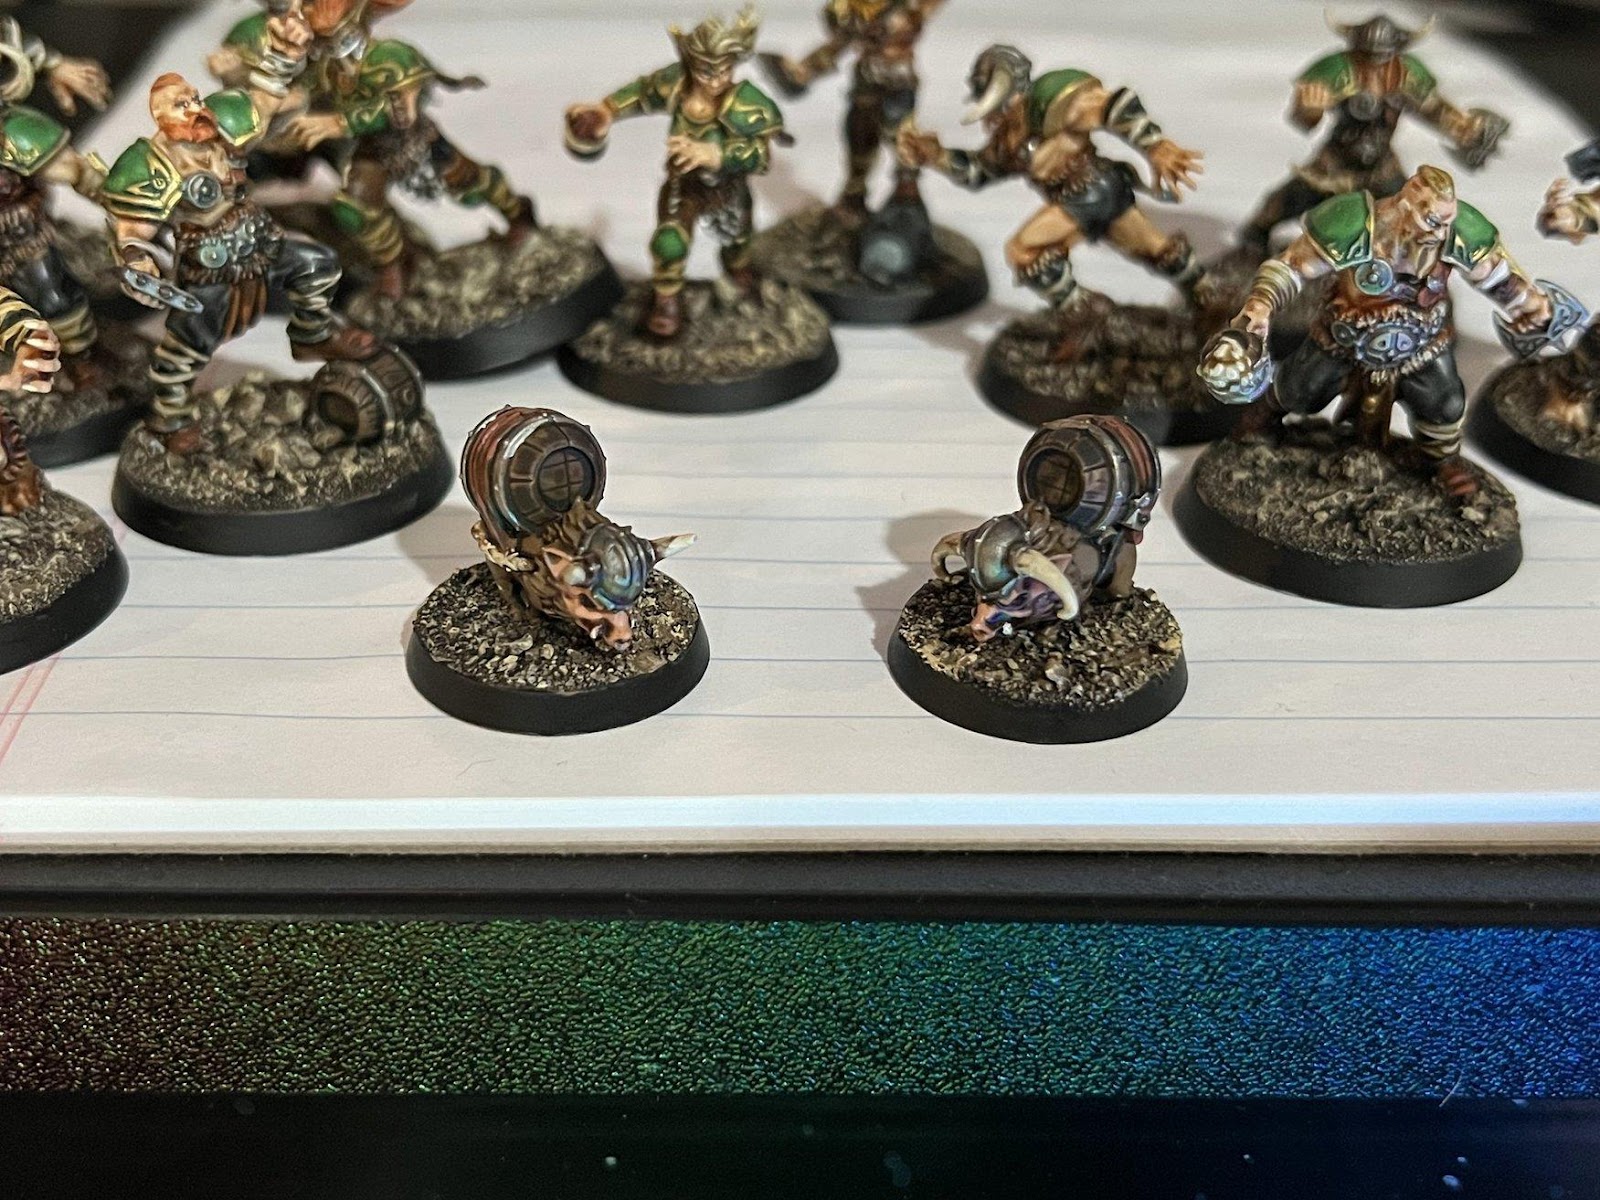
I was able to finish a group of miniatures that have been on my shelf for over a year (received for Christmas 2022) – my Norse Blood Bowl Team! I wasn’t terribly pleased with the eyes on the guys, but I’m glad with the color scheme.

And I can’t forget to add these nice bad boys, for when my Vikings get thirsty…
Until next month!
Jerry S.
March was a busy month for me, I spent over half the month out of town but I was able to some of my in-progress minis with me to get some much needed hobbying done. All in all I got most of what I wanted to achieve done this month so I can’t complain too much.
To start, I finally began painting my epic minis. I began with painting the bases for all of my White Scars infantry as well as a couple knights I had sitting around. While I haven’t began painting the infantry, the popular opinion seems to be that painting the bases separately is the way to go.

As you can see, I decided to paint my bases a very light grey with some darker black/grey road accents. This very neutral basing scheme should really let the brightly colored miniatures pop. I will likely stick to a similar scheme when I begin painting the Legions Imperialis board that has been occupying my 3d printer the past few weeks-very excited to track the progress on that.
I started small with the infantry bases but the fun on Epic scale modeling is the ability to field truly massive units and there is nothing more massive than the mighty Warlord Titan.
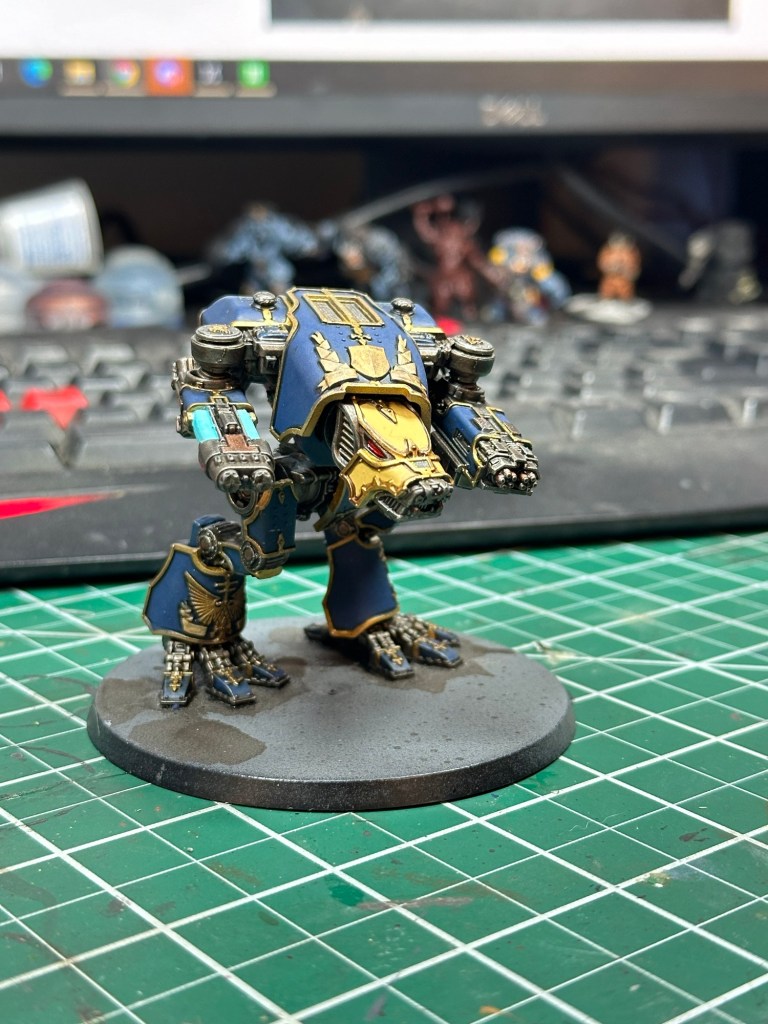
Titans in a Epic Scale
As many of our readers may know, I subscribe to the belief that the best models are blue models, and as such, my titans will be members of the bluest Legio: Legio Astorum aka, “The Warp Runners”. Known for their speed and their blue color scheme.

Step one: the superstructure has been based, washed and dry-brushed. I stuck with a simple scheme for the metallics because I’m lazy and because I felt that the blue and yellow armor plates should be the highlight of the model.

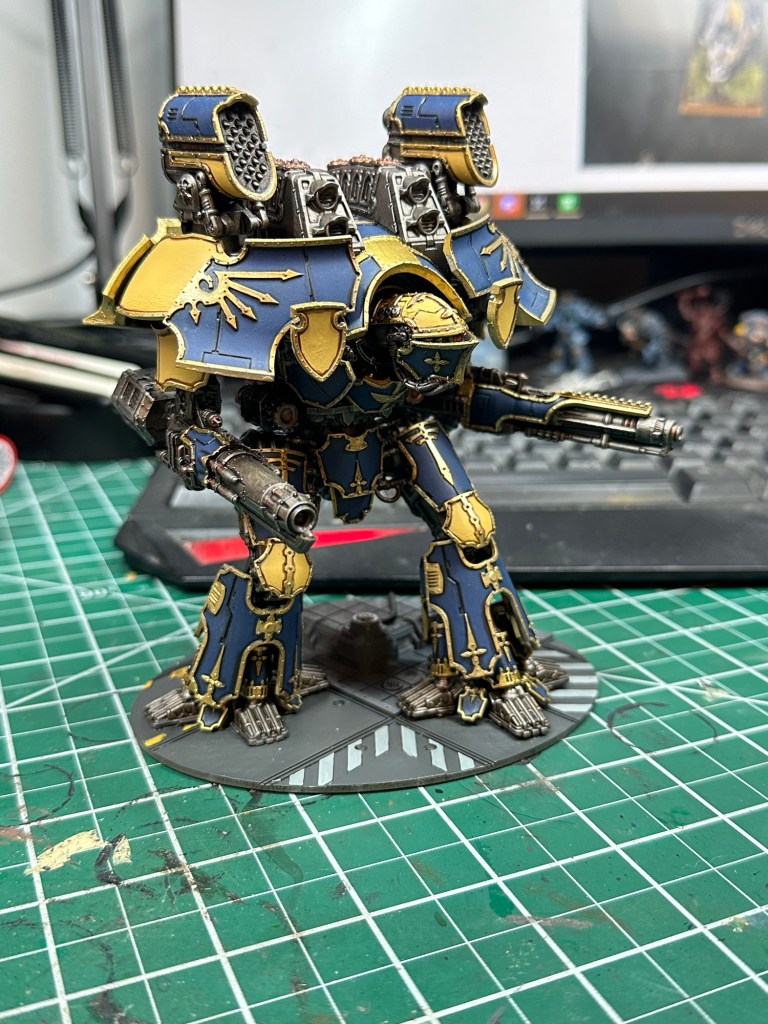
Really happy with the way this model turned out, the pale yellow accents really works well with the dark blue primary colors. I still need to add transfers, and GW has yet to send me the 120mm base this big guy will eventually call home but I’m waiting until I finish the last three titans before I add transfers and the final basing.

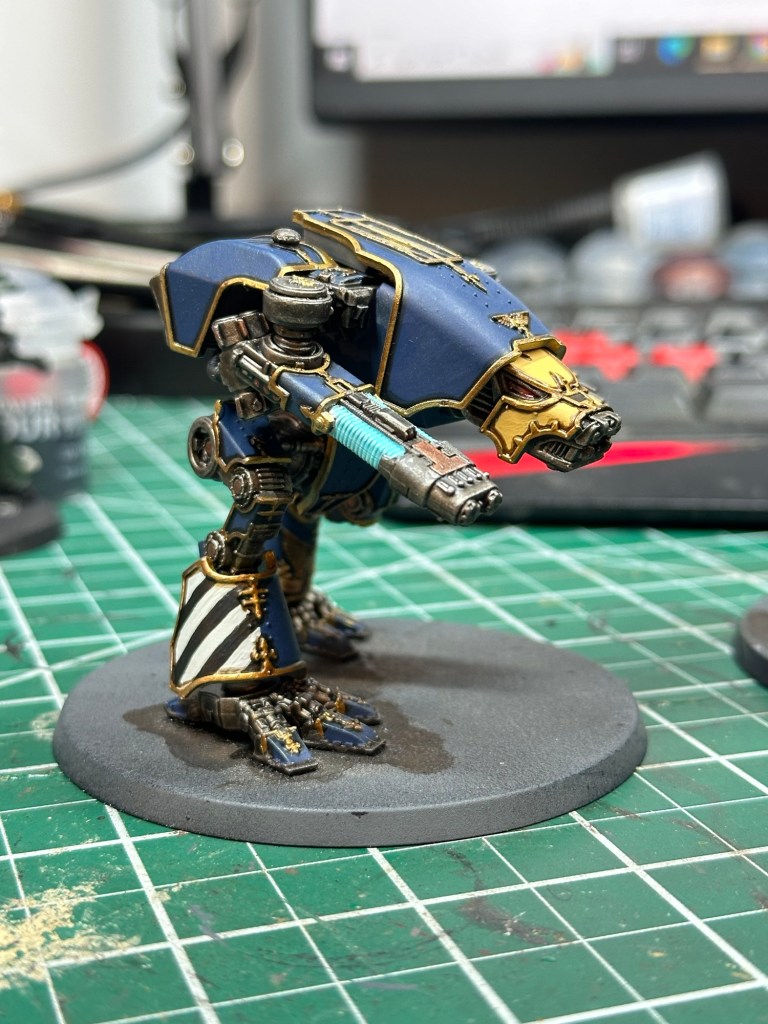
After the Warlord, I decided to stay big, but not as big. I was lucky to trade away half my Legions Imperialis starter set to fellow warlord Austin for the above pictured Warlord titan as well as the 2 Warhound titans below and since I was cruising through the Warlord I thought the Warhounds were a logical next step.
Growing up, I remember seeing my first Warhound titan in a Gamesworkshop. I was only in my early teens but I was blown away by the size, detail and design of the iconic model. All these years later I am still enamored by the Warhound titan and I have actually built and painted 2 in full scale.(I walked throught the building process on this very blog!) Seeing these legendary models in Epic scale has been a treat. The Gamesworkshop design team has really brought their A-game with these minis and even standing at a quarter height these warhounds are still stunning models.
Tombs and their Guards
Next up on the docket this month was my burgeoning Tomb Kings army. Last month I showed off pictures of my first regiment of Skeleton Warriors decked out in turquois and white scheme that my friend (and fellow warlord) Mike and Fiance have affectionately dubbed the “Tarheel scheme”.
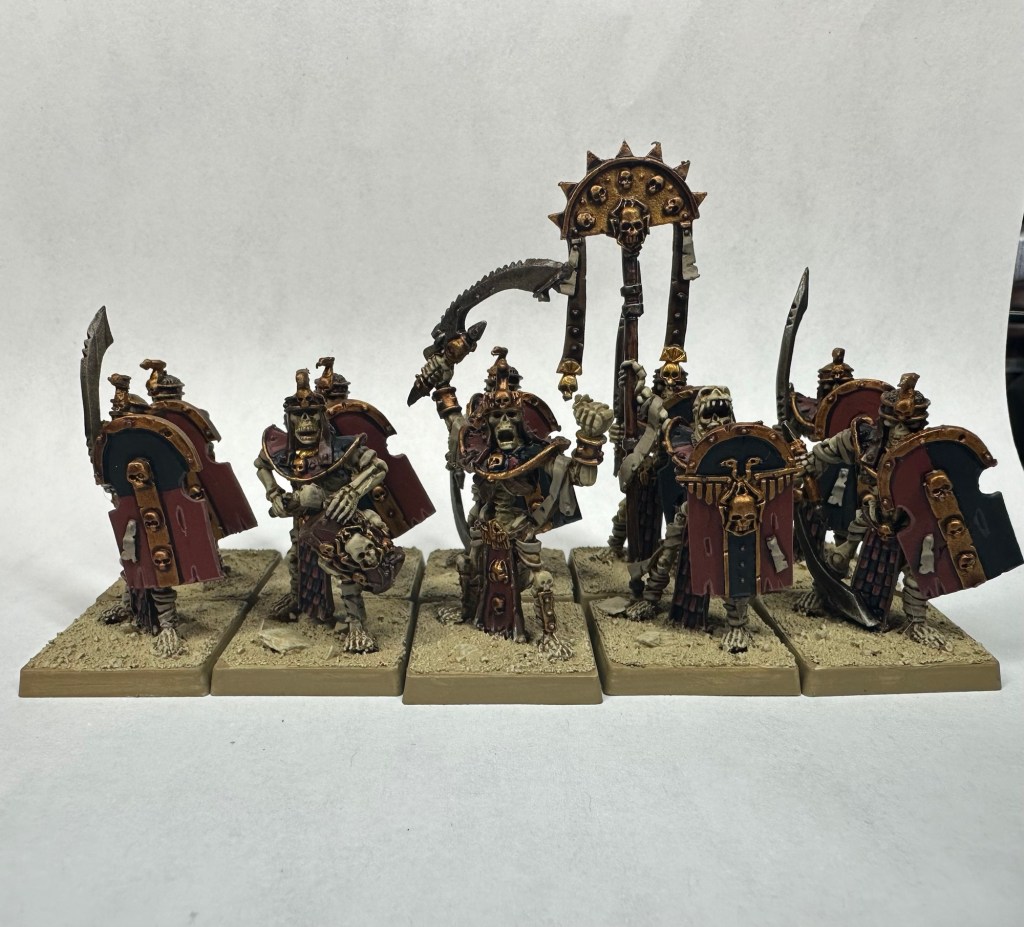
This month I went way back to some models that have been hiding in a box for over a decade since I bought them new in a now closed model train store. I am happy to report I finished my 20 skeleton-strong unit of OG tomb guard as well as the original Tomb Herald from 20 years ago. My plan was to finish 2 units of my Tomb kings but unfortunately as often is the case, life got in the way of that.
Nonetheless, I am very happy with my progress this month and am happy to see this army grow!
First Up we have the first painted character in my army- The ubiquitous Tomb Herald. This is hardly my favorite model- in fact it may be my least favorite model that I own but alas, I have to get it done.
Since the main theme of my army will be based around the mortuary cult who’s colors are red and black, I decided that the army’s banner should have a similar scheme. I’m not sure this was the correct call as the browns combined with black and a dark red don’t really allow the banner to pop on the table as much as I would like so I may change that later.

My gripes with the color scheme on the Tomb Herald are not present in these tomb guard however as I think the scheme really works for these elite warriors. While the new Tomb Guard are absolutely beautiful models I love these old school skeletons for different reasons. I think they more perfectly fit the theme of the Tomb King’s Mortuary Cult that I am building toward. I love these models even with their flaws and they will be a regular on the tabletop in my house.

A question for our readers, what good are Tomb Guard if they have no tomb to guard? Not much good at all I suppose, which is why I got to work on my printer and was able to print out a beautiful tomb that will over time grow to a full Tomb Complex and serve as a fitting battlefield for my games of Warhammer: The Old World over the next couple years.

There never seems to be enough time in the month to get done as much hobbying as I’d like but I am pretty happy with my results this month. Between work and a much needed Vacation, I was only home half of March so I can always fall back on that excuse.
April is looking to be another crazy month for me in the UCH household. With more travel taking my time away from my hobby projects, I will temper my expectations on Hobby progress. With that being said I hope to update y’all in a month with at least one more Tomb King’s unit completed, hopefully some sort of update on my Legions Imperialis army and if everything goes well, I hope to have my full scale Reaver Titan prepped and cleaned for a very productive May.
Well that’s all we have for you this month over at Urban Cowboy Hobbies. There’s a lot still to come this year so stay tuned. Let us know in the comments what you are most excited to see in the next couple months!
