Joe R.
Hitting the Dusty Trail – Old West Miniatures
Well, it’s safe to say that I am fully invested in purchasing, printing, and painting Old West miniatures. At this point, I have gotten the chance to play What a Cowboy! (By two Fat Lardies) and Dracula’s America (Osprey Publishing). I’ve also got the rules for Dead Man’s Hand (Great Escape Games) and Dead By Lead (Electi Studios). DMH is very similar to The Chicago Way, which I’ve already played. It has the benefit of having factions with specific rules, which might be interesting. Dead By Lead is a very intriguing system which allows you to craft your own gunslingers by selecting classes and adding traits. This will probably be the next game I attempt.
I currently have this master plan to run a 1-day Old West campaign. All of the models will be provided (with appropriate stats) and folks will be able to drop in, draft their gang, and play with minimal investment. I’m currently trying to figure out how to “get” a few tables of terrain. I’ve been looking at a neoprene mat from Front Line Games and printing some very nice terrain from the Wild West Rush Kickstarter. I’ll post some of that when I actually take a crack at painting it. Right now, printer go BRRR. I’m also considering trying to make some boards (a ravine, a homestead, etc.) but I have zero experience with this. I’ve watched some videos, but the activation energy still seems too high at this point.
Back in December, I showed off a miniature from Dead Man’s Hand (one of the Lawmen) that I had placed in a recessed base to “fix” the metal base he was attached to. I then filled the base in with Stucco to create a flat surface for basing. I’ve finished this process for the rest of the DMH Lawmen. I also 3D printed several models. A majority of these came from 3D Breed’s Wanted line. I’m a BIG fan of these models (and nearly all of them have a mounted version!), but I did scale them down about 5%. I also printed some models from Skull Forge Studios’ official Dead by Lead line. These were definitely 32-35mm scale models. They needed to be scaled down by 20%, but the proportions are more realistic compared to the other models I have so they stick out a bit. Electi Studios also has several models that I picked up (I think still by Skull Forge?), but haven’t printed yet. Finally, I printed a few models from Cast’N’Play’s Wild West Mayhem. These models are VERY cartoony! I scaled these down by 10%, and they certainly stand out, but they are very entertaining models with great detail.
Painting Old West minis has been such a breath of fresh air. I can’t place exactly why I’ve had such a good time, but I have a few guesses:
- Every model is an experiment. I’ve returned to under painting my models and applying a base coat using contrast paints. I’ve even experimented with brown underpainting (using a brown ink, followed by a heavy tan dry brush, then a light ivory dry brush). I still end up coming in with acrylics to fix mistakes, but it’s great to “finish” models in an hour and spend time cleaning them up as desired.
- A very different color palette. I’ve been using a lot of neutral colors, which isn’t my typical style. Each model still has a pop of color, but trying to get the neutrals to be interesting is a new challenge.
- I’ve really been trying to up my basing game. This has involved a lot of research and the acquisition of several new products!
- LOW STAKES. I don’t know why these miniatures “don’t matter”, but they don’t! They’re mostly for me. They can be as pretty (or ugly) as I’d like.
I don’t know if it’s necessary for me to specifically discuss every model I’ve completed in January. Instead, I’ll showcase the models (and their bases) and highlight a few of the key features that were most interesting to me.


The first model (DMH) is an example of the underpainting process I’ve been trying for these Old West models that I grabbed from this video by Eric’s Hobby Workshop. I had put underpainting + contrast behind me in favor of layering, so it was a nice homecoming. However, I still cannot get contrast paints to work for jackets and dusters! The second model (Wanted) was the first cowboy finished. I actually came back to it a few weeks later to try painting jeans on it. I think it worked out okay. I’ll definitely be trying again. This third model (DMH) is my 2nd favorite of the bunch (and the first to be based!). I freehanded the pinstripes and was pleased with the result. I will definitely try that again.
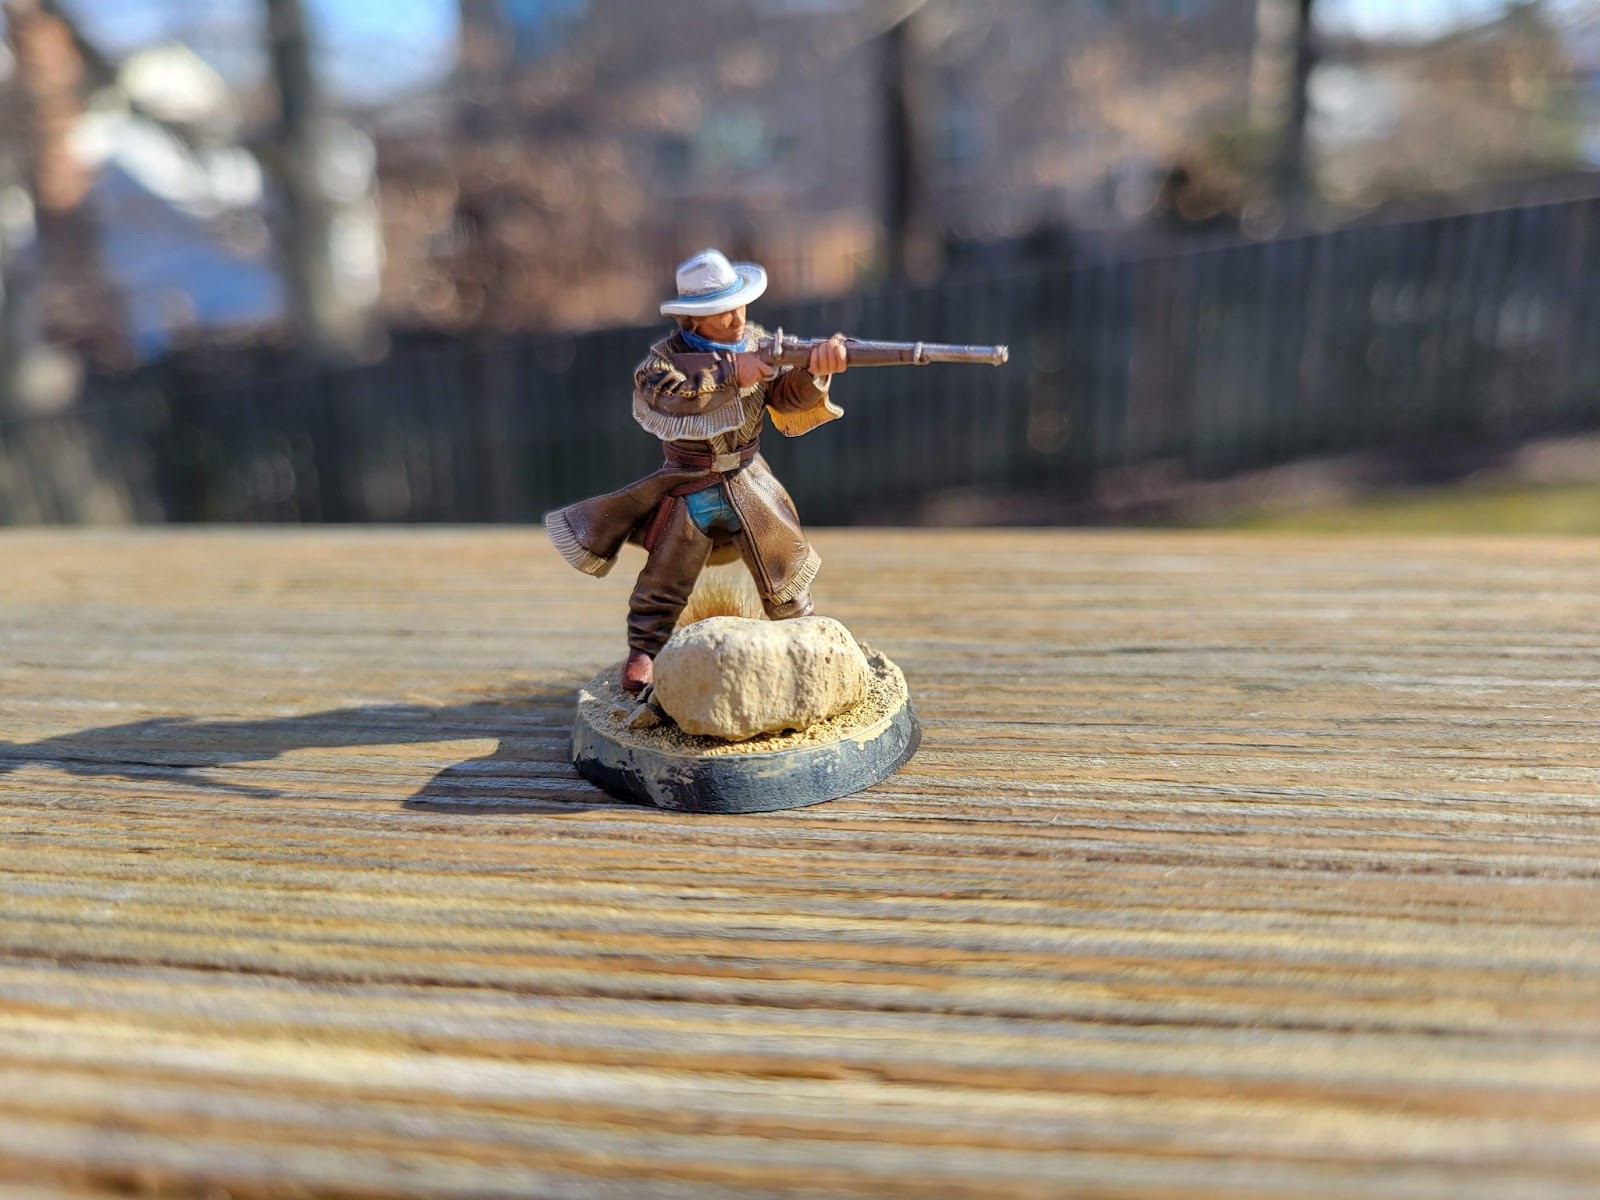
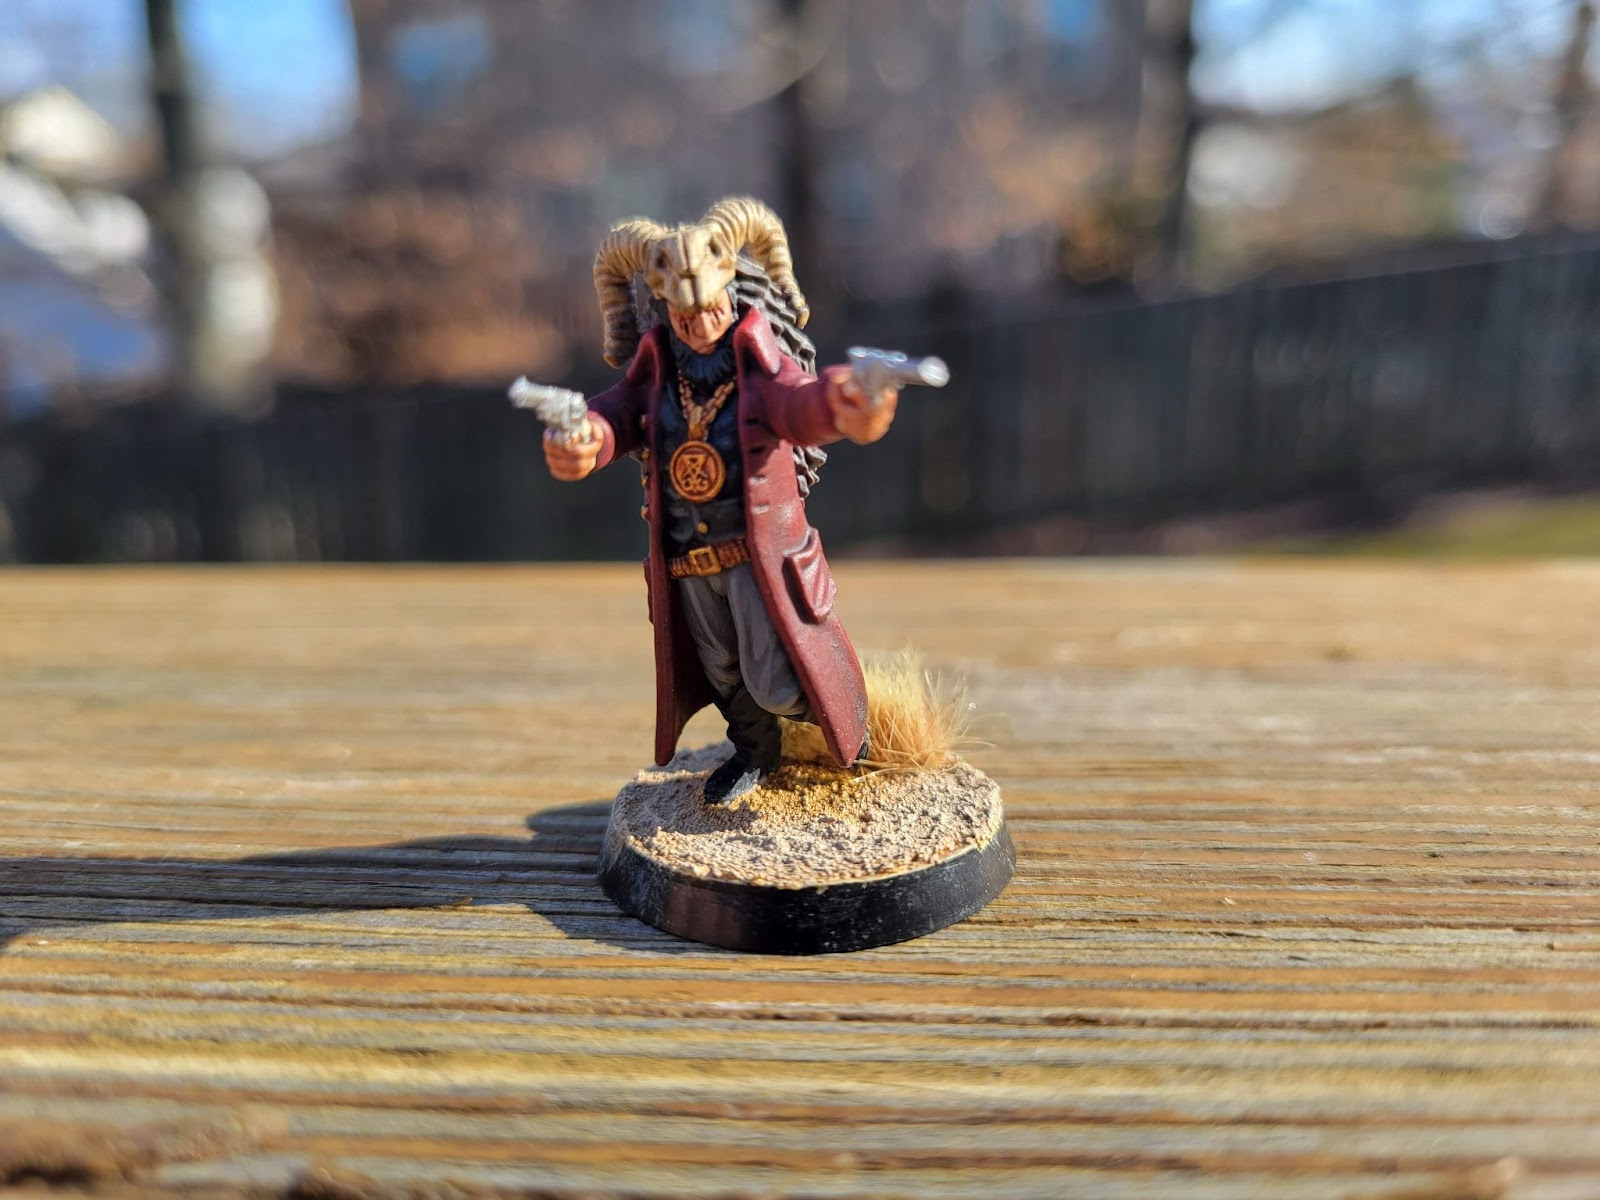

The (literal) white hat rifleman (Skull Forge Studios) took me much longer than expected due to all the leather. I ended up trying about 3 different approaches. They all blended together to create the result you see. The cultist and devil (both Wanted) were both needed to playtest a Crossroads Cult gang for Dracula’s America. The cultist is probably one of my weaker models, but I was very pleased with the pants and coat. I ended up dropping this model and breaking one of the guns. I used a piece of wire to fix it. I don’t think anyone can tell. The devil took me a LOOOONG time. I spent a few hours playing with the reds, which really ended up getting away from me. I think he needed some more black. That said, I was very pleased with the dark red of the suit.
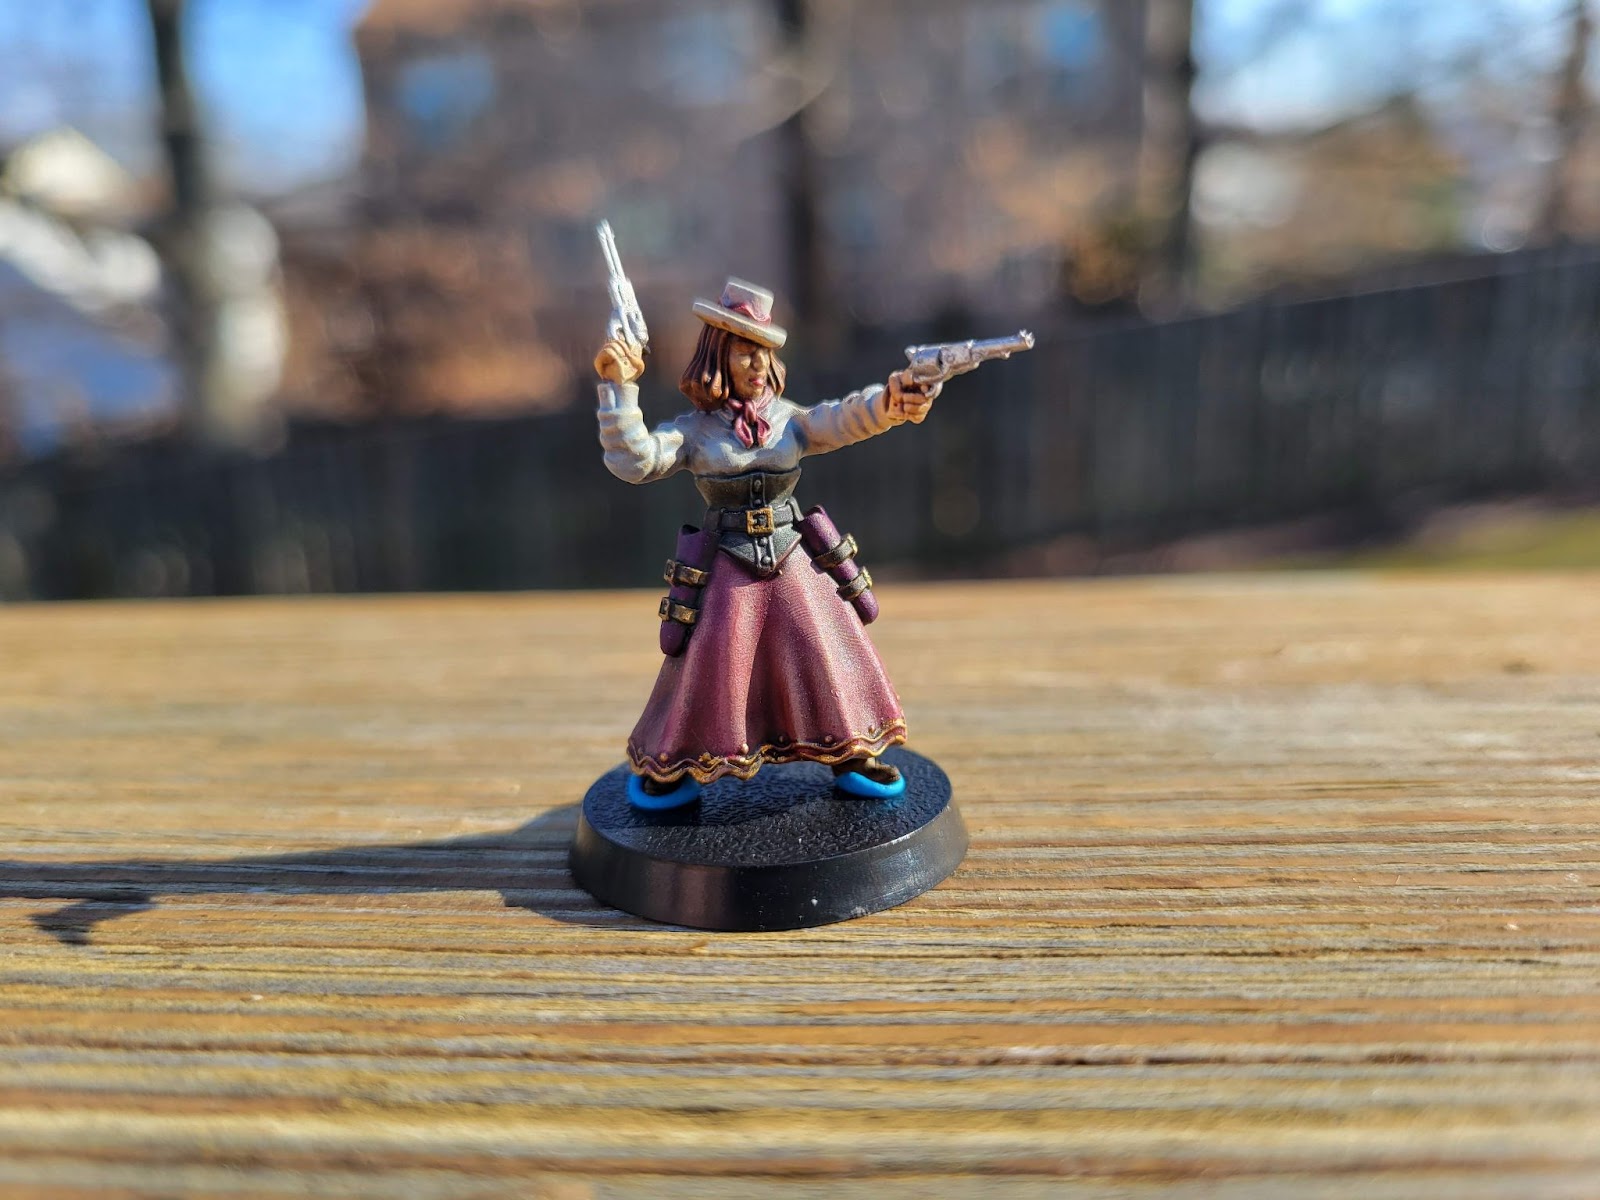
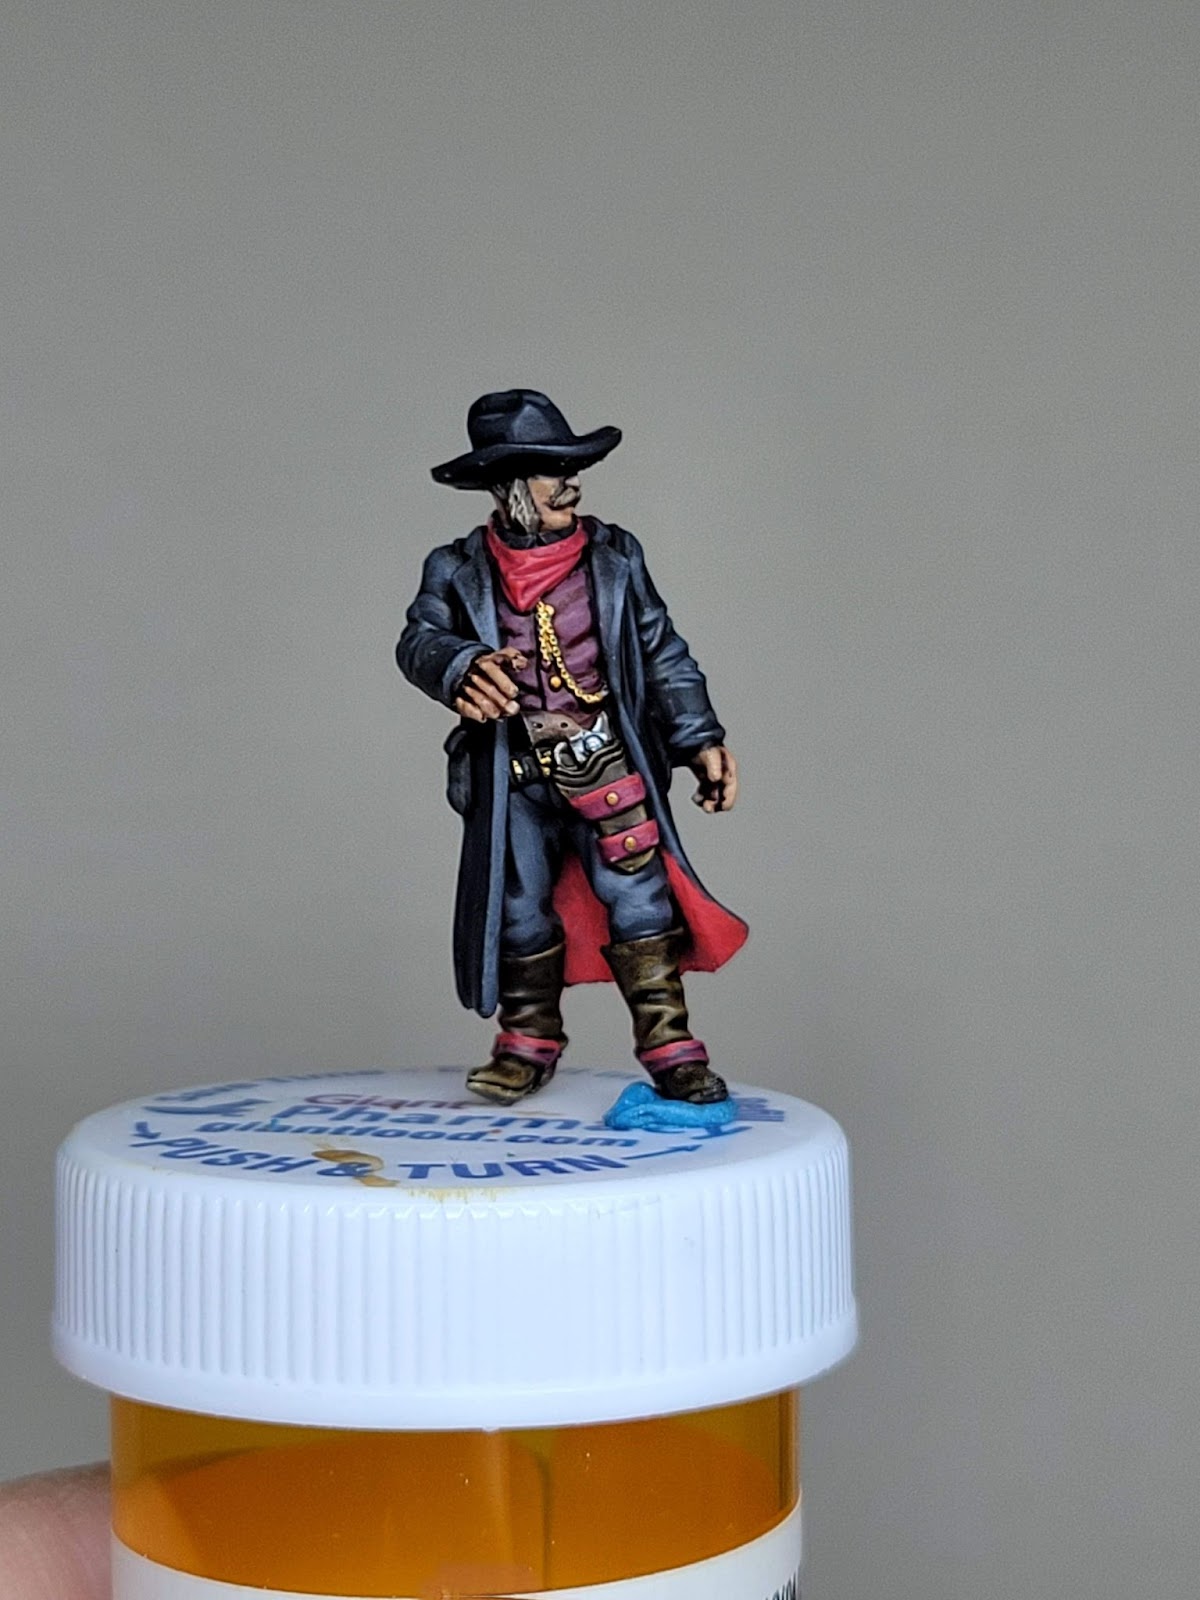
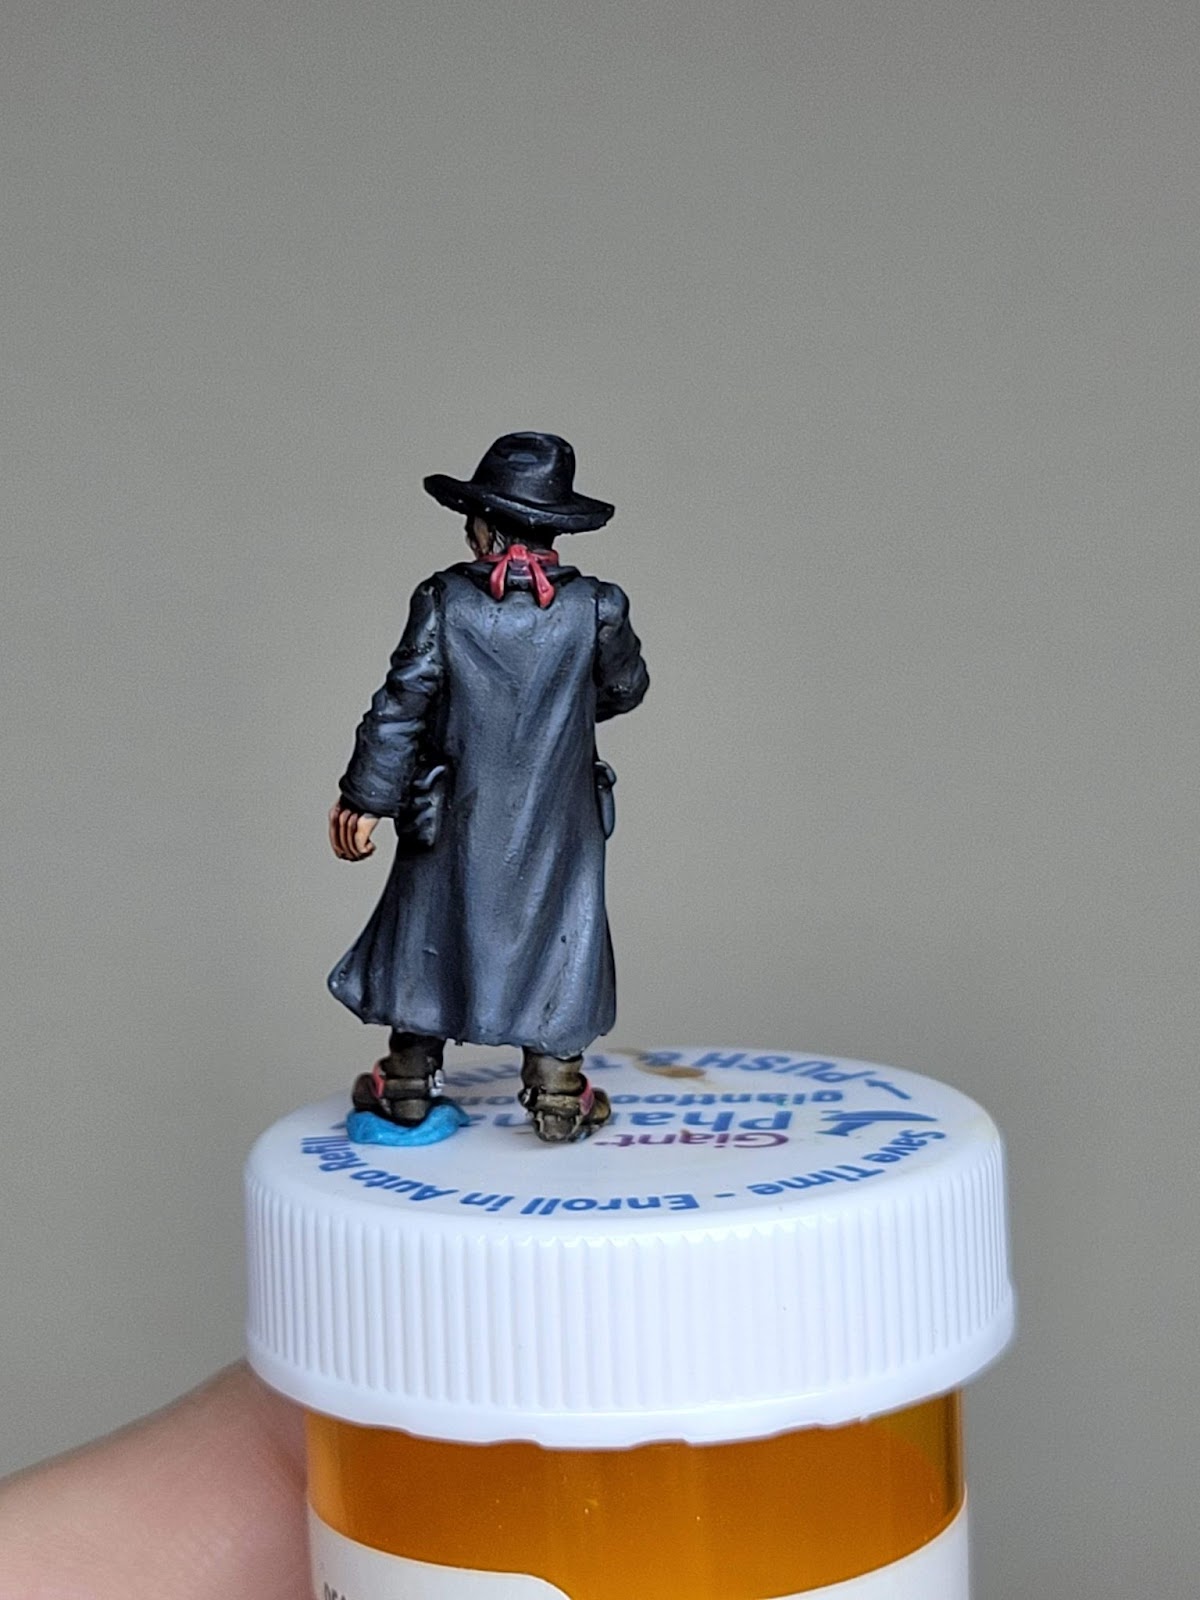
The lady (Wanted) is almost completely done in contrast paints. I underpainted her so starkly that I was able to complete her during an extremely unproductive meeting. Her skin needs some work, but I was otherwise pleased with the final result. I especially love her dark purple holsters. Finally, the fellow on the right (Wanted) is perhaps my best model to date. He has actual contract (between lights and darks, not the paints…) going on and looks sufficiently nefarious to serve as the boss of an outlaw gang. This is the first time I’ve tried layering on the folds of a jacket or cloak. There is more to be done, but I was very pleased with the results. I’m planning to have mauve/red be the color scheme of my outlaw gang.
Finally, I’ve been looking at several desert basing tutorials. Some of these are extremely detailed. I ended up focusing mostly on the advice from HeresyBrush when they reviewed the Ammo Wargaming Universe 01: Deserts box (found here). I was VERY tempted to buy this box, but upon review, I ended up having most of the materials included from one brand or another. So I decided to pick up some desert pigment, some crackle medium, and some dead static grass.
You can see from above, my bases are still pretty simplistic. I have some boulder sized rocks, some smaller rocks, a desert sand texture paint, and some dead grass tufts. I’ve played around with painting, shading, and drybrushing the sand. I’m still not sure I’ve found the right mix yet. Several tutorials recommend shading with Seraphim Sepia, but it ends up making the sand look very red. I’ve also had a hard time making layers of drybrush seem unique and interesting. I will continue to test and refine as I watch more videos. Hopefully the inclusion of some dead grass and cracked earth will augment the effect.
Speaking of cracked earth… instead of picking up GW’s Agrellan Earth (to save a few bucks you see), I purchased Vallejo Crackle Medium. I am… not impressed. I’ve followed the advice of some guides online (Vallejo’s own guide isn’t particularly helpful unless you’re airbrush focused), but so far this is the best result I’ve achieved.

Not particularly noticeable or impressive. So I ended up buying Agrellan Earth anyway. Oh well. I also decided to pick up some Base Ready materials from Gamer Geek Scenics.


I particularly like how easy they are to apply and the varied effect you get without much additional effort. You’ll see some bases with these next month!
Well that’s all for this month! 7 models in the first month of the year! Wow! Only… 30 more cowboys to go?
Michael S.
Tale of Many Warlords – February 2025
This month, my hobby time was largely dominated by a single project: an Imperial Fists Storm Speeder. It’s almost ready to take to the battlefield—almost. The base remains unfinished, but I’m particularly excited about it. I used 3D-printed rubble pieces and texture paste to create an urban ruin aesthetic that should complement the model perfectly once painted. Once the base is complete, I’ll attach the speeder and call it done. I’m quite pleased with how this one turned out—the decals really tie everything together, giving it that extra touch of polish.


Beyond the Storm Speeder, I made significant progress on my Tomb Kings collection. I built the first of two 14-man Tomb Guard units, assembling them in their full skeletal glory. But the standout piece from this month’s work is a converted Liche Priest. I would have picked up the official model, but I haven’t been able to find it in stock.
This model was an interesting challenge—I wanted to capture the desiccated, near-mummified look of a Liche Priest rather than a simple skeleton. To achieve this effect, I used Green Stuff, a Tomb Guard body, and miscellaneous bits, then applied several layers of sprue goo to build up the skeletal frame, making it appear more like dried, ancient flesh clinging to bone. I’m incredibly happy with how this conversion turned out, and I can’t wait to see it painted.


Adding to my growing Nehekharan force, I also assembled a resin Battle Standard Bearer and a retro metal Tomb King, the latter destined to be on a chariot. There’s something deeply satisfying about working with these old metal sculpts—the weight, the detail, the nostalgia. That lasted for about 5 minutes before remembering how much of a pain dealing with metal mold slips and lines is.


On the 40K side of things, I also continued a bit of work on an Imperial Fists Librarian. Right now, it’s just in the early stages, with only a few base colors blocked in, but it’s a promising start. He’ll be a striking addition to my growing Fists force once completed.

And finally, I took a moment to survey the growing block of tomb guard on my desk. Sitting there in all their unpainted glory are 14 Tomb Guard alongside various other Tomb Kings models.

The immediate goal is to finish the Storm Speeder’s base and get it fully completed. Then, my focus will shift back to the Tomb Kings, getting some paint on the Liche Priest and hopefully making progress on the Tomb Guard. With so many projects in motion, there’s never a dull moment in the hobby queue.
Until next month—happy painting!
Kevin C.
Battle of Edoras
“Per my previous post…”
As a “reward” to myself for finishing the whole Rohan army, I was able to pick up a boxed set right when it was released. I had these guys assembled practically hours after receiving them, but it just so happened that we had more than a week of miserable rain, sleet, and otherwise yucky weather, preventing me from priming them until after Christmas. Therefore, I had to wait until January to paint them.

Warriors
These new warriors were an interesting challenge to tackle, as they are clearly more detailed. I wanted to try, as close as possible, to replicate the paint scheme I used for the previous warriors. I mostly succeeded, but there were some elements that I had to deviate from considerably, such as the armor (leather versus metal) and the helmets.


Heroes
The heroes were an interesting challenge. Similar to my Theoden miniatures, I used the Warhipster painting tutorials for Haleth and Hama, but with different horse colors. I had already committed to putting heroes on white horses to pick them out in the battlefield, and I think it helps them stand out in a cavalry force.


I will admit, if you could not tell already, that in the very last step where I glue flock on the models, I broke off half of Hama’s arrow. This is quite possibly the thinnest piece of plastic that GW produces (especially since this is true scale, not epic scale like 40K/AOS) and I broke it off. After much cursing of the gods, I was able to half-heartedly glue it back on, although I have little confidence that it will stay on in the long run.
Houses
I actually managed to finish these houses in the last few days of December, but I figured I’d keep these in the update for January. I am somewhat pleased with how they turned out, especially after copying the painting tutorial Jerry sent me here.


I am admittedly very surprised at the scale difference between these houses and the miniatures, which I suppose is the difference between true scale and epic scale. While true scale miniatures are naturally smaller than their epic scale counterparts, if anything, these houses feel bigger than most of the terrain I have painted in the past for 40K. Strange.
The Muster of Rohan

So, after about three months of painting, I have completed my entire Rohan host. I may add a character or two to the army (banner bearers, captains, red-headed warrior princesses, etc.) but for now I am calling it done and moving on to other game systems.
In Other News
First, in preparation for a Necromunda campaign that will be starting soon, I purchased a Genestealer Combat Patrol box. Odd choice I know, but this campaign is expected to have heavy use of vehicles, and I’ve got to be honest, the GSC vehicles as some of the best-looking vehicles in the game. The Achilles Ridgerunner is just *chef’s kiss* so good. I am hoping to have the entire force painted by the end of February, but here they are assembled.

Second, I finally assembled a fully lit display case. I am very excited, as it is more than twice as big as the one I had previously, so I can more effectively store my armies in this one. That being said, it is already full, so I may be in the market for a new one…

For any interested, I got the display case off Amazon here, and it took me about four hours to build.
