Joe R
Welcome back everyone! I’m happy to report that May became a great month for hobbying. And while I may not have an entire Kill Team painted like some illustrious members of this group (Curse you Kevin!) I did manage to make progress across a variety of different games/projects. I even closed out a project. I know. I’m shocked too.
Cuckoo Clock Figurines
As a reminder, my stepdad recently found a cuckoo clock that belonged to his grandparents. He’s going through the process of restoring it and asked me to repaint the figures that dance at the top of the hour.

The picture above was taken partway through the process. The tube player was mostly done while the drummer had gotten the first two or so layers of paint. I was adamant that this project be done during Memorial Day weekend, so I got to work.

Here is the final result, sealed and everything. Overall, I was extremely happy! I’m not sure how these pieces were painted originally, but taking the time to carefully place their eyes (which had very clear indentations on their faces) and provide some eyebrows really brought them to life. I even decided to play with highlights and shadows, even though most of that isn’t super evident in the finished products. These little fellows are now sitting on the cuckoo clock which is almost completely revitalized. I’ll try to snap a picture the next time I visit my folks.
Smythe, Automaton Gunslinger – Pathfinder RPG
I had been unable to attend my bi-weekly Pathfinder game for nearly a month. We also had some of our key players move away. This left the fate of our gaming group in limbo. We decided to let folks try their hand at GMing a few one-shots. You may recall, dear reader, that I was an avid Pathfinder 1st Edition player during my grad school years. Then I decided to move away from d20 systems almost entirely. Pathfinder 2nd Edition has been a wonderful homecoming. I have more character concepts bouncing in my brain than I’ll ever be able to play. However, for our first one-shot I wanted to try out a Gunslinger and Pathfinder’s answer to a Warforged, the Automaton. This was not an idea born in a vacuum. I’ve always loved Warforged! My only real 5th Edition D&D character was a Warforged detective. I’ve also never gotten around to trying out a Gunslinger (in either edition!), so now seemed like the right time. I also happened to know EXACTLY which model I would be using for this particular endeavor.
Originally, I was going to paint Smythe using a typical silver metallic paint scheme (I’m not cool enough for non-metallic metal yet). However, I’ve had a bunch of Turbo Dork paints sitting around that I’ve never tried. This seemed like a pretty great time to try out one of their color shift paints, Galaxia. I primed the model black, and liberally applied the paint to the spots that would reflect the “body” of the automaton.

Here is Smythe after spending some time blocking in the main colors. The color shift paint is cool, but it’s challenging to make out any details, especially in the face. It was also very challenging to cleanly apply the gold boundaries to break up the body a bit. I ended up applying a few extra layers of the color shift paint, then ultimately decided to do some highlighting in silver.

Here you can see that the additional layers of paint helped deepen the purple some more. The silver has also helped pull out some more details on the face. You can actually see that he has a face! However, let’s take a quick break to talk about Turbo Dork.
I’m a sucker for a cool painting gimmick, especially one that takes its cues from the way that light is diffracted and reflected by microscopic particles (aka iridescence). Turbo Dork absolutely understands these concepts and uses them to make an unrivaled product. They also make a whole spectrum of traditional metallic paints. Needless to say, I’m a fan. However, these unique properties of the color shift paint also made it challenging to understand how to adjust my painting style to make them work. After I finished this model, I spent some time researching this problem. In the end, I found THIS provided directly by Turbo Dork. This is a great guide. I would strongly recommend anyone with interest in these paints to read this carefully before deciding to purchase anything other than their traditional metallic paints. I ultimately didn’t love how Galaxia worked for this model, but I tried. I am willing to try again too, armed with this additional knowledge. Okay, side-bar over.

Here is the end result. I ended up using some Vallejo chrome to further lighten his face (thanks Kevin!). I also applied some quick leather weathering by applying a few lighter streaks across the surfaces. I also spent a significant time trying to figure out how to highlight his cloak. This is a definite area for improvement. The first pass was WAAAAY too bright. I applied a mid-tone glaze to bring it back down. I still wasn’t happy, so I decided to apply a 50% diluted covering of Apothecary White. Ultimately, it ended up looking good enough so I called it. I used a pre-made basing mix (Fields of New Zealand), added a tuft and called it good. I still need to seal Smythe (which might cause some problems) but I have some ‘Ardcoat ready to gloss up the important areas, like that gem!
Zinzinnati Bearclaws – Blood Bowl Chaos Dwarf Team
I had intended to start working on a Gnome team in preparation for the 4 Diamonds tournament, but ended up having significant issues trying to prime them black through my air brush. This problem has since been solved by a friend’s recommendation to try Stynylrez primers. Great recommendation, I won’t be going back to Vallejo. However, this left me in dire need of a team, particularly one I hadn’t played enough games with to reach the “3 game minimum” for record keeping. So, I decided to bring out my recently painted Chaos Dwarves, give them a little TLC, and try out the newly adjusted roster. However, first I needed to adjust my team to match said roster…


You may recall that I had 3D printed by team by combining two different Artisan Guild sets, the Dumlok Flameseekers and the Blackrazor Hobgoblins. I am apparently the only person who thinks big Chaos Dwarf hats are dumb. Anyway, the new roster added a couple of stabby hobgoblins and some dwarves capable of breathing fire. I needed to reflect these changes on my models. So I chopped off a few hands, printed out some swords and spell effects, and called it good. You can see the results above. I didn’t feel like the flame effect was particularly noticeable, so I also decided to select my two unhelmeted Chaos Dwarves, each with massive mohawks, to make identification a little easier.
I also decided, if I was going to play these at a tournament, I could spend a little time improving the slap dash paint job I had “finished” in August 2024. This included spending more time on the base to really bring out that lava effect and touching up several of the base rims.


You can see the lava effect nicely, both on the fireball and the river of lava. I was very pleased with both. To further improve the original paint job, I also spent some time applying silver highlights to the dark metallic (Turbo Dork Purl Grey this time), added some additional shadows and highlights to the hair and beard (not pictured here) and added some orange highlights to the red pieces of armor. Overall, it was a noticeable improvement. I was able to get through about 3 models before the tournament. I’m tempted to try and close this project out too, but Necromunda is calling me…
Converted/Hive Scum – 5 Parsecs from Home/Necromunda
One day I will write some articles about my experience with 5 Parsecs from Home (5PFH) which is predominately a solo campaign set in a sci-fi universe (don’t worry! Your friends can come over and try to kill you!). My next mission required me to fight against some Converted scouts. Converted are basically diet Borg. I happened to have The Guttercogs from my extensive support of Print Minis and thought they looked perfect. Plus… BONUS, they’d also work as Hive Scum for Necromunda. I printed out 5 modular minis with common Necromunda loadouts, assembled them, and gave them a quick zenithal prime. I made the decision to focus on speed over quality, so these cyborgs were effectively getting the ol’ slapchop treatment. So far I’ve managed to knock out two of the 5 models in about… 1.5 hours? Prioritizing speed over quality is definitely evident in the final product. That said, they’ll look WAAAAY better than grey plastic (or black resin) when my tramp freighter crew tries to obliterate them.


I might go back to add some metallics to the models (I’m looking at you Turbo Dork!), but overall for the time invested, I’m pleased with the result. Once I get the other 3 finished, I’ll post a group photo with bases and everything. Time for another side-bar.
It’s hard for me to accept “lower quality” in exchange for speed. I know that I can do a better job with traditional acrylics than with speed paints. That said, there is something to be said about getting “supporting characters” done and out of the queue. These dudes (?) will never be the stars of the show. They’re always going to be fodder, so why spend the effort to make them look beautiful? Eh… I still haven’t convinced myself. We’ll see what happens in the future…
But that’s all for now folks! I’m expecting June to be another great hobby month. It might be just as eclectic too!
Michael S.
This month I took a little bit of time to paint up some Chaos Warriors from Age of Sigmar. It’s been some time since I have played AoS, but I have always loved the models from the Chaos range even before their refresh.
I wanted the warriors to look heavily battle-worn. I can hardly imagine that the rampaging chaos hordes have much downtime to polish their armor, so I gave all of them several passes with various weathering techniques. This finished the bulk of the armor, but I’d still like to do something different for the shields to break up the somewhat plain armor.

The cloaks I decided to paint with a dark burgundy. It’s a slight departure from the tried-and-true red capes, but I like the way they turned out! These 5 warriors are still far from complete but are starting to come together. One thing that led to these taking so long is the transparency of the base paint I used, Evil Red from VGC. While the color was nice and dark, it took upwards of 3 coats to get a solid color. The other five (not pictured) are in a similar state, just without cloak highlights.

The Chaos Warrior Lord is one of my favorite models. The old sculpt was just fantastic and really sells how intimidating Chaos Warriors should feel. While I love the new sculpts, the old ones just had a certain feel to them that is hard not to miss!

Thats all for this month. A relatively paltry list of projects but I am making steady progress!
Kevin C.
This month was much less productive than last month, and even less productive than I would have liked. Oh well…
Primaris Kill Team
I had never actually painted any of these new-fangled Primaris marines, but I was able to get a set from Target, of all places. The Space Marine Heroes set is guaranteed to have seven individual marines, each with Kil Team (2019) rules, and one random extra, for some unknown reason. On the box they are painted as Ultramarines – because of course they are – but I wanted to paint them as one of my favorite chapters… the Blood Ravens!
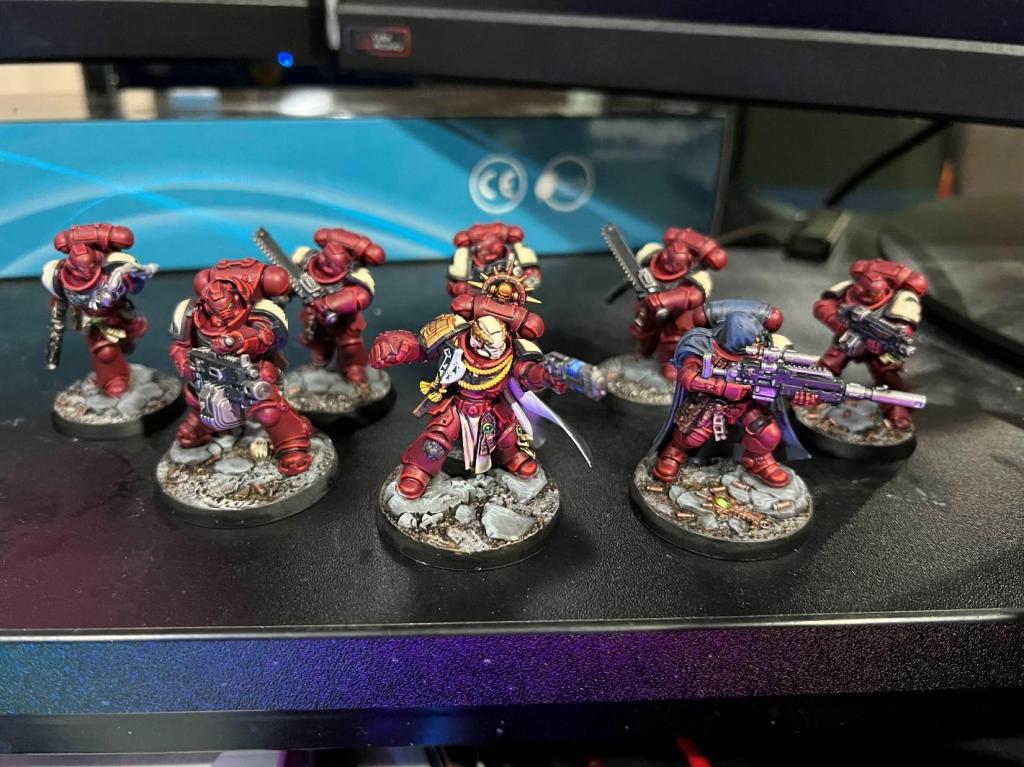
For those of you of a certain age, you will remember the classic RTS, Dawn of War, with the trailer being quite possibly the best cinematic in the 40K universe (possible exception being Astartes). The game came out when I was in college, and it more than anything else brought me back into the Warhammer hobby. However, I had never painted a squad of these thieving bastards glorious heroes of the Imperium, so I figured I would change that.

For much of the armor, I used Duncan Rhodes’ fantastic tutorial on painting a Blood Ravens terminator, but I made some slight modifications. As an example, I did not like the pink wax seals he uses for the purity seals as it is too close in color to the red armor, so I used a Warboss Green, with Agrax Earthshade wash and a Moot Green highlight.

Similarly, I did not have any Blood Raven transfers, so I had to find a way to freehand it. I found a great tutorial online, also done by Duncan Rhodes, for easy freehanding, but I wasn’t able to find it on YouTube, which was weird. Even still, while the style is not exact, I found that it worked quite well for the shoulder pads.

I will say that I really like Corvus Black as a color, which I was reluctant to use. It is not strictly a black but a very dark grey, but it gives a warmth and depth to black elements that I believe I will use it from now on as opposed to Abaddon Black or, for my sins, black primer.

One technique I tried and did not succeed at was in painting urban camo on the sniper clock, using the technique in a different video. Duncan paints it on a Kasrkin, which works because that has segments of armor. I was dealing with a cloak, a very bland, flat surface, at I could not get the pattern right. I ended up painting completely over the cloak and just using a straight blue-grey (The Fang).

Anyway, I had also hoped to have my Votann Kill Team done, but they will have to wait until June to be complete. I have a busy month ahead, but I am still hopeful I can keep up the painting queue.
Until next month!
