So, this article came out a LOT later than I had hoped for. This is mostly because my work location (and my job) has changed, and so I am now always in the office. The commuting and the additional parenting duties has cut significantly into my hobby time. Despite this, I was able to finish a few projects this year, and get two more armies complete for the year of 2025.
For Rohan!
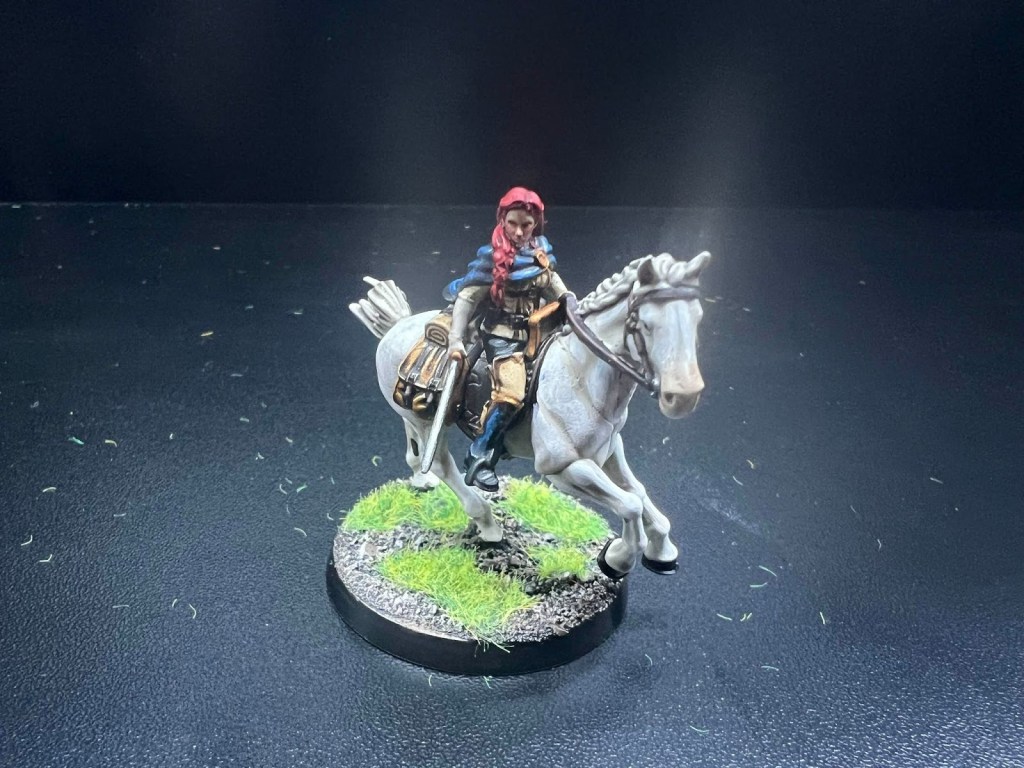
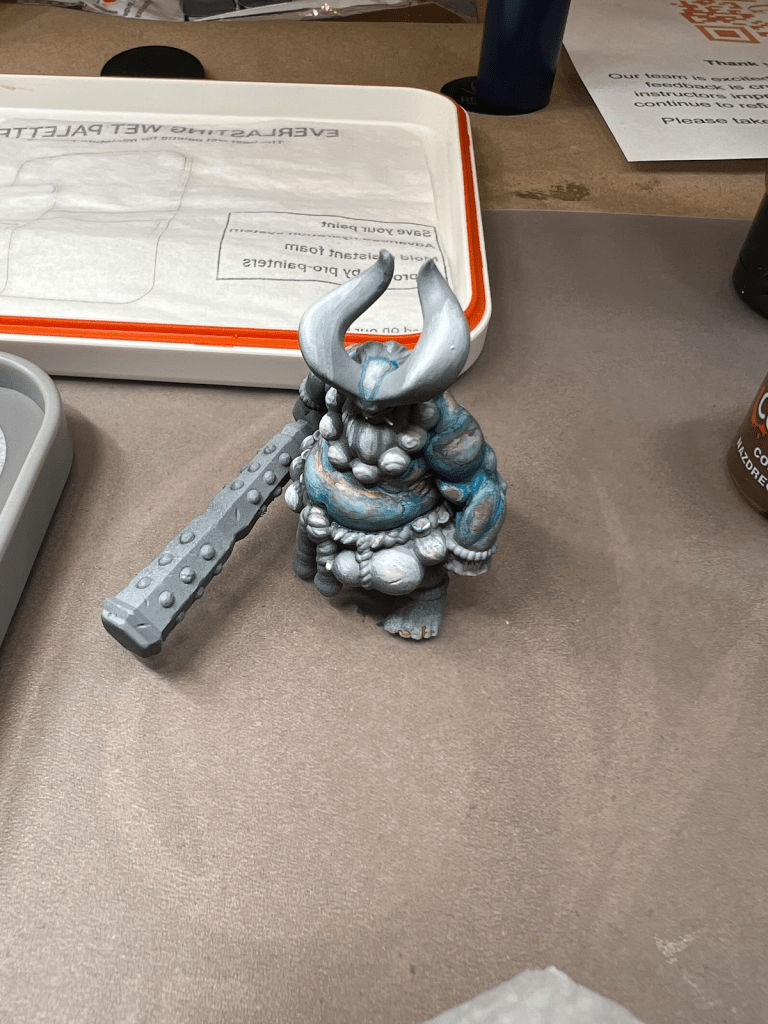
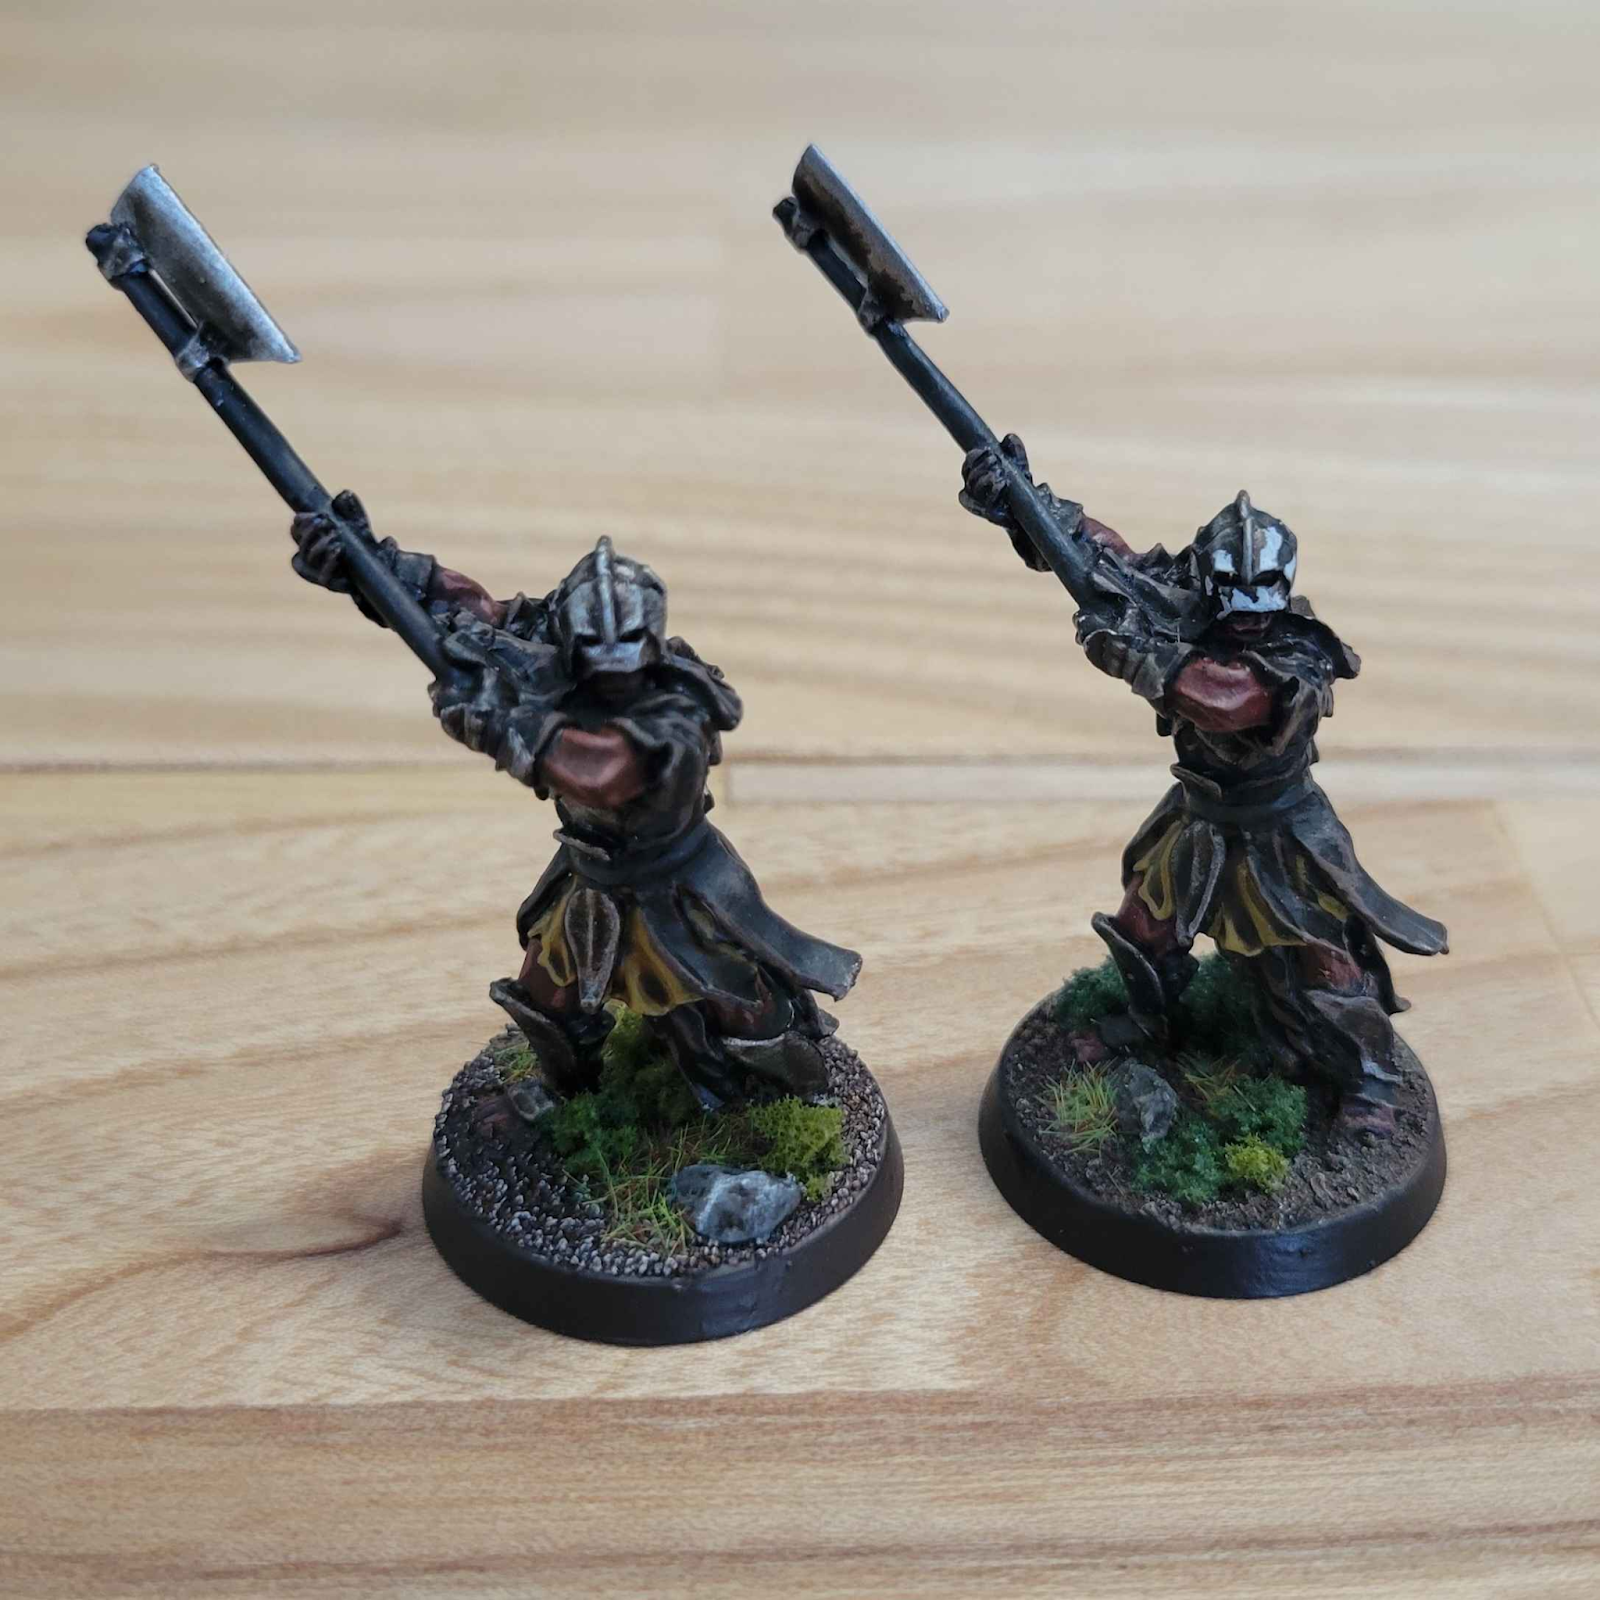
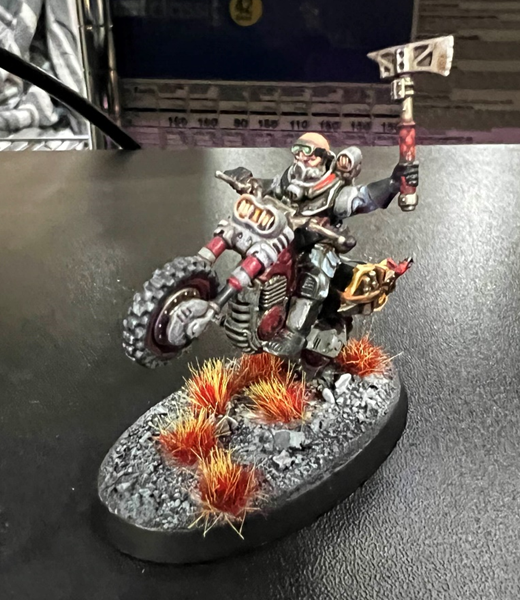
I had mostly finished my Rohirrim army earlier this year, but I was able to pick up one last miniature – (Hotboots) Hera. I really like this miniature, and I am glad I was able to use a different color palette with her – more blues and whites, rather than the greens and browns I used for the rest of the army.
On the one hand, she does not fit in with the rest of the army, even with her brothers Haleth and Hama, but she does decidedly stand out, as characters should. I’m content to call the Rohirrim army done, and I am glad that I learned so many good techniques for painting horses, which will be useful for when I paint my beloved Bretonnians.
For the Empire (Part Zwei)!
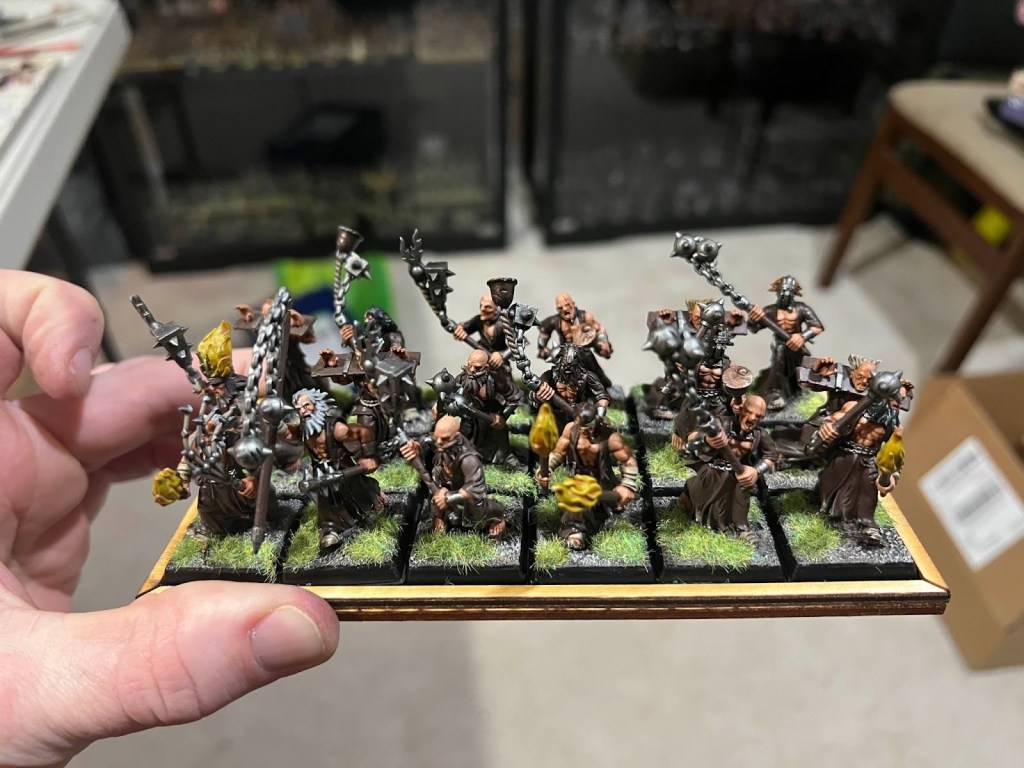
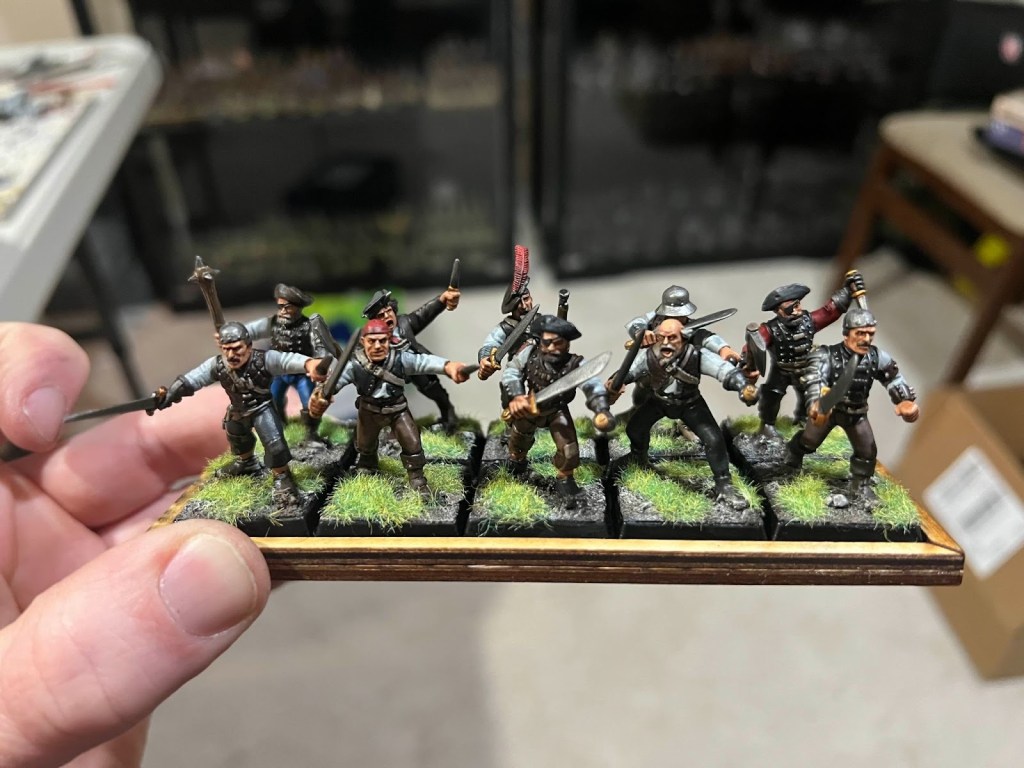
First, I have to give a MASSIVE shoutout to my boy Jerry for his fantastic work with my militia and flagellants. He did a great job with these, and they work well with the rest of the army. I may even use some of the Free Company miniatures in a Mordheim game… if I can ever get enough time for a Mordheim game.
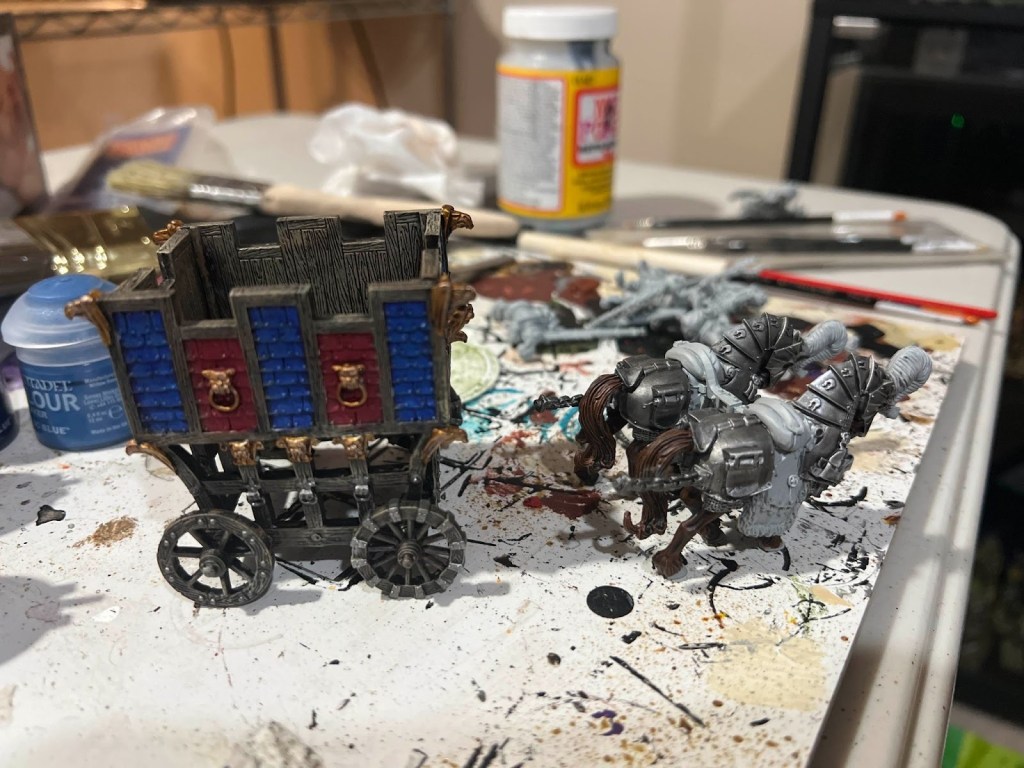
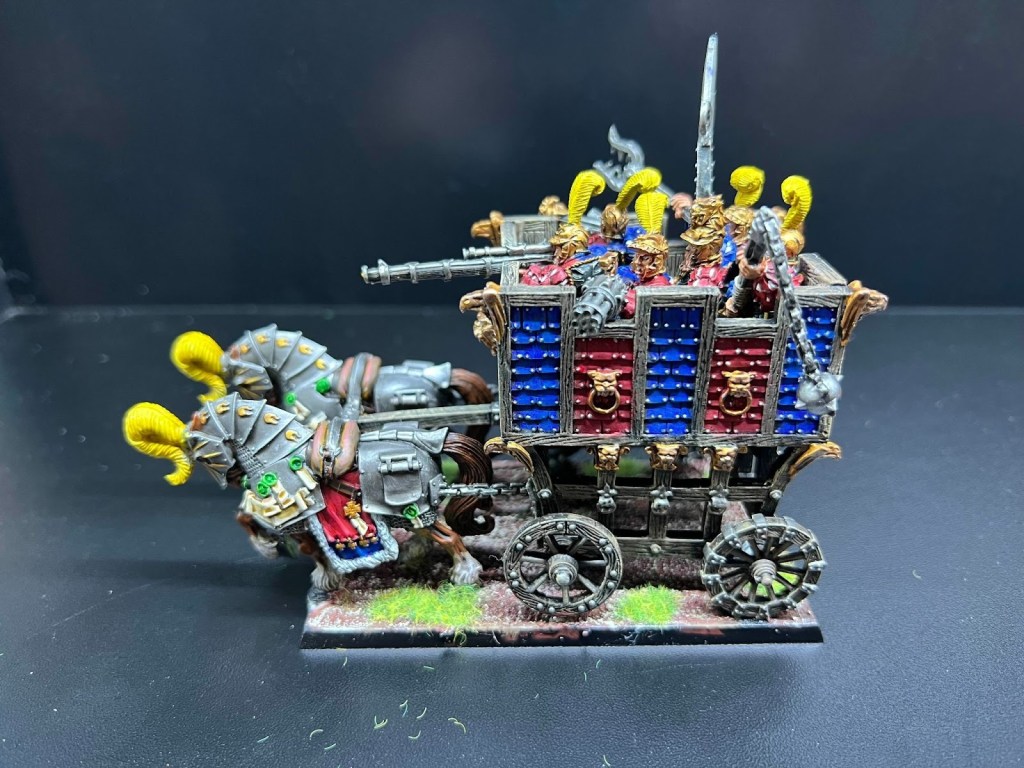
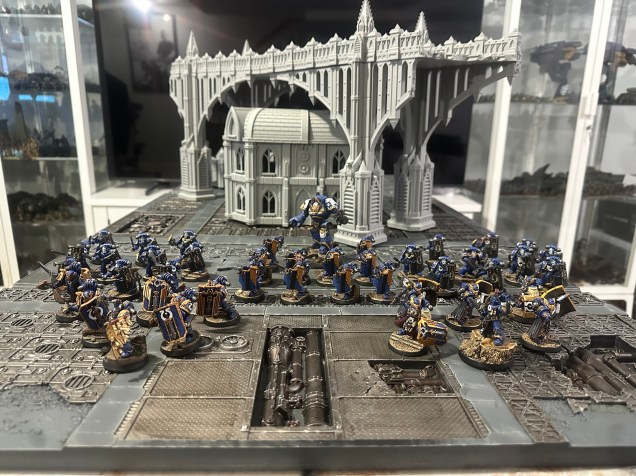
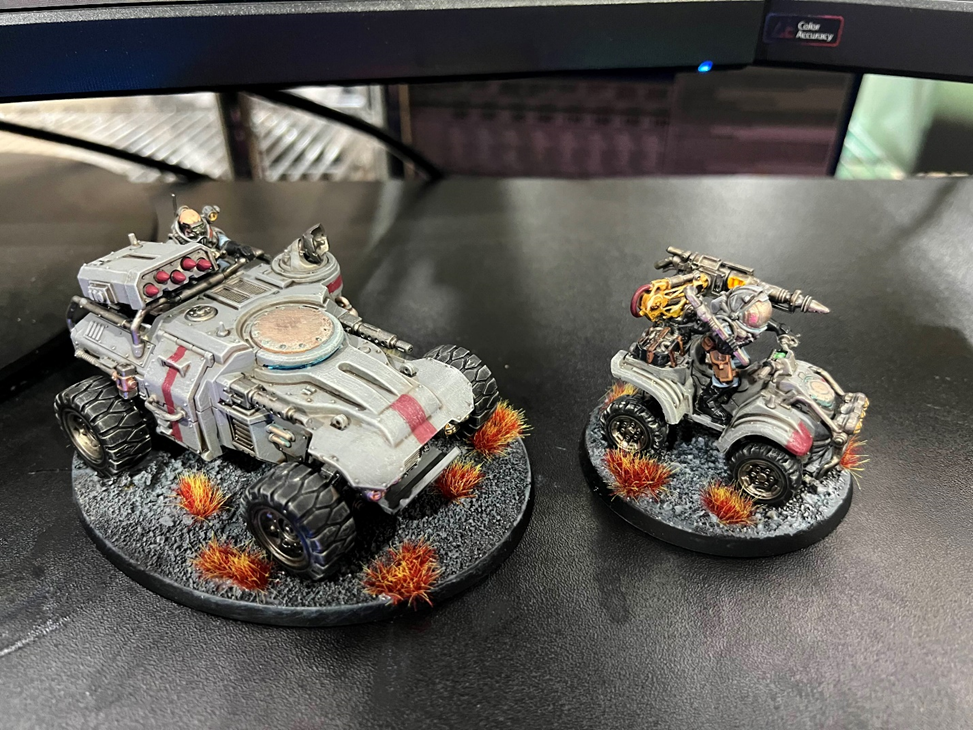
Okay, so onto my own work, I had one last miniature that I purchased personally this year – the War Wagon. All of my other miniatures in my Empire army were either bought all the way back in 2012, or were gifted to me through offloading. This project was half completed on my table for a LONG time (three months), but I made a commitment to myself to finally finish my Empire army this year, so I buckled down this holiday and got it done.
The wagon was the easiest bit, mostly due to the large blocks of color. I painted the wood with a Wyldwood Contrast à Steel Legion Drab heavy drybrush à Screaming Skull light drybrush. With the horses, I used some of my techniques I learned from the Rohirrim horses (see above), thanks to the eternally useful Duncan Rhodes.
With the crew, I spent a lot of time on them, which seems like a bit of a waste of time, since about 75% of their bodies are hidden due to the tight packing inside the wagon. I did want to add some detail to the slitted sleeves, a la Landsknecht that they are clearly based on, so I put in some white in the gaps of their sleeves to make them stand out compared to the regular state troops.
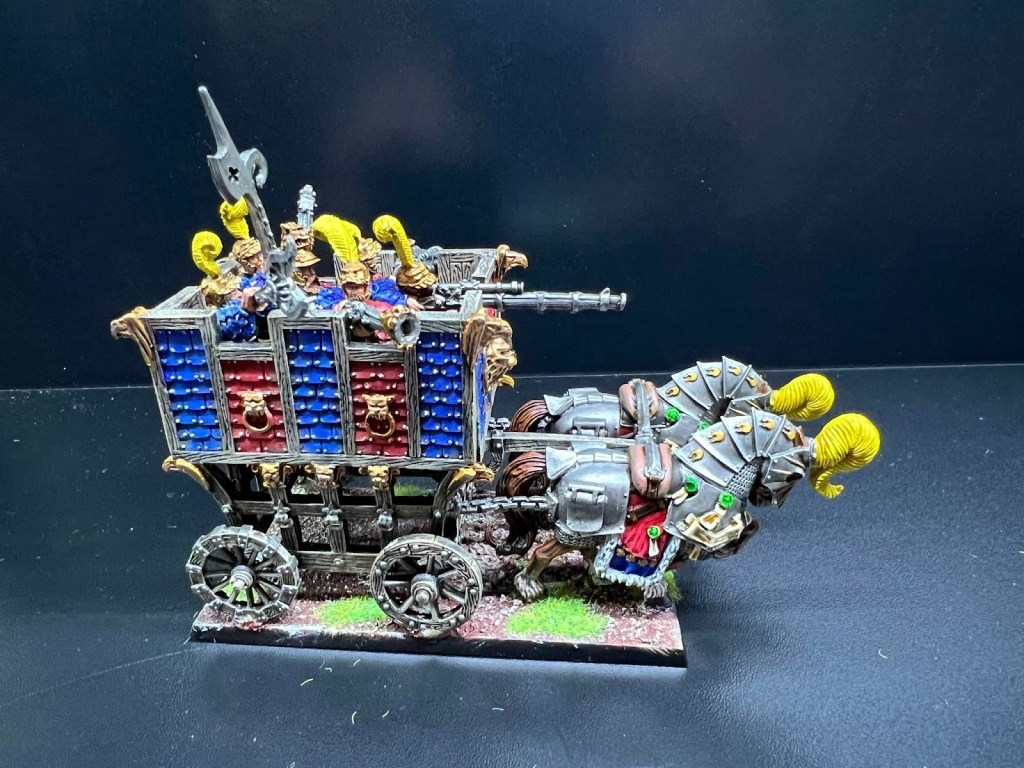
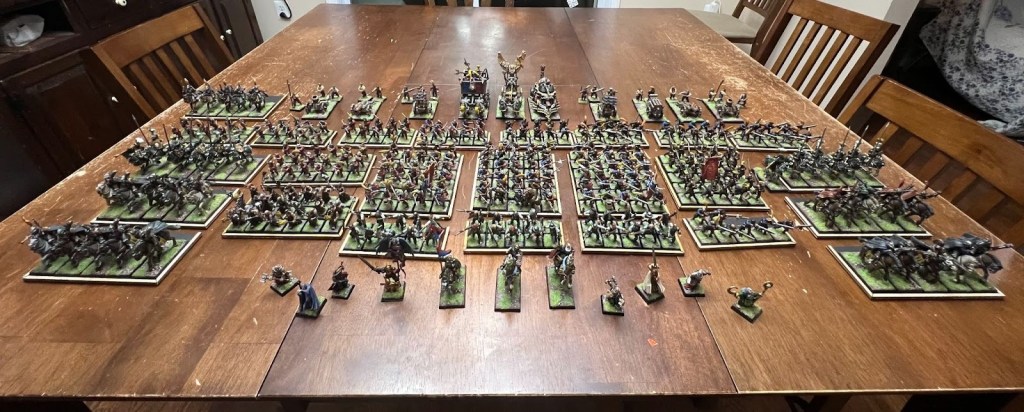
And with the War Wagon complete, here is the full army in its glory. I am going to declare it done for now, though I may go back and add a character miniature or two in the future.
Future Plans
I still need to figure out what I am going to paint in 2026. I realize that I cannot afford to be as ambitious as I was in previous years, so I will have toi be choosy with what to paint. Here is what I have on my docket, all assembled and primed:
· Trench Crusade (Red Brigade from Westphalia Miniatures)
· Sister of Battle Army
· Two Kill Teams (Ork Kommandos and Phobos Scout Marines)
· My remaining Bretonnians (Questing and Grail Knights, Mounted Yeomen, Squires, Trebuchet, Grail Reliquae and Pilgrims, and some characters)
Also, at some point I am going to want to assemble and paint all of the Mk IV marines I have for Horus Heresy to have the Alpha Legion army I always longed for. These are not assembled or primed, but someday perhaps.
Thank you for reading, and I wish everyone a safe and happy new year, and a calm and serene 2026. Cheers!
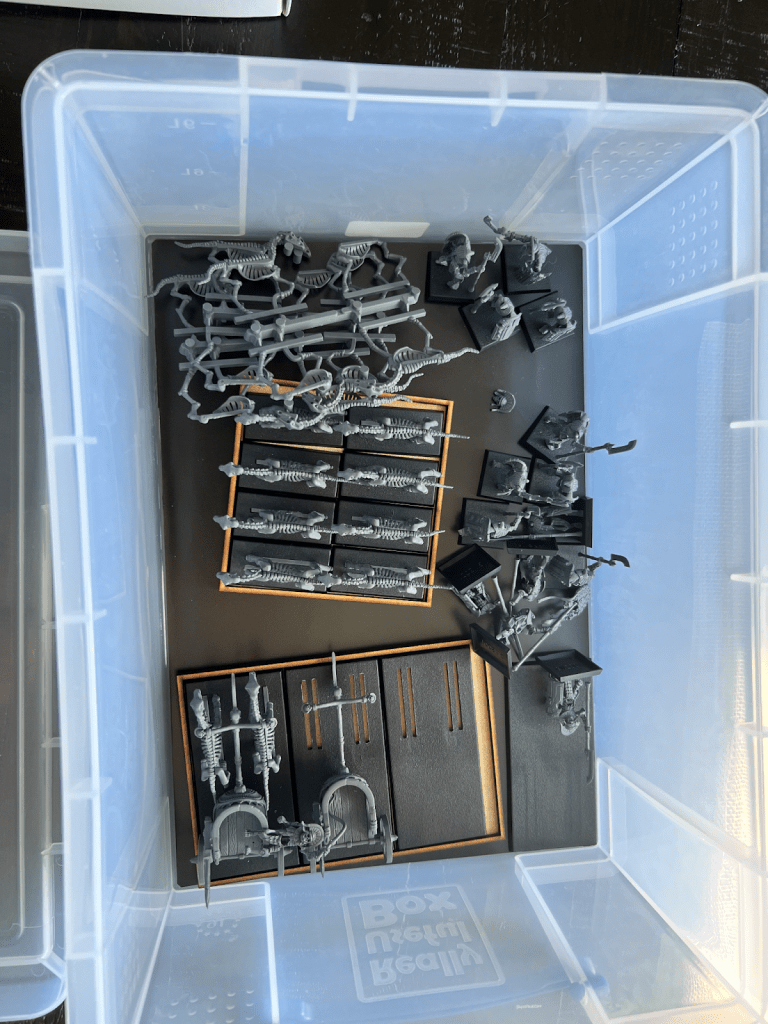
This month I aimed to tackle a few different projects. I wanted to get some more work done on my Tomb Kings and continued to finish up some half-baked projects around my desk.
I was a bit scarred from trimming moldlines off endless skeletons for the past few months, but I was finally back up to the challenge and was motivated to complete another squad of skeletons. A quick zenithal undercoat and contrast paint made short work of the majority of these skeleton archers. Since I was pretty mindlessly slopping on contrast paint, I was able to be a bit more mobile while painting these guys. Plenty of time to watch some TV and paint!
Towards the end of the month, my fiance and I took a much needed vacation into the mountains for an escape from work. We both brought along some hobby supplies and got to spend a bit of time painting and building models. In the interest of traveling light, I opted to bring some chariots and horsemen to build. Using some spare Tomb Guard, I was able to build these into some tomb guard chariots
For 40k, I finished up some Imperial Fist intercessors. The only thing remaining here is transfers for their right shoulder and they should be battlefield ready. I chose to go with a dark brown for the leather details to add some variation to the model. All in all happy with the end result. Setting them on a simple dark base helps the yellow really pop.
For my Black Templars, I was able to finish up the Captain from last month. After finishing up the details on the Bolter, I just need to add some texture and paint to the base before calling this model finished.
For the rank and file, I used a much less time-intensive method for painting. A simple zenithal highlight and some quick edge highlights and battle-damage made the black armor pop a bit. I used some crosshatching with thinned paint to achieve a nice cloth texture, and painted in some frayed edges to complete the worn look. For the Templars, layering up the shoulder pads to white has proved to be pretty time-consuming. By next month, my plan is to have tried out a few new methods for painting shoulderpads that don’t involve as many layers.
Joe R
August is always a busy month as I try (and fail) to get as much hobbying done as possible in preparation for the NOVA Open. For those unfamiliar, I am part of the team that supports all of the Blood Bowl events at NOVA Open. As such, I like to make sure I’m following the hobby requirements. There is also a significant amount of downtime while running an event, so I like to have several hobby options available to putter with while I wait. So, without further ado, this is what I’ve got to share for August (and a tiny bit of September).
Chests and Teleporters – Dungeonbowl
I cannot believe how long it took me to finally get around to preparing these essential pieces for Dungeonbowl. I’ve had these pieces assembled for a long time. I even had some of them primed. I had never bothered to try and paint them. Since we were running Dungeonbowl at NOVA Open, I wanted to make sure that my kit got a little attention. So, the week before NOVA Open I primed everything and got to painting. I said to myself “Joe, how hard could this possibly be? It’s 6 chests and 6 teleporters. They hardly have any detail.” A week later, I was at NOVA Open frantically scrambling all morning to get these components ready for the evening. I am pleased to report that I finished! Are they amazing? No. Are they painted and washed? Yes! Can you tell the difference between a bomb and the ball? Yes. Are all of the teleporters clearly identifiable? Kinda! The numbers are hard to read, but my colored dice system helps out quite a bit.
A long while ago, I bought these dice so that folks could paint their teleporters to match and look for colors instead of numbers. I’m pleased to report a majority of our Dungeonbowl sets follow this scheme and it works pretty well. We are getting ready to roll into a short Dungeonbowl season, so it helps to have this set ready to roll. I just need to varnish them now…
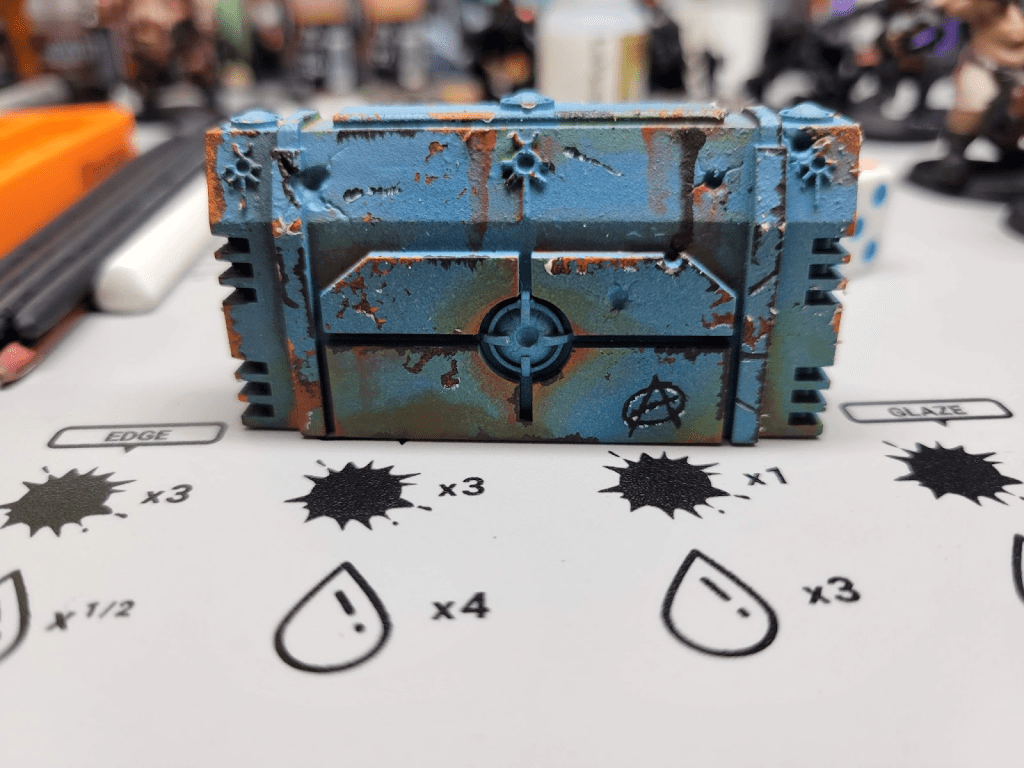
Weathering with Aaron Lovejoy
I only took one painting class at the NOVA Open this year. I had already taken a weathering class at Cold Wars earlier this year, but it’s a technique with A) lots of options, B) limited stress, and C) relaxing practices. This was also one of the only options I was interested in AND fit my schedule.
Aaron provided us with a teal barricade. The barricade had originally been undercoated black and mishmashed with rust spots. Then he applied a silicon coating and sprayed it with teal. The idea was, at some point, we were going to pull off the parts of silicon to produce chipping. We also practiced the acrylic application of various ages of rust, dirt, and grime. We also applied some scratches and graffiti. You can see the end result below.
I was pretty pleased with this, especially since I had almost no plan. However, the best thing I learned? Blending through feathering. Aaron had us use two brushes. One was for the application of paint. The other was to feather out the edges of the paint to blend it more seamlessly with the base color. This was pretty cool! I’ll admit that I still like sponging more, but it was definitely nice to learn how to do scrapes and streaks.
Zhufbar Cinders – College of Fire Dungeonbowl Team
I mentioned that we are doing a season of Dungeonbowl in our local league. I must admit, I vastly prefer to play variants over traditional Blood Bowl (aka 11s). 11s games almost always go for 2+ hours. I would prefer to play something that I can finish in about an hour (Oh… hello Trench Crusade! How you doing?). Our league has put a timer on Dungeonbowl (1:45 minutes), but it’s different enough that I’m very excited.
Originally I thought I had enough official GW models to fill out the entire College of Fire roster. I had the Ogre & Dwarf sprues from the Dungeonbowl box plus a Khorne team. However, I am adamant about running 3 Ogres. So, it turns out that I didn’t have enough stuff. 3D printer go BRRR. In the end, I printed out 1 3rd party Ogre (this fella) and a couple of 3rd party marauders. I wasn’t ready to dedicate two official GW marauders if I was already going to be printing stuff.
I spent most of my painting time at NOVA Open (after the Dungeonbowl parts) working on this team. I decided that each player would utilize Turbo Dork’s Redrum paint, a candy apple red metallic. It is very striking! Initially I was batch painting things, but eventually fell into a rhythm on the Ogres. I got especially enticed by the 3rd Party Ogre.
My painting continues to improve. Most times when I finish a model I say “Well, this is probably the best thing I’ve ever painted.” I think that’s a great sign. Are there imperfections? Absolutely. Could highlights be brighter? Could shadows be darker? Yes. Does the model look bad ass on the table? HELL YES. And that’s good enough for me right now. Is this my entry for Capital Palette in 2026? Probably not, but I also wouldn’t be afraid to enter him (once he’s based of course!). I’m hopeful to continue knocking out these models because… I’m invested. I haven’t felt that way in a while. So I look forward to seeing if I actually finish this team before the season is over.
That’s all for now folks. I’m working to write a review of the NOVA Open Blood Bowl experience. Hopefully you’ll see that come across your feed in the near future.
Kevin C.
For the Empire!
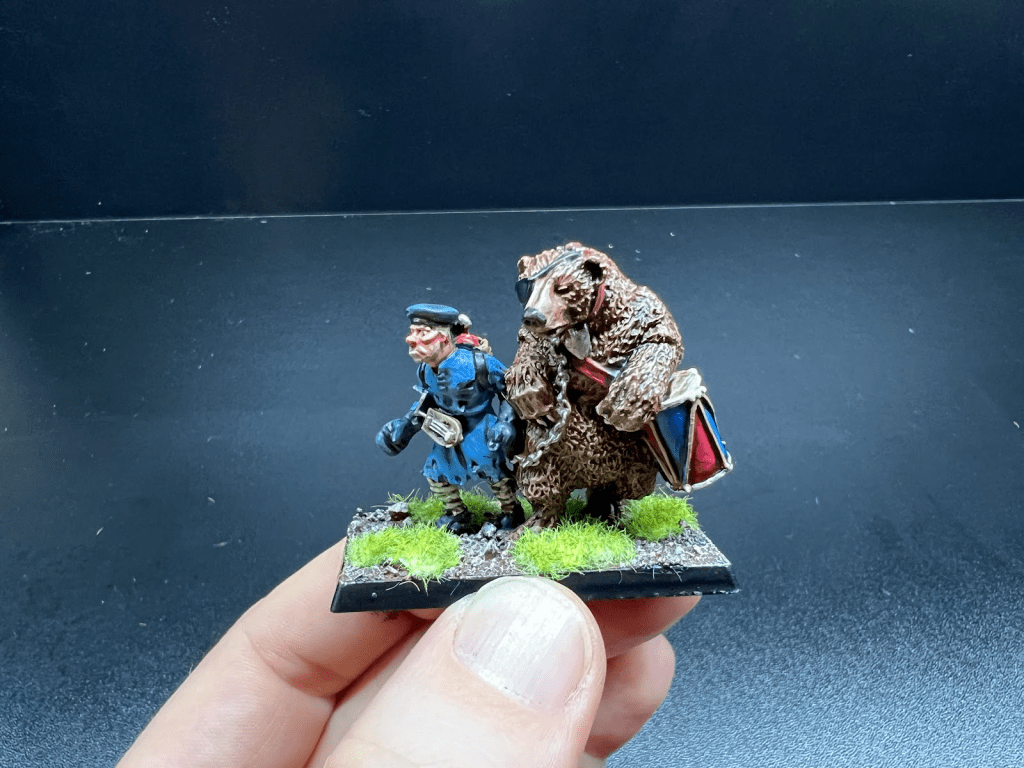
I spent this entire month finishing up all of my remaining Empire that I bought back from my brother, as I discussed last month. However, to kick off the month, I still had a few miniatures left over from when I sold the whole army back in 2014. They were gems, and I knew I wanted to paint them. I spent a good amount of time making sure they look nice, since they are colorful characters, and it gave me a chance to practice painting fur. The Empire Witchfinder I am using for the Pathfinder campaign I am currently playing in, and the regimental… ahem… mascot will double as a musician and standard for my halberdiers.
For the faces, whenever I get a chance, I like using a yellow-red-blue glaze at the very end (yellow-red-yellow if you are painting female faces). After shading and highlighting the face, use a red glaze at nose/cheek level, a yellow glaze above the eyes, and a blue glaze near the mouth and below. It gives great depth to the face, and it’s a neat, quick trick. For female faces, just replace the blue for another yellow glaze.
Hellblaster
I still had a very old pewter Hellblaster from long ago, along with some old pewter crew. It reminded me that Games Workshop used to strive for much more realistic scaling back in the day. These guys are tiny and slight compared to my other war machine crews, but they are properly proportioned.
The Troops
So, the majority of my time has been spent painting up the handgunners, of which there were a lot. 57 in total. I like to run missile troops mostly in small units of ten, which allows me to use them as detachments when appropriate. I had some old school handgunners, which I was able to apply a nice quick contrast paint to to get them tabletop ready.
Next, I had a bunch of “newer” (released in 2006 as opposed to 2000) handgunners which I painted using my more traditional methods. These were annoying to paint, as they apparently had quite a lot of paint and primer on them already, so much of the detail is gone. In retrospect, I should have used isopropyl alcohol to remove the layers of paint, but I wasn’t terribly keen on spending a lot of time getting these guys looking great. They aren’t Greatswords, after all.
And yes, one is missing a head. He’ll probably be fine.
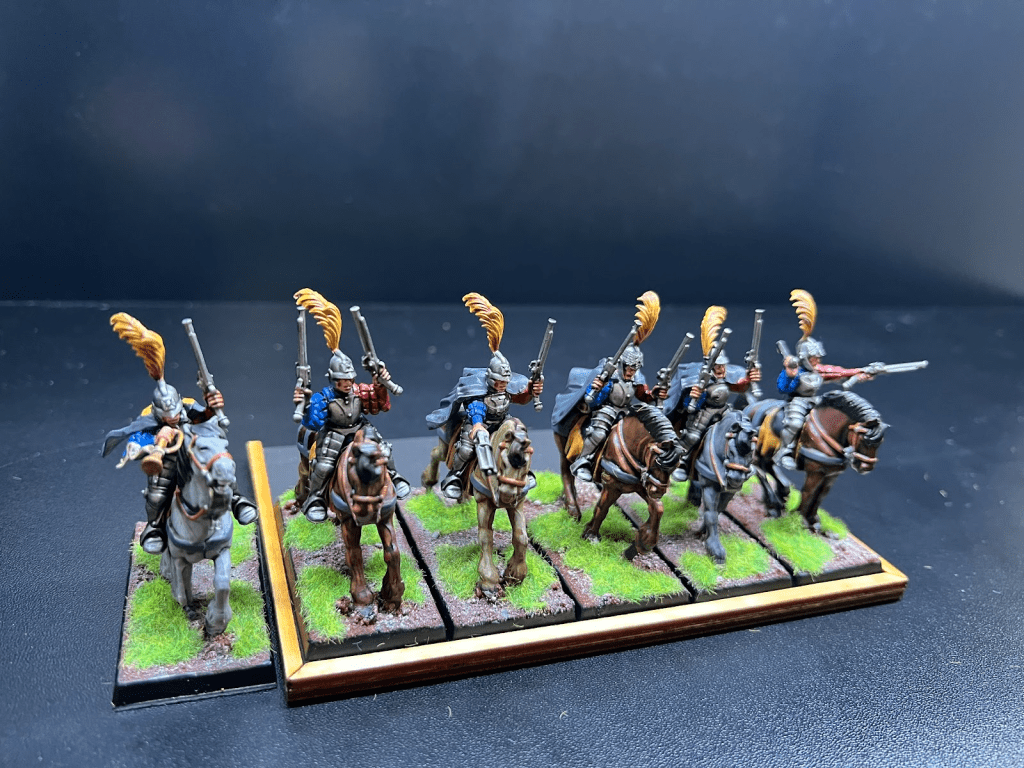
Pistolliers
So, while I was painting these guys, I’ve been reading the Dan Abnett book Riders of the Dead about two pistolkorps survivors behind Chaos lines. Such a good book! It kind of made me want to spend more time with these guys, but I was ready to get these guys done with.
For the horses, I used much of the same recipes I used for my Rohan horses several months back. I didn’t give them too much detail, but I’m glad I was able to give them some variation.
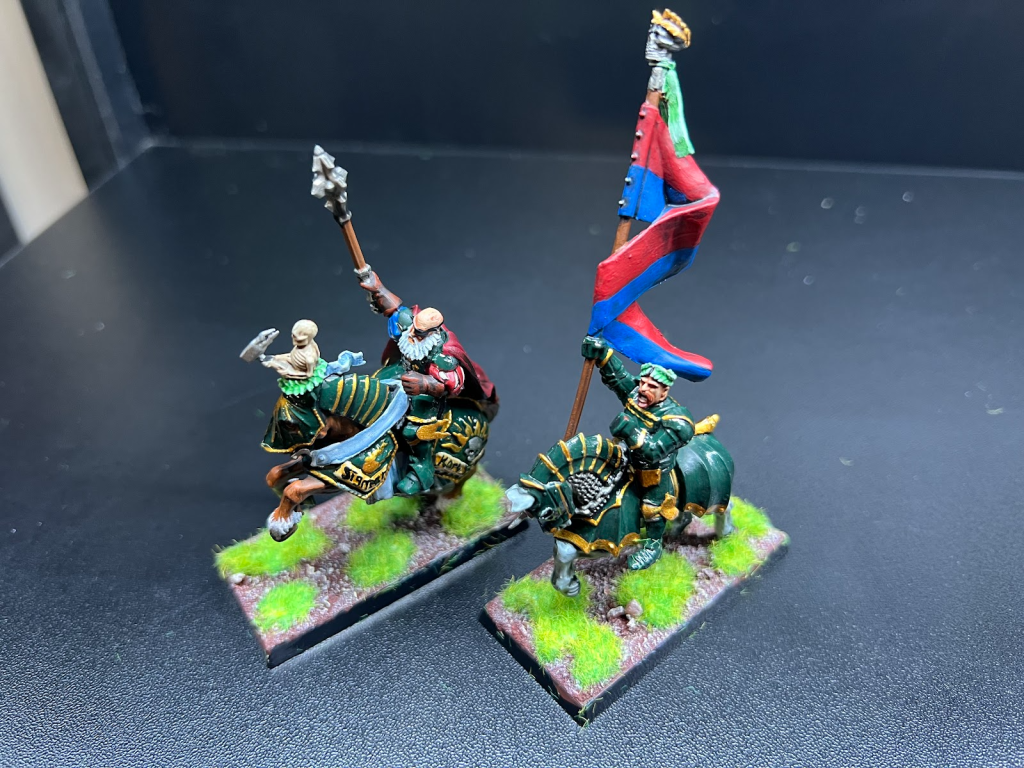
Characters
Finally, there are my mounted characters. These lads will probably end up being captains for the army, as army standard bearers or some such. I wanted to paint them similarly to how I painted the Knights Griffon earlier, so I based them with Castellan Green and then used an ‘Ardcoat to mimic lacquer finish on the armor.
I will get a full picture of the army hopefully next month, but I have now officially finished painting all of the miniatures I got back from my brother, minus those I sent to Jerry for painting.
NOVA Open 2025
I don’t think I have missed a single NOVA Open since it started in 2009 as a pavilion in a park in Northern Virginia (hence the name), so of course I went this year. I have been backing away from most miniature games at these events however, as I end up being more annoyed and tired from them than invigorated. So, my weekend was packed with mostly RPGs with a few painting sessions built in.
One was taught by Marco Frisoni on underpainting shapes and textures and then using a light contrast paint above the underpaint, similar to what was done in canvas painting during the Renaissance. I was not very good in the final result, namely because I am unused to using mattes, but I hopefully will get to use this technique in the future. Here is my final result
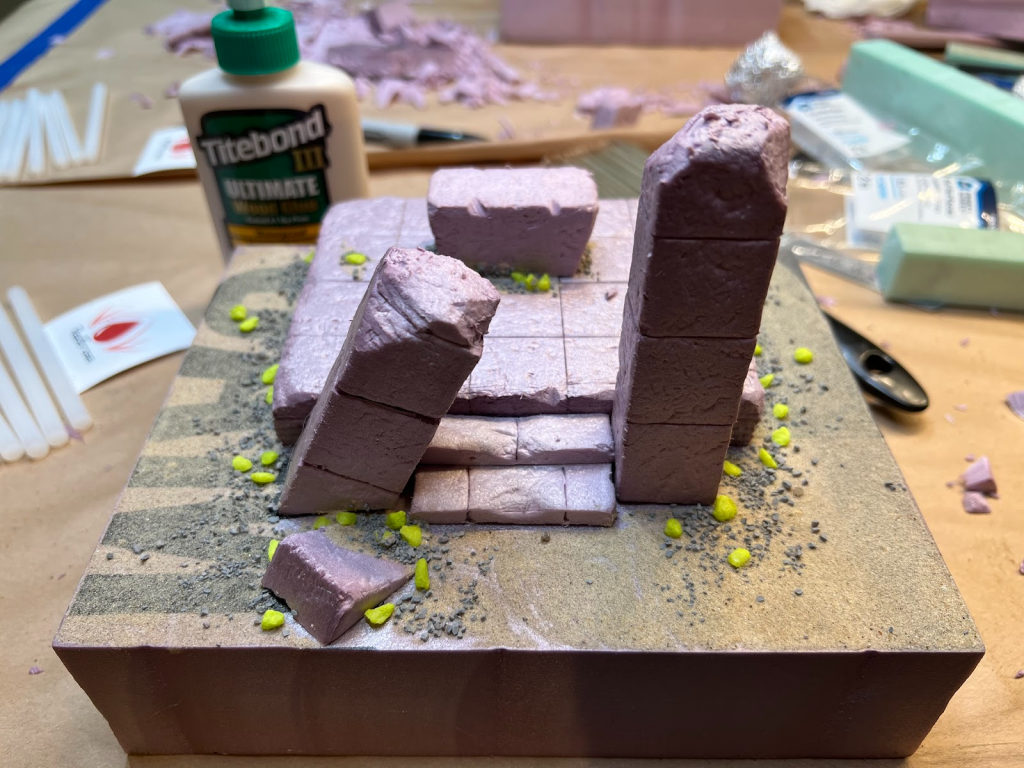
Next, I took a class on building a display board. I don’t actually own a display board, but I have always wanted one. I have considered building one for Meduseld. However, I was given some great molding tips for pink foam, on how to create natural (and man-made) surfaces. This was the small display board I produced. I will still need to paint and base it, but I am hopeful I can do that this month.
Finally, I got a ton of great RPG sessions in, mostly in games I have never played. My two favorites for the weekend were definitely Fallout with fellow blogger Joe R., and Pirate Borg. I am very thankful that NOVA Open has started branching out into RPGs, as I am starting to drift away from competitive miniature gaming.
Next month, I am looking to complete my War Wagon, and finish painting both the display board from above, and Hera of the Rohirrim. Wish me luck!
This month I wanted to take my hobby time to work on a character model for my Black Templars. I’ve always had a soft spot for retro game pieces, and I found this old Captain Draco model on eBay a year or two back for cheap. Something about holding a pewter mini just feels so nostalgic.
That’s about all the good things I have to say about pewter minis. Any major mouldlines are a huge headache, and luckily this model came in okay shape. I’ve always had issues surface quality of metal minis affecting the final paint job, so I was meticulous about cleanup. I took a micro-file and some fine sandpaper to lots of the flat surfaces to help smooth out any irregularities. After a good bit of manual labor, I was ready to start painting. I don’t have a picture of the cleaned model, but the pitting is visible in the original shot.
For the robes I worked with muted browns and ivory. I tried to put some texture on the fabrics using crosshatching, but I found that this didn’t quite give me the effect I wanted. I tried my hand a freehanding a Templar cross, which is easier then it sounds. By following the pattern below, you can consistently get a symmetrical cross as long as you have a good brush point.
There are plenty of ways to paint black armor, but for a centerpiece mini I wanted to put in the extra mile to make it pop. I decided to paint the model using non-metallic metals, and followed a similar method for painting the black armor, albeit with less pronounced reflections. .
For the NMM metal, I researched some potential recipes for various metal tones and chose about 4-5 colors for the progression. For the golds I started with dark brown, to a pale yellow and finally a highlight of off-white. For the silver and steel, I used a dark gray, then progressed up to pure white leaning more towards the cooler midtones. I started by sketching out my highlights and blending them in using several thin glazes.
At first I wanted to scrap it, but the final step of applying specular and edge highlights really turns on the effect. It was a great excercise, though I’m still not sold on how the Bolter is turning out. There was still some residual texture which I found made it hard to get a good clean color transition. All in all though I am glad I really pushed myself to try new things.
I am not quite done with this model yet, but I am looking forward to finishing it up and getting him based!
Cory E.
In the far future of the 41st Millennium there is only…. Nostalgia ?
From Wizkid’s Mageknights to James Workshop’s Warhammer, I’ve always loved plastic minis and spending money. My Jr. High School days saw my fleet of red Eldar facing off against Necron Monoliths, Space Marine Dreadnaughts, and Tau. ….getting shot off the board by Tau.
I genuinely don’t know what edition it was and if we even played by the right rules but boy-howdy did we roll some dice!
I have to shout out my old spot as being an absolute kingdom to first be introduced to the game. This was an official Games Workshop store, but I swear it used to be a pool hall before that. Walking into the store you’re met with two rows of 4-5 wargaming tables to the back wall that goes left with 2-4 more tables. A couple vending machines in the back for a Mountain Dew & Funyun fix because YOLO. The other half of the store had the product shelves and then there was a U-Shape bar top with stools for painting. (I think I saw my first men’s butt crack there….) You could bring your own paints and brushes but this was the early 2000s and GW employees were cracking open fresh paint pots for patrons without a care in the world!
We got in a lot of 40K but as happens, one of the guys got into Warhammer Fantasy so we all did. My Dark Elves & Cold-One Riders got somewhat painted up and I probably played two games. It was fun but I was more enthralled with the new Lord of the Rings tabletop game. I think my 1st or second purchase was a Mumakill because who doesn’t love a giant elephant??
Much more a collector than a gamer at this point, I amassed a sizable LoTR army before slowing down and eventually putting it away in my trademarked GW foam cases.
But that was the past. I had put it all away and rid myself of my plastic addiction until I picked up Middle-Earth Strategy Battle Games a few years ago after a 15 year hiatus. (I would admittedly look at the models every 2-3 years and say that I’d get back into it but never did.) But love it or hate it – Rings of Power got me back into Tolkien’s world and I found a great east coast community to play! I’ve got stories and updates from modest LotR hobbying, but this is about 40K, right?
“Just when I thought I was out – they pull me back in.”
-The God Emperor of Mankind, 31st Millenium. Probably.
So the 40K relapse isn’t entirely my fault. I’ve got this buddy and I tried to get him into LotR. We played a practice game and he even kicked my ass just like you’re supposed to let happen when introducing a friend! So I’m introducing him to Mr. Workshop, show him the website and -uh-oh those sci-fi boys are looking pretty sweet. Chainswords, lasers, TANKS … it’s hard to compete. Ok, ok I know the 40K 2k pt army rabbit hole so I try to prevent this with things like Age of Sigmar Spearhead and Kill Team: buy 1-box and you’re all-set kind of games. And it works! We’ve got some Spearhead games under our belt and even a game of Kill Team!
Then comes that dang Death Korps of Krieg box. And then that Space Wolves Army Set came out. And then Audible had an 80% off Black Library sale. So 2 pre-orders, 5 Horus Heresy books and a Space Wolves Omnibus later and we’re back!
(Disclaimer – my friend got the Krieg box… which is what tee’d up the Space Wolves purchase so I think we can blame/thank him.)
So I don’t have a picture of my first model for comparison but you know the type: 1 thick coat, heavy nuln oil wash and two big white color-outside-the-lines looking eyes. This time we’re gonna do it right. I’ve better tools, better patience, and an endless supply of youtube videos telling me what version of the slapchop method is meta right now.
This month I took to the icy shores of Fenris and assembled the Space Wolves Army Set. I got the Blood Claws and Grey Hunters assembled and sticky puttied onto their bases. I’ve got big plans for making some frost bases and I want to be able to take them off. I also built the Head Takers and these are some sweet models! Being new to 40K, I didn’t know if I’ll need a shield or two swords so I magnetized. I got out my dremel tool to hollow out each arm and added some greenstuff for the magnets to sink into. The Head Taker shoulderpads are built into the torso & cape so I added the inside magnets first but otherwise it couldn’t have been easier.
Time for some paint! Now if these models were following my traditional pattern, they’d stay assembled and unpainted while I order Logan Grimnar…(okay he is on the way). But this time is different and this time I’ve got better tools – like Jerry’s airbrush! I did a classic black prime with a grey “Zenithal” to get all the guys staged. We used the airbrush to paint the shoulderpads yellow and this was game changing and a vast improvement from my layer-painted Blood Claw I got from the Adepticon preview. I generally like layer painting and want to improve but I get fatigued when painting a whole army.
This is my Adepticon Blood Claw I test painted before all the rest. Although it’s perfectly acceptable, it was painstaking and I’d like to do better. The shoulder pads were a paint to layer paint with yellow. The recess shading with a pinwash was a bit messy. You’ll see in the next pictures that I opted for airbrushing the new shoulderpads white first then painting yellow. And I opted for an overall contrast paint with sponging on top for the power armour.
So instead I opted for speed paints – a 50:50 mix of Runic Grey and Cloudburst Blue. This turned out to be a sweet deep blue that is totally wrong for my Space Wolves so I sponged on some Vallejo Steel Grey and it looks great. The speed paint + sponging made the speed paint stay in the recesses like a wash and offers a sort of chipped battle damage underneath so I’m going to say that it all worked out according to plan. I have a Fenresian Grey that I’ll use to push the highlights up whenever I get the courage to edge highlight.
Time to add the shoulder pads. These were left off so they’d be easier to airbrush and paint. I stuck them to some painters tape that I looped to be double-sided and then airbrushed them grey/white. Then I took imperial fist contrast paint and airbrushed that as well. Much easier than brush layering the yellow and a cleaner look than my fist go around.
So with the shoulder pads and the rest of the bodies ready I put them on and painted the trim. I’ve been loving the Space Wolves books surrounding Ragnar Blackmane so I’ll be running his chapter. So I’ve got some MicroSol & MicroSet on the way so I can do those transfers. I’ll also need to search for my sharpest/thinnest brush so I can do their Blood Claw pack markings!
And that’s where I end with my Space Wolves success so far. It feels great being back in the world of 40K with a bit more patience for all this painting. Tune in next month to see the Blood Claws completed hopefully alongside their Grey Hunter & Headtaker brothers. That or I’ll fully pivot over to my Mortisan Elite Spearhead that I just built…. Oh the choices we make!
Okay full disclosure: This article is coming out about July hobby progress… but I did start this in June. So I’m a bit ahead. Which means that I’ll be sure to have more for y’all next month. Here’s a quick spoiler:
The Whistle Stop Whisper
*Legal Distinct from all other machines that convert circulating stories into hype*
Joe R
While I would say that July also turned out to be a great hobby month, this particular recap isn’t going to be all that impressive. This is a situation where the end products don’t necessarily communicate the activation energy that was required to FINALLY start some of these projects. However, I am extremely pleased with both results, even though there is more work to be done on both.
Ash Wastes Terrain – Necromunda
Look at that, a single header. Everything I did this month was in support of Necromunda. Let’s start with the “Prof” Pyggi, the newest addition to my Junktown Jesters.
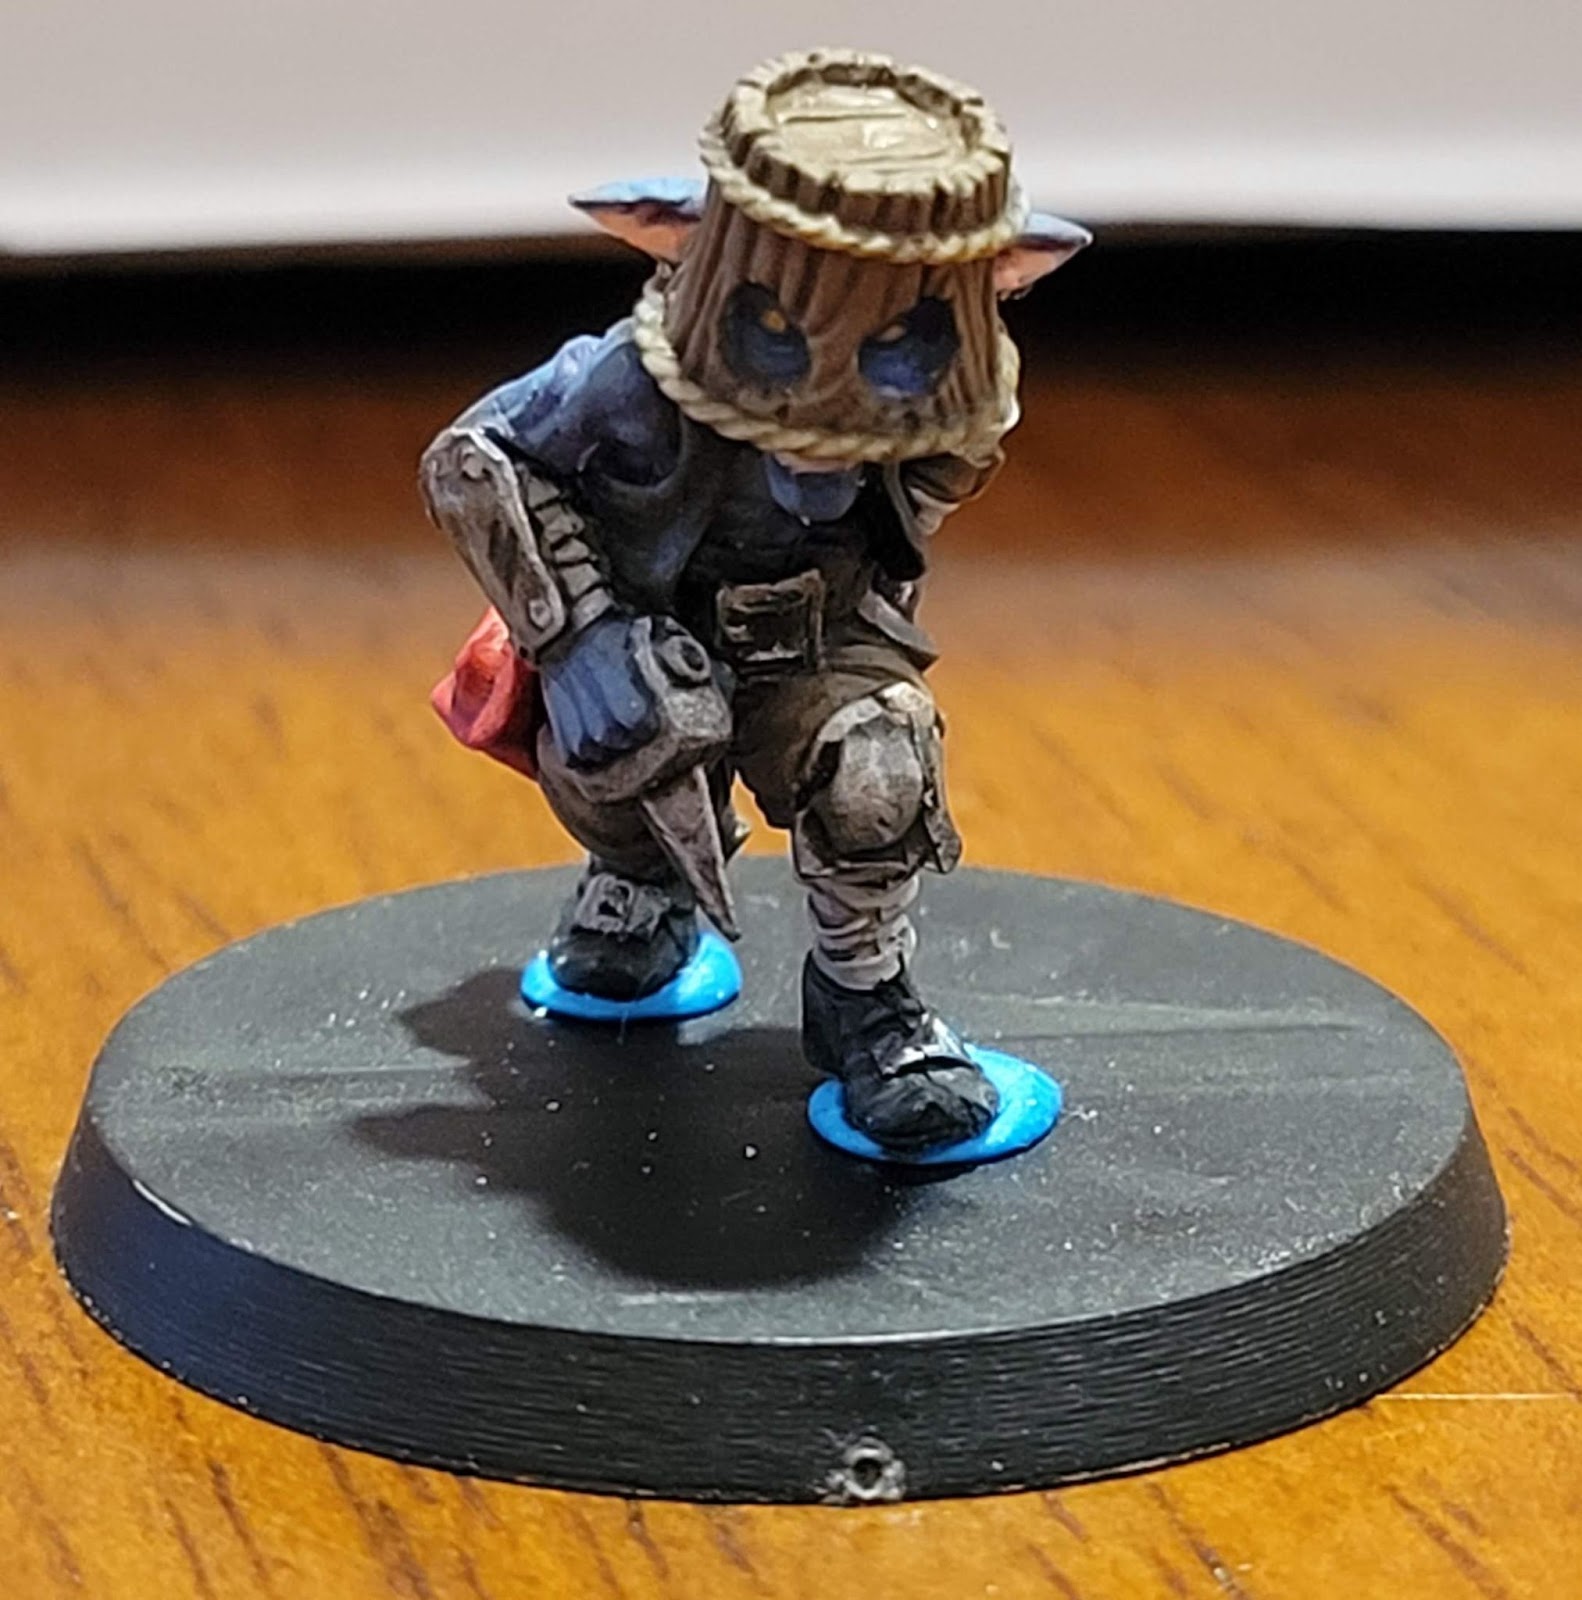
Since I am the arbitrator of my Ash Wastes campaign, I am inclined to run a gang that is fun for me to play but not designed with every optimal mechanical choice. It’s also my first time consistently playing Ash Wastes, so I wanted to try out some options that I’ve never gotten to the table. One of these is the Waster Dirtbike. Now, folks on the internet will tell you that the bikes tend to be a liability instead of a benefit. The Junktown Jesters do not care! So I slapped an Escher on a dirtbike with a chainsword and decided to model her after Batman’s Professor Pyg. I was not willing to spend actual GW models on this experiment, so I used parts from various Print Minis sets to assemble my vision. The bike is from Sedona Bikers, the rider is from the Sickles (though in hindsight I should have used the one from the Bitter Nightshade Vehicle Kit), and the chainsword arm is from City Outlaws. I would select a different bike next time (the railing is hard to paint) and I would prime everything black instead of white, but overall I am very pleased with Pyggi!
I was very pleased with the pinks on the model. I started with Reapers Punk Rock Pink for the base. This paint is very thin so it took several coats. Then I used Vallejo Old Rose to highlight up to a midtone. Finally I did some targeted highlights with Vallejo Salmon Rose mixed 1:1 with Old Rose. It took a little time to understand the lower half of the model. I’m not sure if some of the details didn’t come out, or I just didn’t know what I was looking at. Regardless, eventually I got there. I used Reaper Leather White for the straps and came back through with some Vallejo white to provide some limited highlights. I also tried to do a gem effect on the boots. It looks okay. Once I seal the model (as far as I’m convinced, she’s done!) I’ll go over them with a gloss finish. I also freehanded the hazard stripes! I’ve done better, but they look good enough on the table.
The bike is still a work in progress. Priming it white was the wrong decision. I ended up going over it with a black ink so that the metallics would work better. This has been a somewhat frustrating bit of work to fix my initial priming mistake, but it’s getting there. I will eventually add some weathering powder to the rider, bike, and base to reflect the dust kicked up from the ash wastes.
One of my favorite things about 3D printing is producing my own bases. Here I used Txarli’s Dry Ground. While I am pleased to have “finished” a base for this model, it didn’t turn out exactly as I hoped. I’m currently using a red rock battlemap for my Ash Wastes campaign (mainly so I can overlap with my Cowboy shenanigans!). I should have gone for an orange approach to the base (like the rocks I painted) instead of the dried dirt approach I took. Oh well. I have since watched a few videos and will be prepared next time.
Next up, the Fuel Station from Print Minis that I showcased recently. This has been sitting on my desk, primed, for at least two months. Why? Because I’ve never painted terrain and I was scared. How do I get over that? Sponges. Holy Moses, I love painting with a sponge. I originally started with one of those egg shaped sponges everyone on YouTube is using. I could not get that sucker to work well for me. I either wasn’t adding enough water or I had added too much! I will revisit this sponge, but instead I started ripping apart make-up wedges and using those little pieces with a pair of tweezers to do my painting. This worked out much better for me.
Frequent readers may recall that I wanted to paint my fuel station like a Red Rocket Fuel Station from Fallout, so I knew that red was going to be the primary color. I started by doing the whole model in Army Painter’s Basilisk Red. Then I came back with a liberal helping of Pure Red everywhere except the bottom. Then I provided some limited highlights with Raging Rose. Overall, I am VERY pleased with the results. Some touch ups will be required, but for now it’s gorgeous. I am considering using this for my first oil wash because, well, why the hell not. I think it will bring out some of the dents and add to the atmosphere of a functional, but poorly maintained, fuel station.
Next I started working on the roof and awning. I did these almost exclusively with Two Thin Coats (TTC) Sir Coats Silver with little highlights of Mythril Blade. To do the rust I combined Rust Orange with Wasteland Brown in various mixes. I think I went a little crazy with the rust spotting, but it was fun. Next time I’ll be a little more targeted.
The most important thing about this project though? I had a BLAST doing this. Sponging was easy and the results looked great. There are still several pieces to finish before I’m done with the Fuel Station. I’m going to continue to use this to experiment with different techniques to help it reflect its environment, but I will continue to use sponging as my main terrain tool.
That’s all for my July folks! Next month is the Nova Open! Let’s see what we can get done before then, alright?
Kevin C.
For the first week of this month, I spent in the sunny mountains of Colorado, celebrating my parents’ 50th anniversary. I am never able to get much hobbying done on vacation, but I was able to get some riding in, this time on horses rather than bikes.
While not a painting project, I was able to get my second display case assembled and anchored, so I will be working hard this year to fill this up. Only with fully painted armies, mind you.
Empire Rebasing
So, a bit of a backstory. In the old days of 2009, my fiance (now wife) was out of the country for several months, giving me time to work on a new army. Having recently finished my first Bretonnian army, I began my work on a new Empire army, inspired by the artwork of the recently released Heraldry of the Empire, specifically the Company of Honour out of Altdorf.
I attempted to replicate this color scheme in my troops. Admittedly, my skills back then were… not great, consisting solely of base coat and wash, maybe a highlight or two. I did spend a lot of time on my greatswords and steam tank though, which I have taken pictures of here.
I played a ton of games with these guys, including several large event battles, like the Battle of Miragliano, which was a ton of fun. But, as I got married and then had a kid, I no longer had time to play large games, so I sold the army off. Unlike my first Bretonnians, who are now lost to the Winds of Chaos, I sold this army to my brother, who was at that time sans kids and had the ability and interest in playing large games.
Fast forward to 2024 – The Old World has been released, and Empire along with it. I am getting the itch to get some games in, as well as painting armies. In a reversal of roles, my brother was now newly married and with a newborn, and I was able to have some free time, so I offered to buy back my army, which he graciously accepted.
However, in the intervening years, he had had all the miniatures rebased for Age of Sigmar, reasonably assuming that that was going to be the future of Warhammer Fantasy from now on. So, my first task was to re-rebase all of the troops onto square bases (and magnetize them). While this was a time-consuming task to be sure, this was not terribly creative, so I won’t bore you with details here. Suffice to say, here is the end result.
Empire State Troops
Even though this is already a ton of troops, I still have several more that my brother obtained that were not painted, so I’ve made it my goal for the next few weeks to paint them to display. These will… not be as good as my Bretonnians. There are a lot of miniatures, and I am mainly painting them to tabletop standard, if even that. I have fleshed out my Swordsmen, Halberdiers, and Crossbowmen this month.
Even still, I’ve been able to speed up the process immensely with some nice application of contrast. I am looking forward to getting a full army on the field before the end of the year, perhaps even by the end of summer! It also helps that I am getting Jerry to paint my Flagellants and Free Company infantry as well, which will be immensely helpful.
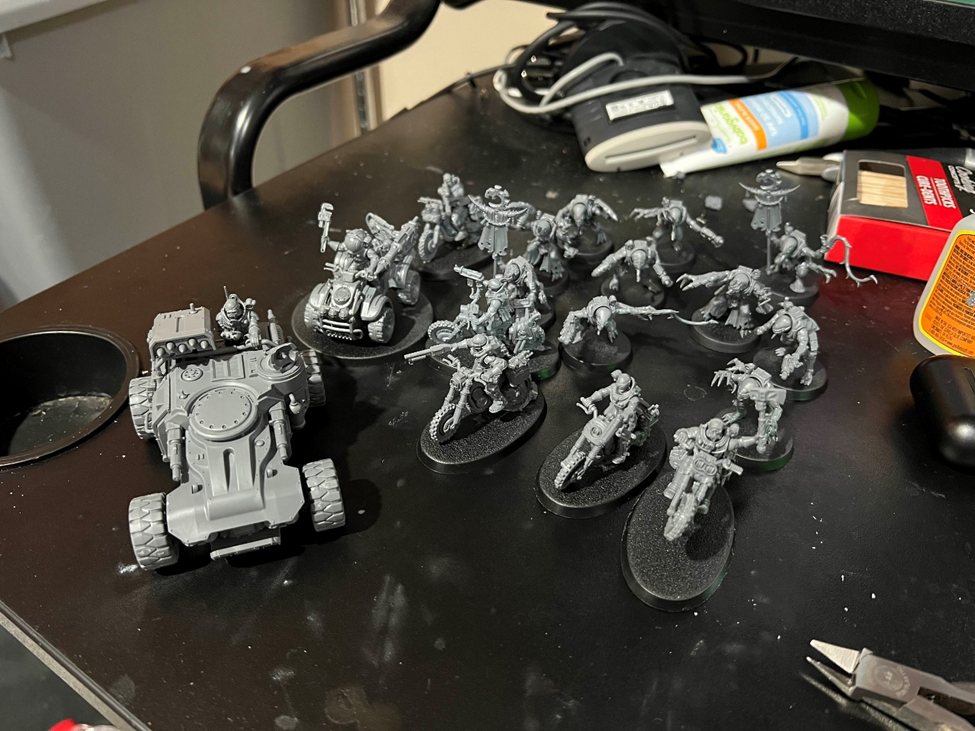
Empire War Wagon
The last bit of hobbying I was able to complete is going to be a bit of a treat for me, the last Empire piece I will work on before calling the army complete. I picked up the Empire War Wagon when it went on sale with the release of the Empire for The Old World, but I have been putting off assembling it until now.
It was a difficult piece to assemble, but boy oh boy, these miniatures look phenomenal. Unlike the rest of my Empire miniatures, I will be spending a long time painting this project. I am looking forward to it.
For next month, I am looking to paint my Pistoliers and (old pewter) Hellblaster with crew, and then getting through an ungentlemanly number of handgunners. Finally, I have some characters which I hopefully will be able to share next month.
Hello! Some of you may be a little confused, we’ve changed our name! Don’t worry, we’re still the same great group of hobbyists, the editors just thought this name better reflected the community aspect of this blog! We have some more changes on the way, and hopefully a bunch of great new content as well so stay tuned!
In the meantime, here is our monthly “Community Roundup”
Joe R
June turned out to be a deceptively good hobby month despite this relatively short article. I’m actually on vacation as I write this, so we won’t have many pictures. I have also watched several painting videos this month, largely focusing on terrain. I also watched some sponge chop tutorials which I might try when I return.
Oh. I primed SO MUCH STUFF. Those new airbrush primers are awesome. I have more primed miniatures than I have painted miniatures at this point.
Ash Wastes Terrain – Necromunda
My 3D printers have been going BRRR all month. My Fallout Gas station is printed and primed. I even started sponging on some silver craft paint which was a miserable failure. Since then I’ve printed most of this oil rig, started on this train, and printed a TON of these gem lodes. I’m planning to give a set of lodes to each of my Ash Wastes players to represent the Lithicarium mines we’re using instead of loot caskets. I’ve also been printing a bunch of rocks, which I’m hoping will serve for both Necromunda and my Cowboy related shenanigans. However, none of these items are painted (or even primed!).
After playing the first campaign session, it was clear I needed to find a solution for Ash Wastes roads. I had been using a racetrack from one of my daughter’s toys.
You may be surprised to discover that Mario Kart’s Rainbow Road doesn’t mesh well with the Ash Wastes! So I went about trying to find solutions. Tim and Mike, both esteemed hobbyists from another game group, gave some excellent recommendations using thin foam boards. I was able to find some post apocalyptic road files, so I figured I’d give that a shot first. The first batch has completed printing, but I haven’t fully inspected them. If that’s a bust, I will go get some foam board and call that good for now.
GMing and Bandits – Pathfinder 2E RPG
I’m going to keep this section short since I’m not sure it’s in the spirit of this effort. I 3D printed some bandits that were some of the first 3D printing files I purchased from My Mini Factory. I’m going to slap chop these bandits, paint them each a unique color, then provide them to the gaming group.
I’ve also been preparing to run Pathfinder for the first time since like… 2015. Thankfully I’ve had the opportunity to play in 2E, so I feel pretty good about my ability to run the system. Depending on timing, and Jerry’s good graces, I may try to post something here.
Converted/Hive Scum – 5 Parsecs from Home/Necromunda
I continued to work on the cyborg hive scum from last month. I had mentioned that I wasn’t fully pleased with my return to contrast paints. I decided to mix and match for my 3rd scummer.
You can see a majority of the model is done with contrast. I’ve gone in and added silver to most of the metallic regions. I also added a little metallic green to some of the armor. Finally, I painted the skin with a skin tone and then washed it with a layer of 1:1 Guilliman Flesh:Contrast Medium. This has been my go-to for flesh for a while. Then I usually highlight back up to the flesh tone. I didn’t do that here.
I still have two more of these goobers to finish for my next 5PFH adventure. That said, I still need to finish my crew! My hope is to focus on them during the next month so I can play that game with limited interruptions as I see fit.
Pennyworth – Necromunda Rogue Doc
I typically don’t rush to get a Rogue Doc in Necromunda. However, I’ve had two gangers die in two games this time (including my specialist!!). So I decided to pick one up. I’m also running the campaign so that Hangers-On are included in gang selection. So my Rogue Doc needs a model who can take to the battlefield.
Now, I’ve never read Gaunt’s Ghosts, but Jerry turned me on to this Kickstarter for legally distinct models to represent the characters from this series of books. And look! A perfect Rogue Doc! Also, these files are AWESOME. Crisp details, clean and easy to remove supports, very strong recommendation if you’re looking to put together your own legally distinct Gaunt’s Ghost cohort.
I’ve been having a hard time with painting cloth. I decided to use this model as an attempt at painting without any pre-prepared washes. The intention was to just use traditional layering, with the occasional glaze thrown in to smooth things out.
As you can see, the model isn’t done. I spent a majority of my time working on the apron. It’s fine. Some days I look at it and go “Wow! I did that”, other days I’m less impressed. I’ve thought about going over the whole thing with a glaze, but so far haven’t pulled the trigger. I’m much happier with the shirt. The transitions are much smoother.
Since taking these pictures I’ve completed his pants and boot covers. I also started adding some depth to the muscles of the skin. I’ve got a game when I return from vacation, so I’d like him to be mostly done so he pops on the table. Hopefully he won’t be killed immediately…
Well, that’s it for now folks. Since I primed a ton of models I have a ton of options! Hopefully I can stay focused and actually get something finished, but we know that won’t happen. 😀
Kevin C.
This month I was able to complete two projects, in preparation for heading off for a week for family “vacation”, one terrain and one kill team.
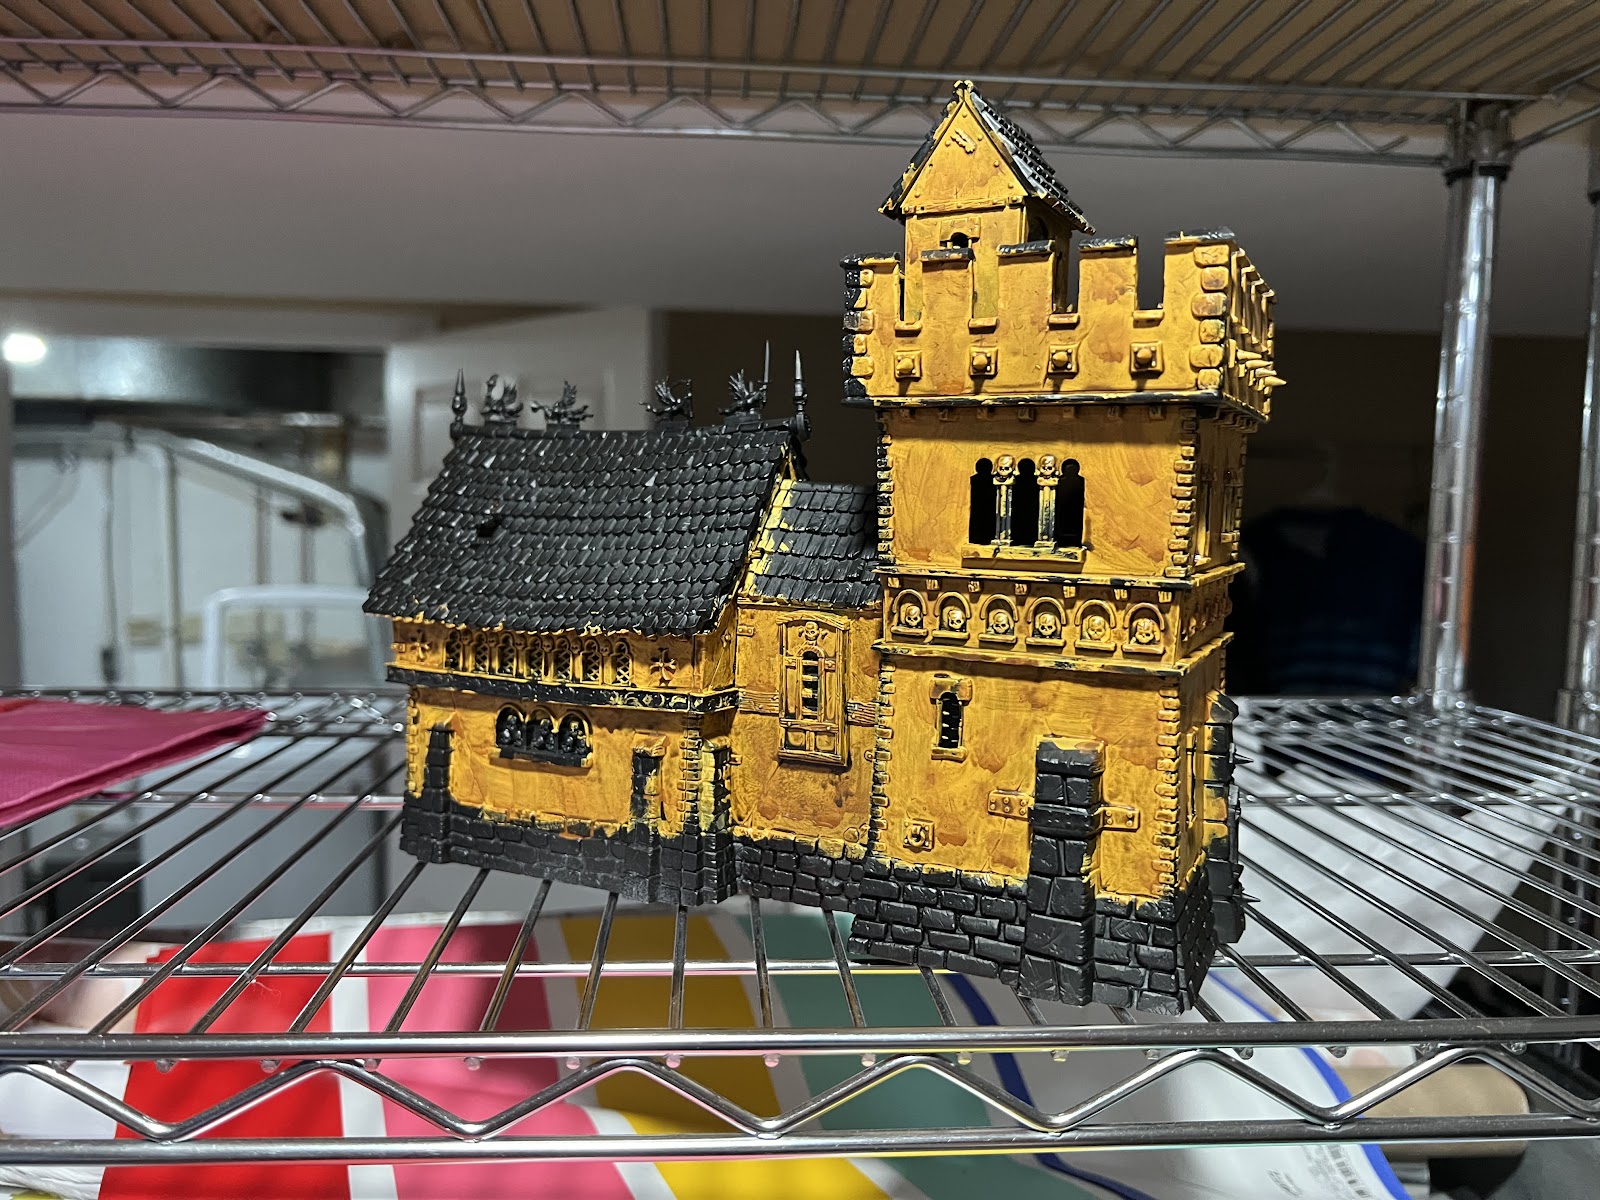
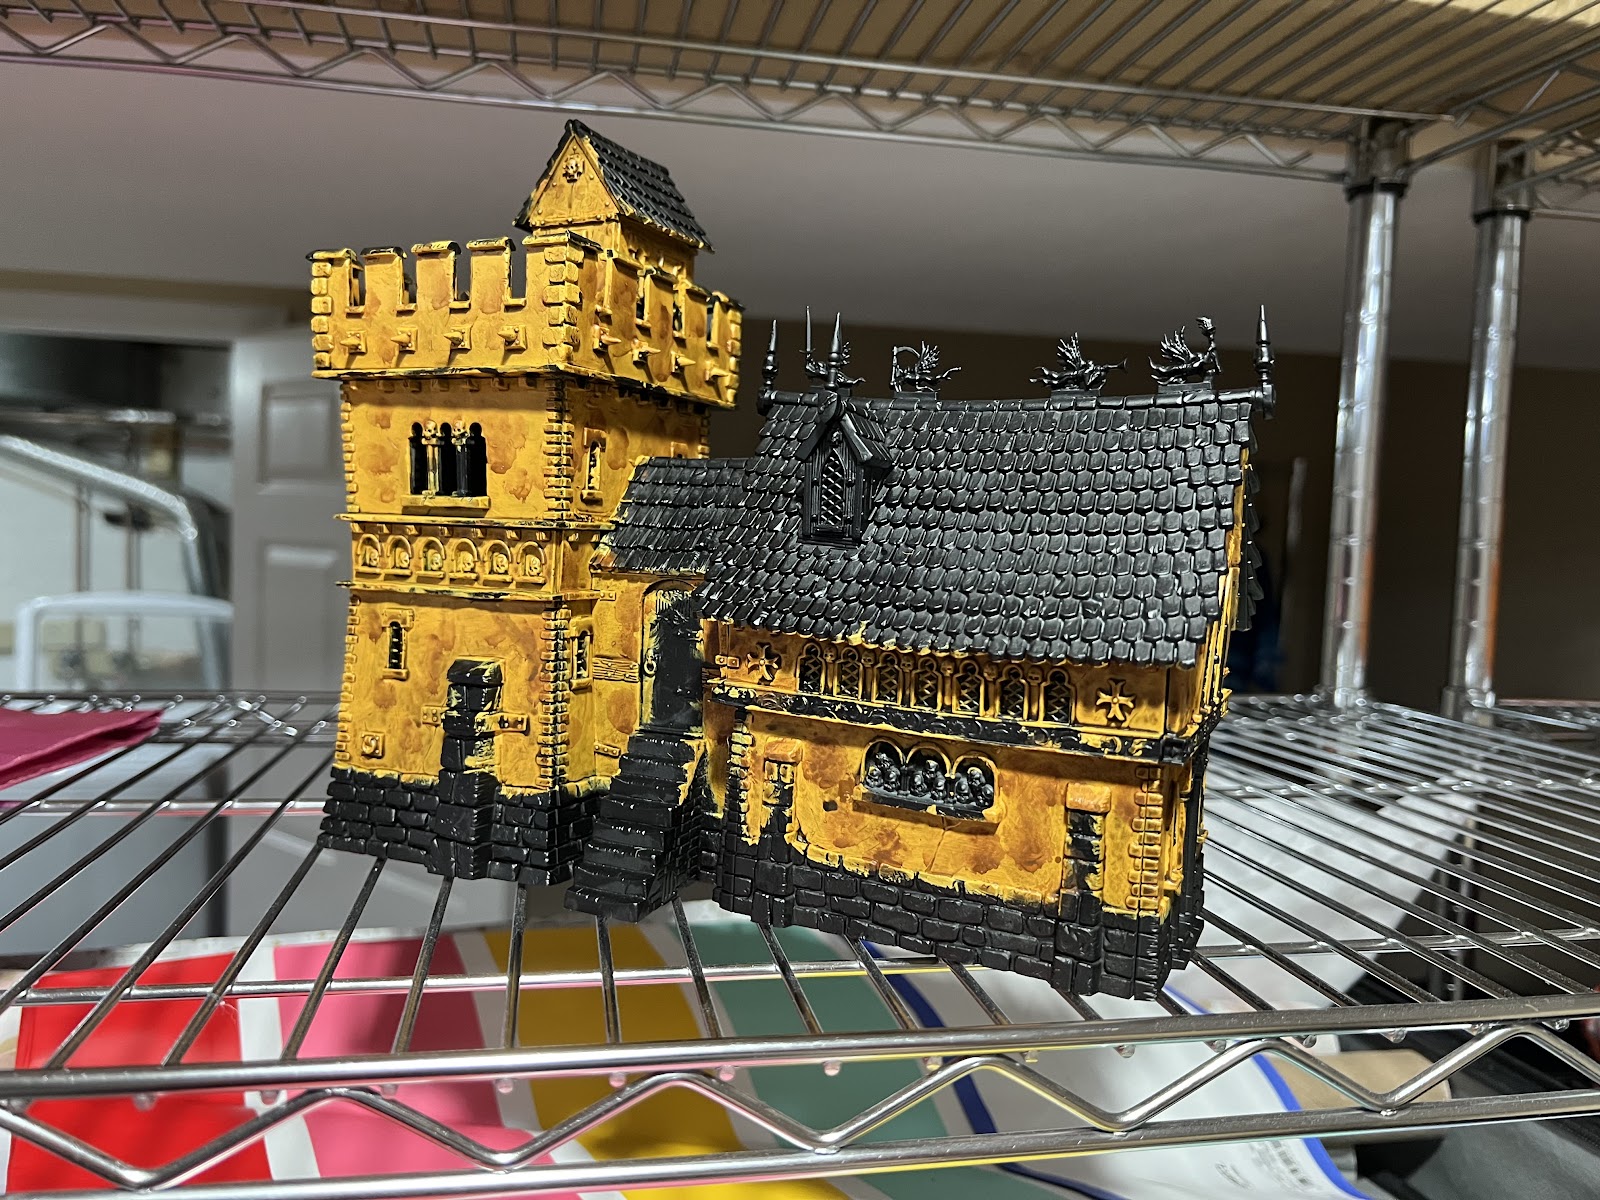
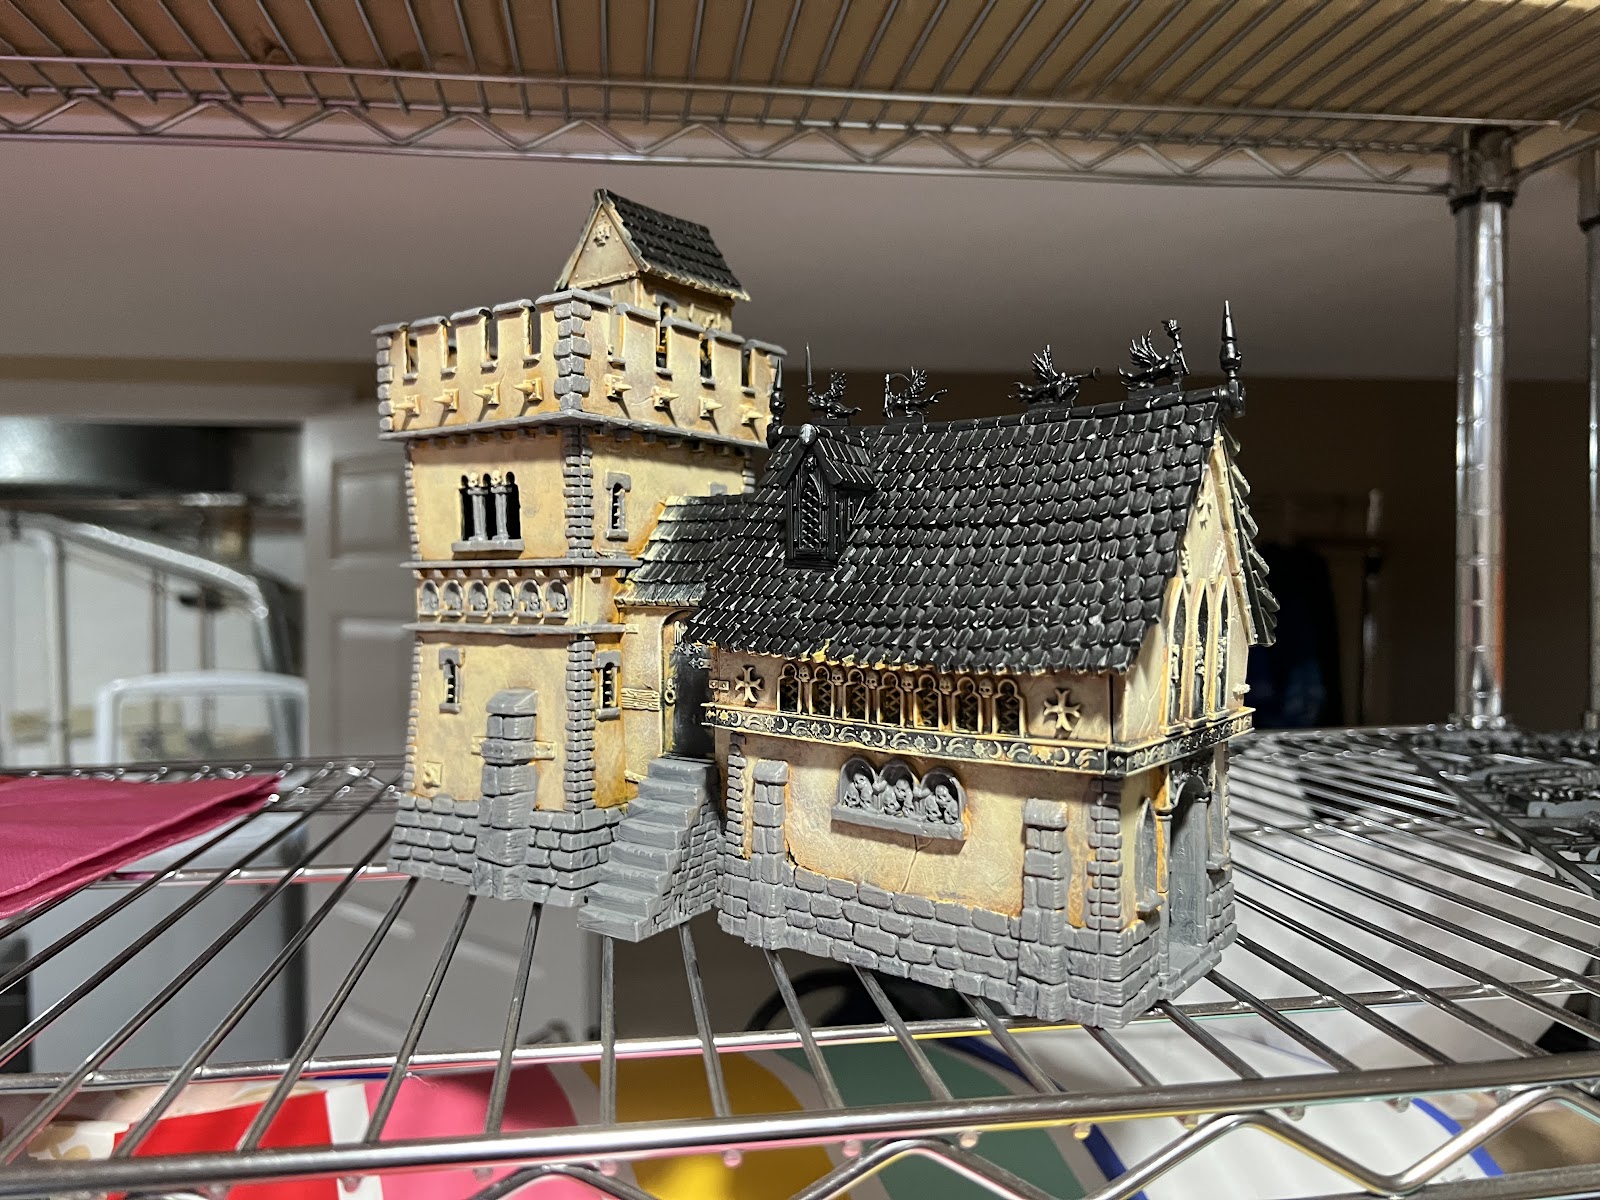
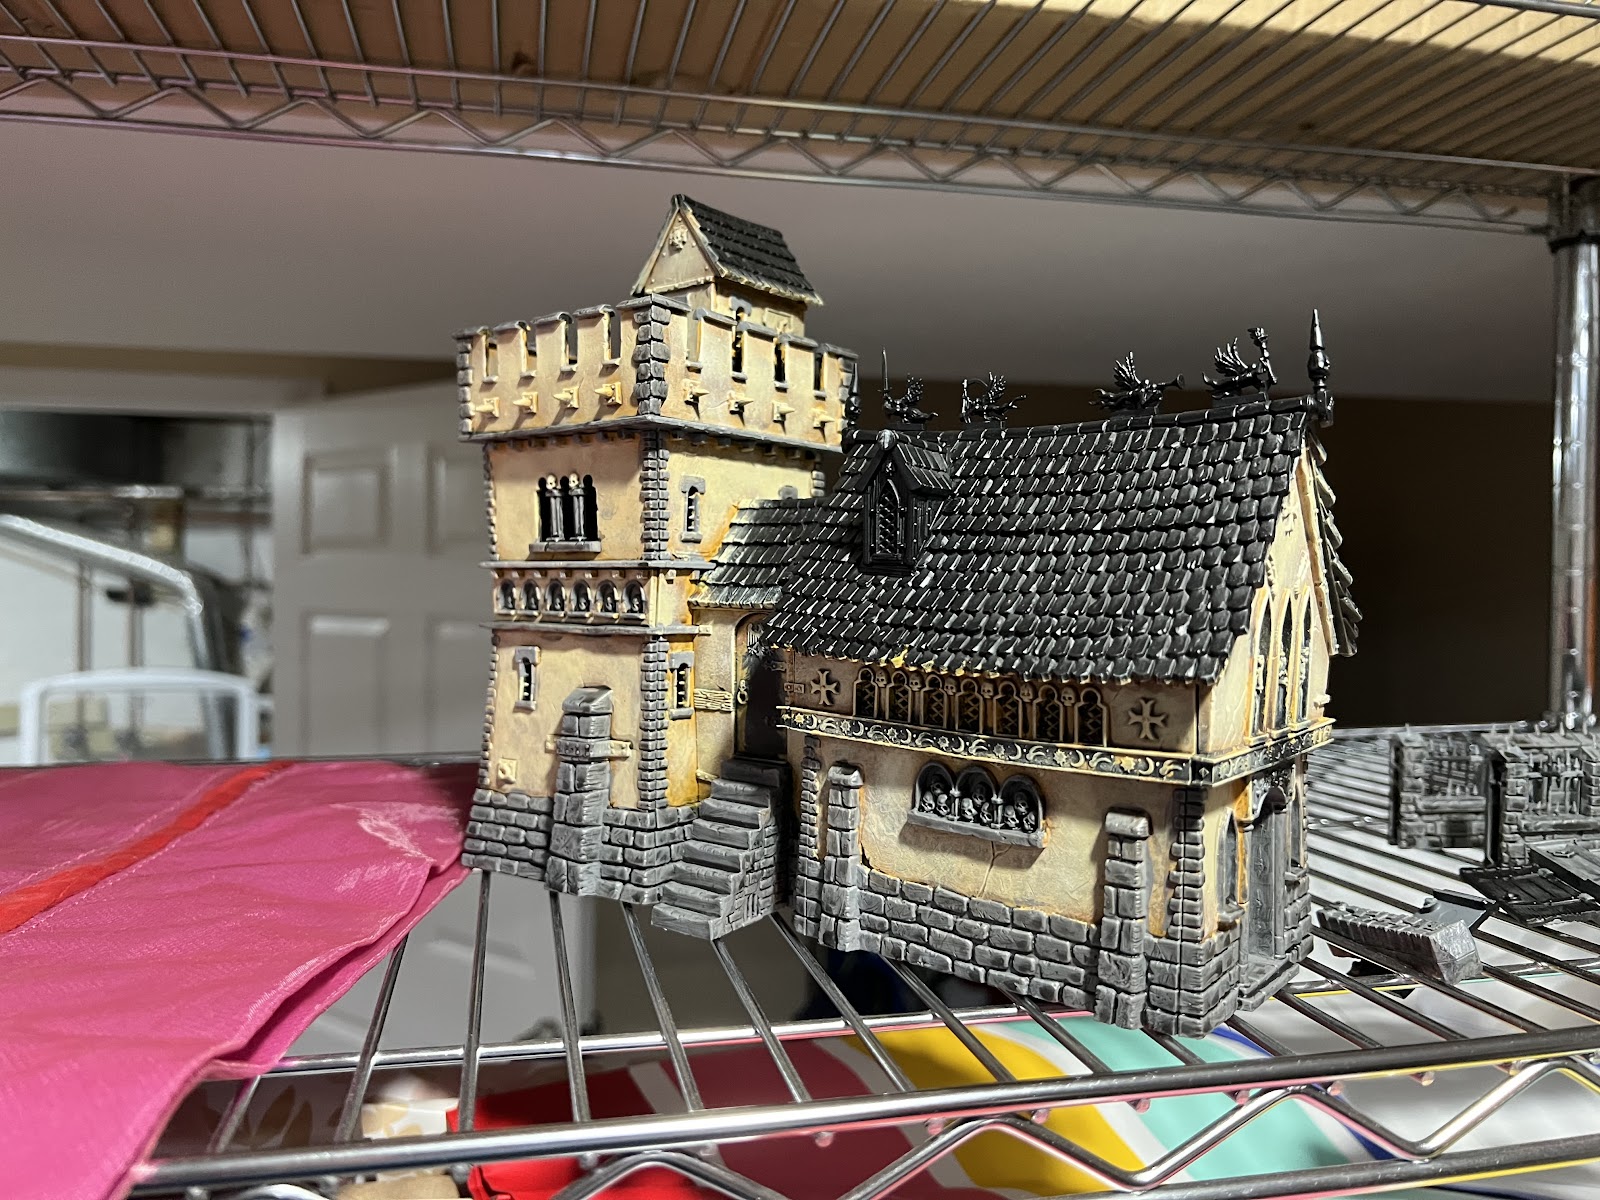
Empire Manor House
I have had this manor house on my list of things to complete for a while now. When Empire was rereleased for The Old World last year, I wanted to grab one of the most iconic pieces of terrain for The Empire. Assembling this piece of terrain was an absolute pain. Not nearly as bad as a certain Duke on Pegasus, but there were a lot of deformed sheets of plastic that did not glue together correctly. I do feel like this piece of terrain is a lot more fragile than it looks, but it is a considerable piece nonetheless.
For painting, I used this excellent guide from a 10-year-old blog, Jester Painting Studio. I don’t know what has happened to Jester in the past ten years, but his guide was indispensable for me in painting my own manor, particularly dealing with the stucco. I have never painted stucco, so I am glad I had this guide to go off of. While the building isn’t my best work, I am pleased with how the walls turned out.
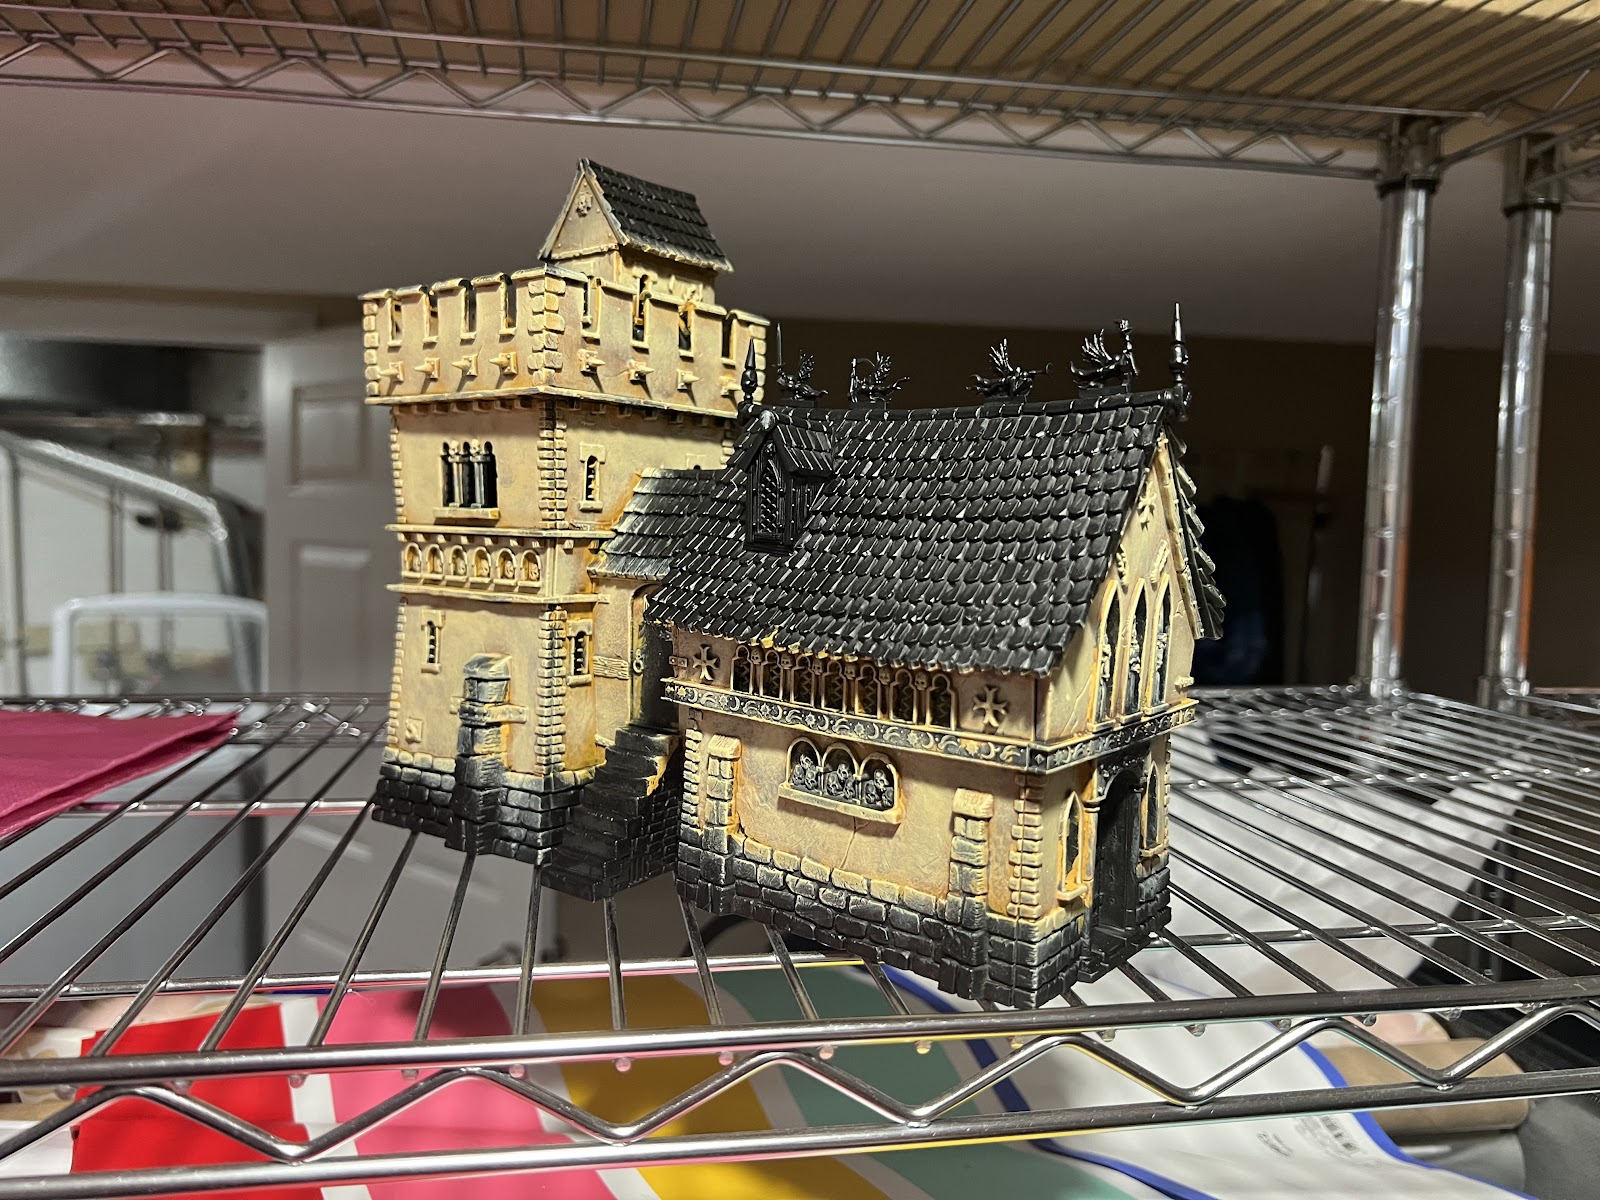
Painting yellow on black is always an iffy proposal. Even with two coats, as shown above, you can see the black through the yellow coats. Since I still had 2-3 more coats to put on, I wasn’t too worried. The next step was to dirty up the undercoat with some random patches of watered down Mournfang Brown. And afterwards, it looked really bad.
Afterwards, I put my Artis Opis drybrushes to use once again to get two nice smooth coats of the stucco. I was concerned that (a) the stucco was not looking like Jester’s pictures, and (b) I was not able to get into any of the many odd crevices. The first issue did not end up being a problem after the second drybrush coat – I think it may be because Jester ended up having more paint on his brush than I did, so my coats looked a lot smoother. The second issue actually ended up adding depth to the overall building, much like a wash, so I was okay to leave it.
Next step was to paint the stones. The guide had recommended doing a base of Dawnstone with a black wash and a drybrush, but I wish I had given a darker base first. I think the stones are a bit lighter than I would’ve liked, even with the wash, but I did get the edges I was looking for.
Finally, I painted the roof and all the metal bits. Unfortunately, much of this was done in offset steps, so I only got pictures of the end result. The roof was a Burnt Siena base with a heavy Agrax Earthshade wash, followed by a gradient drybrush of Burnt Siena to Unbleached Titanium. The wood floors and beams were a base coat of Rhinox Hide, wash of Agrax Earthshade, a heavy drybrush of Mournfang Brown, and a light drybrush of Ushabti Bone.
The brass was the longest part to accomplish, mostly because there are so many random bits that I kept missing (doors, etchings, points, statues, etc.). I started with a base coat of Balthazar Gold, a first wash of Agrax Earthshade, a second pass of Nihilakh Oxide, and finally a drybrush of Sycorax Bronze. It is a recipe that worked well for me with the Genestealer Cultist vehicles, so I employed it here. On the regular metal bits, I just did Iron Hands Steel with a heavy Agrax Earthshade.
While it was a bit touch and go for a while, I am pleased with the end result. I didn’t end up finishing many of the stone walls, as those end up protruding at weird angles. Maybe I’ll end up painting those at some later time, when I can get a game in with my Empire.
More on my Empire Army at a later date.
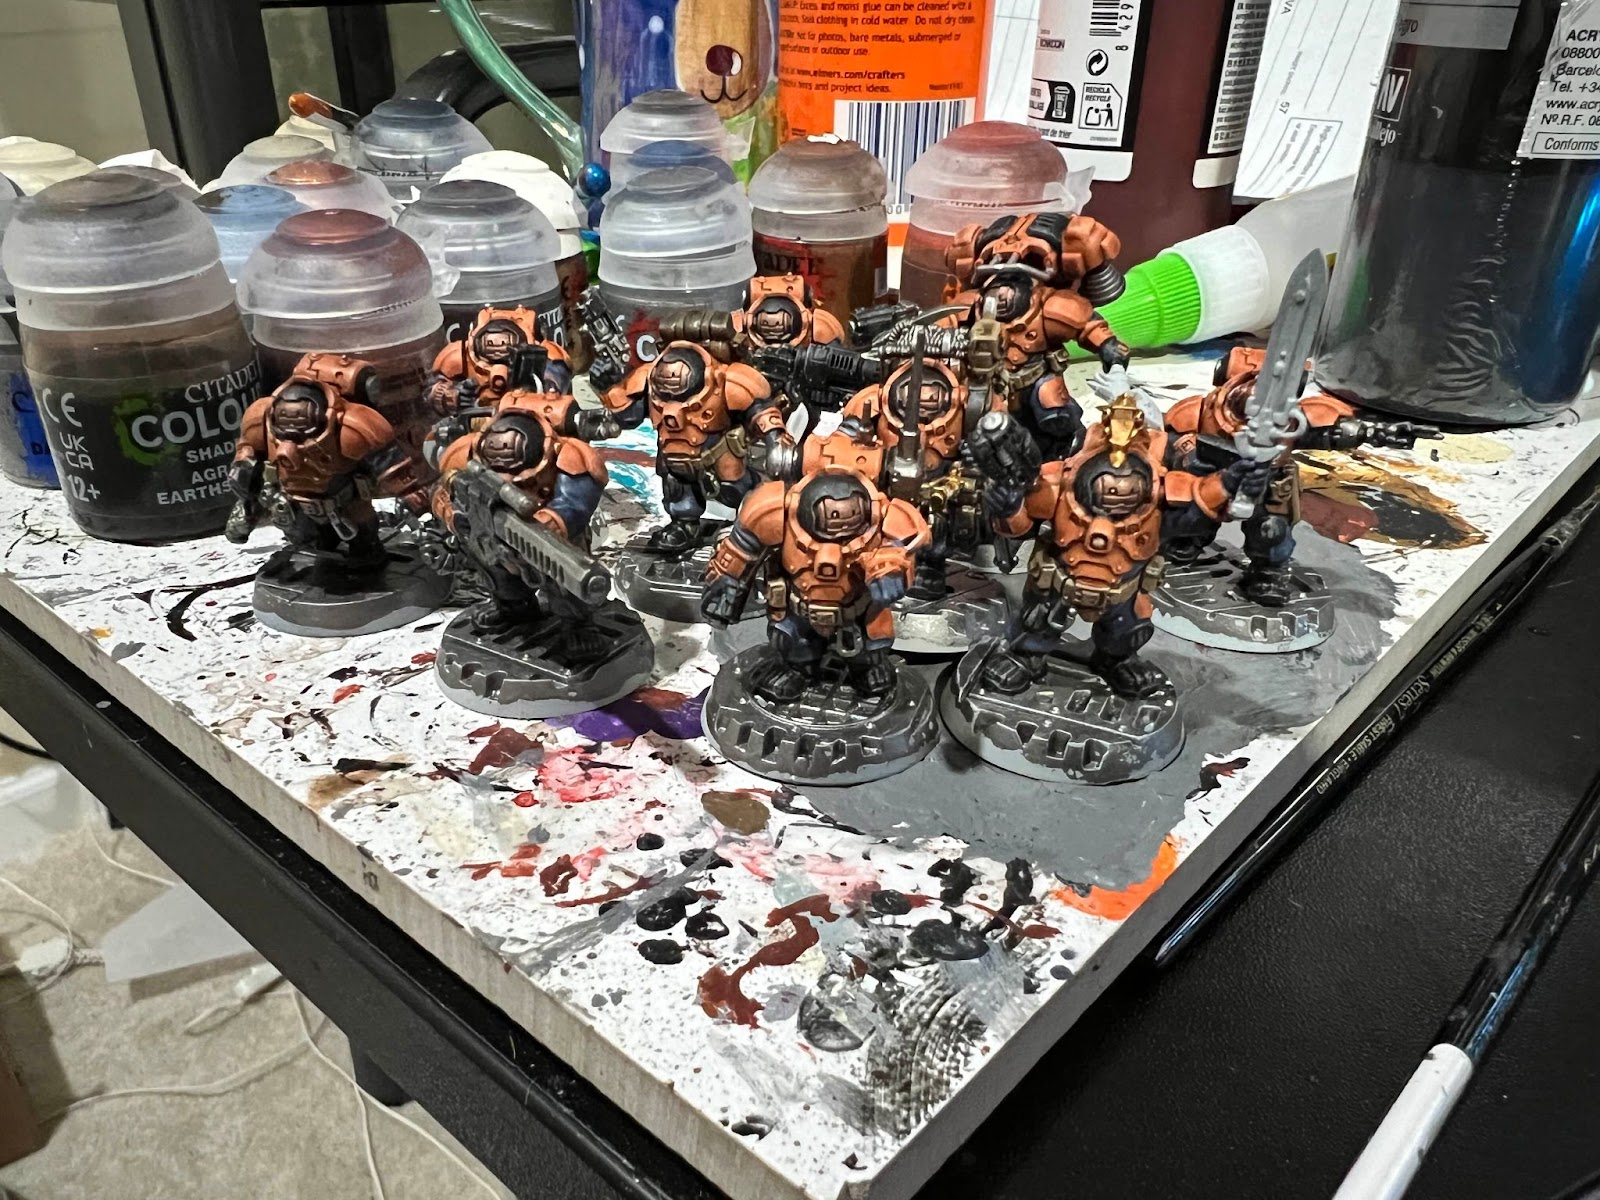
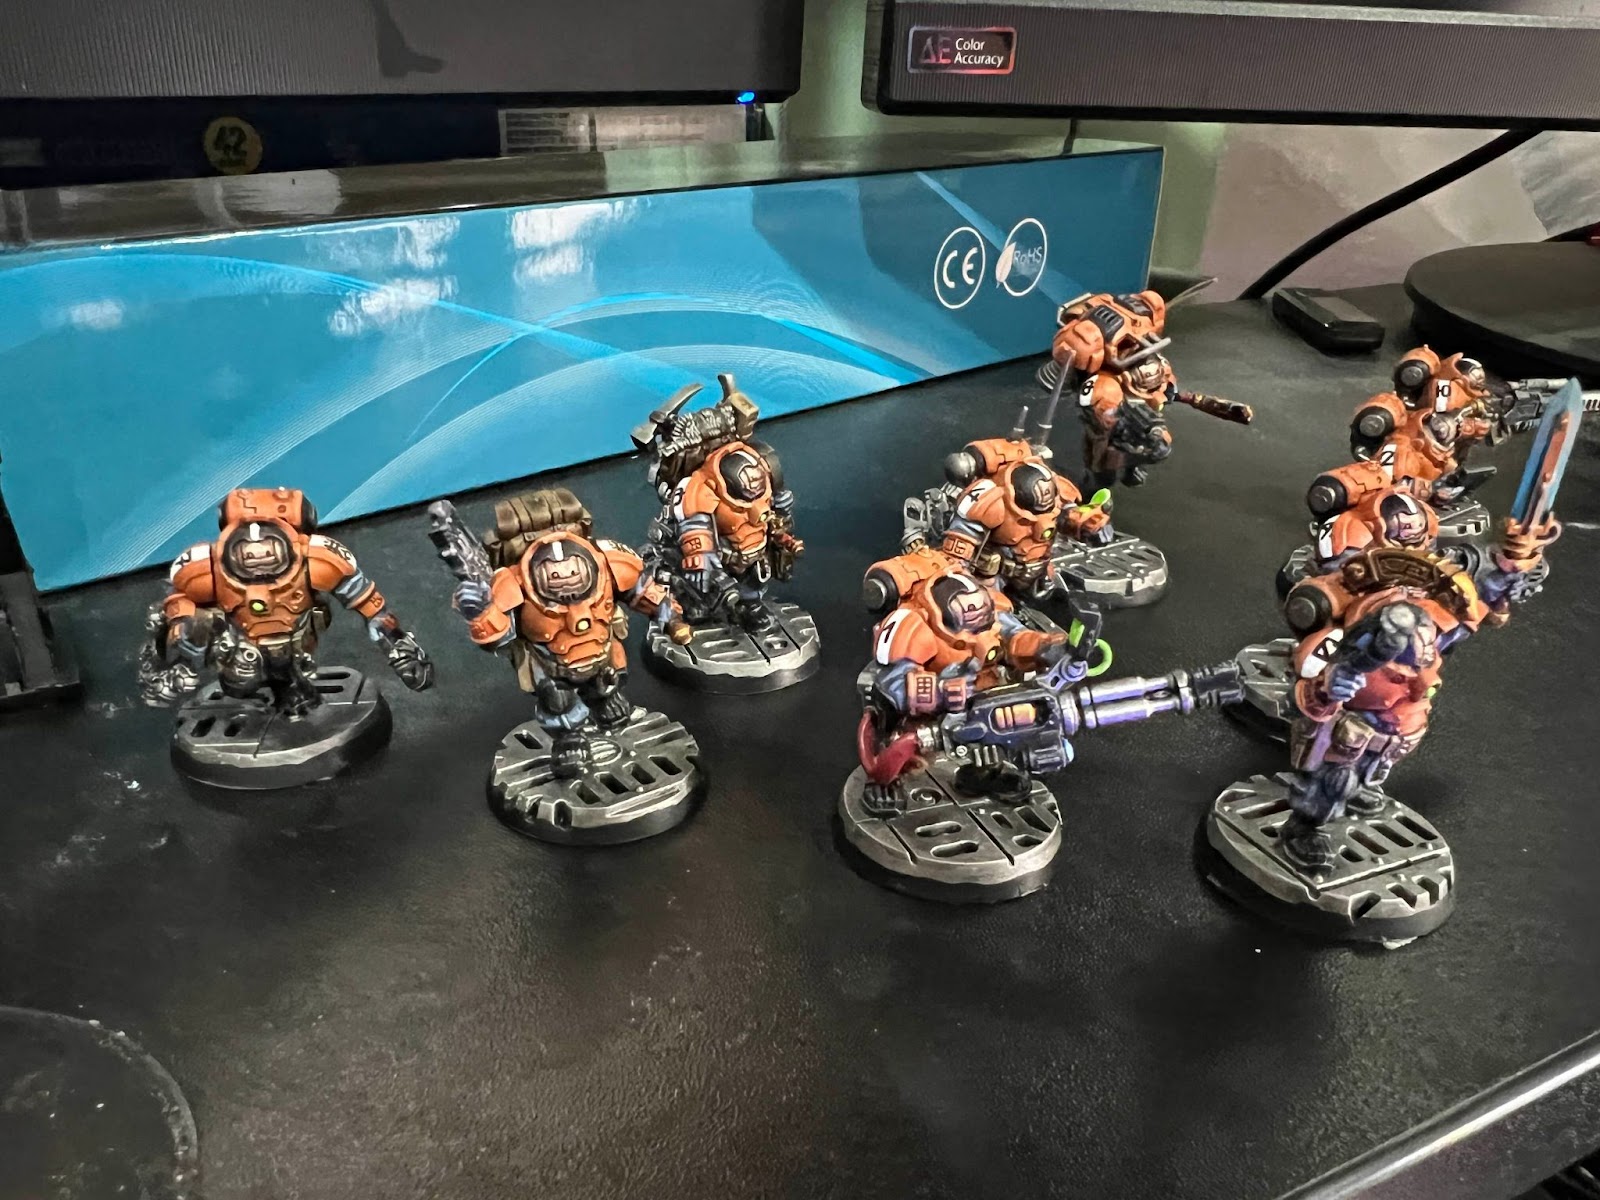
Hearthkyn Kill Team
At the same time as I painted the manor, I tried taking care of the Hearthkyn Kill Team. I was hoping to make the armor a lot brighter of a metallic, almost like a candy metal orange. I didn’t quite achieve that effect, namely because the orange contrast on metal was not nearly as light and “candy” as I was hoping. I ended up revisiting these guys and using a tutorial from YouTube here for Trans-Hyperian League.
I modified the paint scheme, as I preferred a desaturated blue for the cloth, rather than the grey, since the grey feels a bit too drab to me. Also, I have always liked how blue and orange pair together since going to UVA (Go Hoos!). I used the same power weapon recipe that I used with my Deathwatch – Akhelian Green with Kroxigor Scales at the forte, with a highlight of Blue Horror.
I am glad I added the white stripes and the transfers on the shoulders, as it adds some more interest to the miniatures. One element that did not turn out as well as I would have liked is the face plates – since the plates are smooth, there isn’t as much texture for the highlight to catch, and so the highlight looks sloppy.
I will be taking a week long break, and afterwards, I will be working on my largest army – the Empire! It is truly a huge army, that I have finally finished rebasing for Warhammer: The Old World.
Welcome back everyone! I’m happy to report that May became a great month for hobbying. And while I may not have an entire Kill Team painted like some illustrious members of this group (Curse you Kevin!) I did manage to make progress across a variety of different games/projects. I even closed out a project. I know. I’m shocked too.
Cuckoo Clock Figurines
As a reminder, my stepdad recently found a cuckoo clock that belonged to his grandparents. He’s going through the process of restoring it and asked me to repaint the figures that dance at the top of the hour.
The picture above was taken partway through the process. The tube player was mostly done while the drummer had gotten the first two or so layers of paint. I was adamant that this project be done during Memorial Day weekend, so I got to work.
Here is the final result, sealed and everything. Overall, I was extremely happy! I’m not sure how these pieces were painted originally, but taking the time to carefully place their eyes (which had very clear indentations on their faces) and provide some eyebrows really brought them to life. I even decided to play with highlights and shadows, even though most of that isn’t super evident in the finished products. These little fellows are now sitting on the cuckoo clock which is almost completely revitalized. I’ll try to snap a picture the next time I visit my folks.
Smythe, Automaton Gunslinger – Pathfinder RPG
I had been unable to attend my bi-weekly Pathfinder game for nearly a month. We also had some of our key players move away. This left the fate of our gaming group in limbo. We decided to let folks try their hand at GMing a few one-shots. You may recall, dear reader, that I was an avid Pathfinder 1st Edition player during my grad school years. Then I decided to move away from d20 systems almost entirely. Pathfinder 2nd Edition has been a wonderful homecoming. I have more character concepts bouncing in my brain than I’ll ever be able to play. However, for our first one-shot I wanted to try out a Gunslinger and Pathfinder’s answer to a Warforged, the Automaton. This was not an idea born in a vacuum. I’ve always loved Warforged! My only real 5th Edition D&D character was a Warforged detective. I’ve also never gotten around to trying out a Gunslinger (in either edition!), so now seemed like the right time. I also happened to know EXACTLY which model I would be using for this particular endeavor.
Originally, I was going to paint Smythe using a typical silver metallic paint scheme (I’m not cool enough for non-metallic metal yet). However, I’ve had a bunch of Turbo Dork paints sitting around that I’ve never tried. This seemed like a pretty great time to try out one of their color shift paints, Galaxia. I primed the model black, and liberally applied the paint to the spots that would reflect the “body” of the automaton.
Here is Smythe after spending some time blocking in the main colors. The color shift paint is cool, but it’s challenging to make out any details, especially in the face. It was also very challenging to cleanly apply the gold boundaries to break up the body a bit. I ended up applying a few extra layers of the color shift paint, then ultimately decided to do some highlighting in silver.
Here you can see that the additional layers of paint helped deepen the purple some more. The silver has also helped pull out some more details on the face. You can actually see that he has a face! However, let’s take a quick break to talk about Turbo Dork.
I’m a sucker for a cool painting gimmick, especially one that takes its cues from the way that light is diffracted and reflected by microscopic particles (aka iridescence). Turbo Dork absolutely understands these concepts and uses them to make an unrivaled product. They also make a whole spectrum of traditional metallic paints. Needless to say, I’m a fan. However, these unique properties of the color shift paint also made it challenging to understand how to adjust my painting style to make them work. After I finished this model, I spent some time researching this problem. In the end, I found THIS provided directly by Turbo Dork. This is a great guide. I would strongly recommend anyone with interest in these paints to read this carefully before deciding to purchase anything other than their traditional metallic paints. I ultimately didn’t love how Galaxia worked for this model, but I tried. I am willing to try again too, armed with this additional knowledge. Okay, side-bar over.
Here is the end result. I ended up using some Vallejo chrome to further lighten his face (thanks Kevin!). I also applied some quick leather weathering by applying a few lighter streaks across the surfaces. I also spent a significant time trying to figure out how to highlight his cloak. This is a definite area for improvement. The first pass was WAAAAY too bright. I applied a mid-tone glaze to bring it back down. I still wasn’t happy, so I decided to apply a 50% diluted covering of Apothecary White. Ultimately, it ended up looking good enough so I called it. I used a pre-made basing mix (Fields of New Zealand), added a tuft and called it good. I still need to seal Smythe (which might cause some problems) but I have some ‘Ardcoat ready to gloss up the important areas, like that gem!
Zinzinnati Bearclaws – Blood Bowl Chaos Dwarf Team
I had intended to start working on a Gnome team in preparation for the 4 Diamonds tournament, but ended up having significant issues trying to prime them black through my air brush. This problem has since been solved by a friend’s recommendation to try Stynylrez primers. Great recommendation, I won’t be going back to Vallejo. However, this left me in dire need of a team, particularly one I hadn’t played enough games with to reach the “3 game minimum” for record keeping. So, I decided to bring out my recently painted Chaos Dwarves, give them a little TLC, and try out the newly adjusted roster. However, first I needed to adjust my team to match said roster…
You may recall that I had 3D printed by team by combining two different Artisan Guild sets, the Dumlok Flameseekers and the Blackrazor Hobgoblins. I am apparently the only person who thinks big Chaos Dwarf hats are dumb. Anyway, the new roster added a couple of stabby hobgoblins and some dwarves capable of breathing fire. I needed to reflect these changes on my models. So I chopped off a few hands, printed out some swords and spell effects, and called it good. You can see the results above. I didn’t feel like the flame effect was particularly noticeable, so I also decided to select my two unhelmeted Chaos Dwarves, each with massive mohawks, to make identification a little easier.
I also decided, if I was going to play these at a tournament, I could spend a little time improving the slap dash paint job I had “finished” in August 2024. This included spending more time on the base to really bring out that lava effect and touching up several of the base rims.
You can see the lava effect nicely, both on the fireball and the river of lava. I was very pleased with both. To further improve the original paint job, I also spent some time applying silver highlights to the dark metallic (Turbo Dork Purl Grey this time), added some additional shadows and highlights to the hair and beard (not pictured here) and added some orange highlights to the red pieces of armor. Overall, it was a noticeable improvement. I was able to get through about 3 models before the tournament. I’m tempted to try and close this project out too, but Necromunda is calling me…
Converted/Hive Scum – 5 Parsecs from Home/Necromunda
One day I will write some articles about my experience with 5 Parsecs from Home (5PFH) which is predominately a solo campaign set in a sci-fi universe (don’t worry! Your friends can come over and try to kill you!). My next mission required me to fight against some Converted scouts. Converted are basically diet Borg. I happened to have The Guttercogs from my extensive support of Print Minis and thought they looked perfect. Plus… BONUS, they’d also work as Hive Scum for Necromunda. I printed out 5 modular minis with common Necromunda loadouts, assembled them, and gave them a quick zenithal prime. I made the decision to focus on speed over quality, so these cyborgs were effectively getting the ol’ slapchop treatment. So far I’ve managed to knock out two of the 5 models in about… 1.5 hours? Prioritizing speed over quality is definitely evident in the final product. That said, they’ll look WAAAAY better than grey plastic (or black resin) when my tramp freighter crew tries to obliterate them.
I might go back to add some metallics to the models (I’m looking at you Turbo Dork!), but overall for the time invested, I’m pleased with the result. Once I get the other 3 finished, I’ll post a group photo with bases and everything. Time for another side-bar.
It’s hard for me to accept “lower quality” in exchange for speed. I know that I can do a better job with traditional acrylics than with speed paints. That said, there is something to be said about getting “supporting characters” done and out of the queue. These dudes (?) will never be the stars of the show. They’re always going to be fodder, so why spend the effort to make them look beautiful? Eh… I still haven’t convinced myself. We’ll see what happens in the future…
But that’s all for now folks! I’m expecting June to be another great hobby month. It might be just as eclectic too!
Michael S.
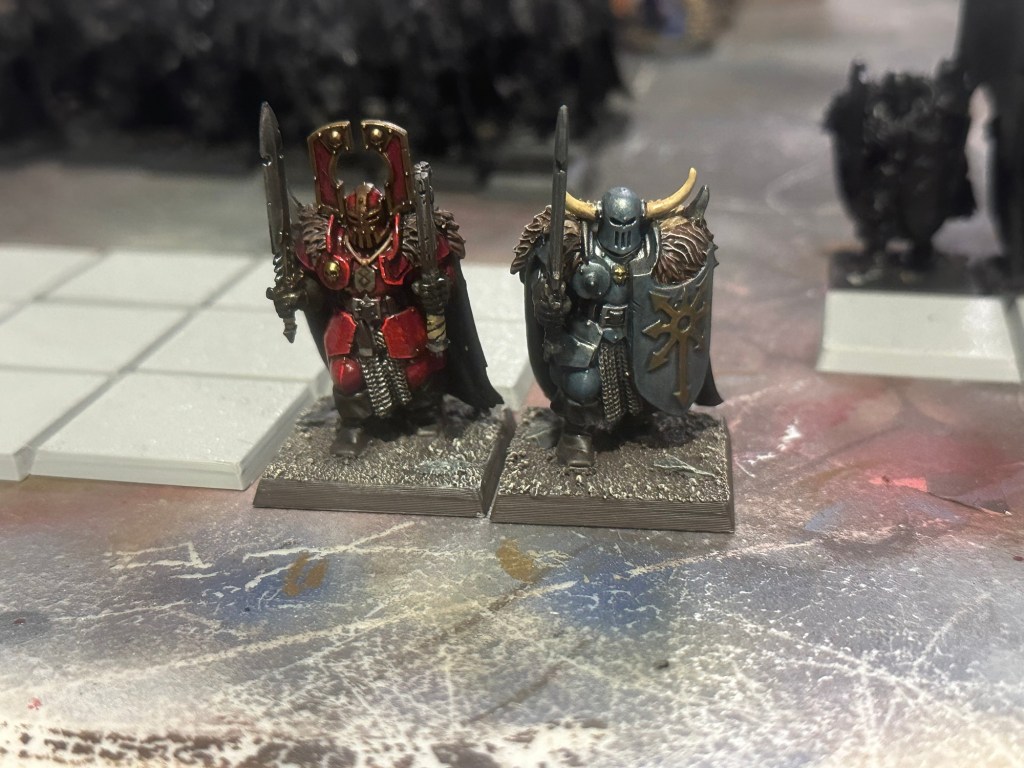
This month I took a little bit of time to paint up some Chaos Warriors from Age of Sigmar. It’s been some time since I have played AoS, but I have always loved the models from the Chaos range even before their refresh.
I wanted the warriors to look heavily battle-worn. I can hardly imagine that the rampaging chaos hordes have much downtime to polish their armor, so I gave all of them several passes with various weathering techniques. This finished the bulk of the armor, but I’d still like to do something different for the shields to break up the somewhat plain armor.
The cloaks I decided to paint with a dark burgundy. It’s a slight departure from the tried-and-true red capes, but I like the way they turned out! These 5 warriors are still far from complete but are starting to come together. One thing that led to these taking so long is the transparency of the base paint I used, Evil Red from VGC. While the color was nice and dark, it took upwards of 3 coats to get a solid color. The other five (not pictured) are in a similar state, just without cloak highlights.
The Chaos Warrior Lord is one of my favorite models. The old sculpt was just fantastic and really sells how intimidating Chaos Warriors should feel. While I love the new sculpts, the old ones just had a certain feel to them that is hard not to miss!
Thats all for this month. A relatively paltry list of projects but I am making steady progress!
Kevin C.
This month was much less productive than last month, and even less productive than I would have liked. Oh well…
Primaris Kill Team
I had never actually painted any of these new-fangled Primaris marines, but I was able to get a set from Target, of all places. The Space Marine Heroes set is guaranteed to have seven individual marines, each with Kil Team (2019) rules, and one random extra, for some unknown reason. On the box they are painted as Ultramarines – because of course they are – but I wanted to paint them as one of my favorite chapters… the Blood Ravens!
For those of you of a certain age, you will remember the classic RTS, Dawn of War, with the trailer being quite possibly the best cinematic in the 40K universe (possible exception being Astartes). The game came out when I was in college, and it more than anything else brought me back into the Warhammer hobby. However, I had never painted a squad of these thieving bastards glorious heroes of the Imperium, so I figured I would change that.
For much of the armor, I used Duncan Rhodes’ fantastic tutorial on painting a Blood Ravens terminator, but I made some slight modifications. As an example, I did not like the pink wax seals he uses for the purity seals as it is too close in color to the red armor, so I used a Warboss Green, with Agrax Earthshade wash and a Moot Green highlight.
Similarly, I did not have any Blood Raven transfers, so I had to find a way to freehand it. I found a great tutorial online, also done by Duncan Rhodes, for easy freehanding, but I wasn’t able to find it on YouTube, which was weird. Even still, while the style is not exact, I found that it worked quite well for the shoulder pads.
I will say that I really like Corvus Black as a color, which I was reluctant to use. It is not strictly a black but a very dark grey, but it gives a warmth and depth to black elements that I believe I will use it from now on as opposed to Abaddon Black or, for my sins, black primer.
One technique I tried and did not succeed at was in painting urban camo on the sniper clock, using the technique in a different video. Duncan paints it on a Kasrkin, which works because that has segments of armor. I was dealing with a cloak, a very bland, flat surface, at I could not get the pattern right. I ended up painting completely over the cloak and just using a straight blue-grey (The Fang).
Anyway, I had also hoped to have my Votann Kill Team done, but they will have to wait until June to be complete. I have a busy month ahead, but I am still hopeful I can keep up the painting queue.
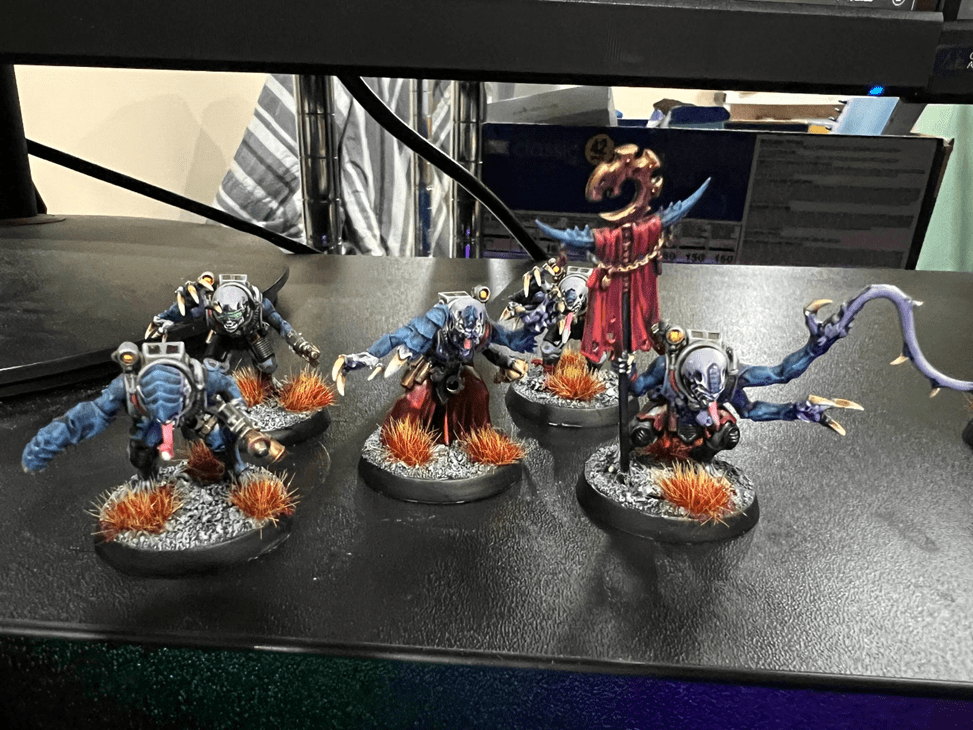
The last time I went to Adepticon, all the way back in 2011, I was frantically painting up Space Wolf & Vostroyan armies for the Team Tournament. One of my teammates showed me his display case, which had a considerably sized Deathwatch army, all the marines from different chapters. That, in conjunction with the recent release of the Deathwatch RPG by Fantasy Flight (now sadly OOP), inspired me to get some Deathwatch upgrade kits, the old pewter ones, and make a Deathwatch army of my own.
I bought some basic tactical marine kits, and requested Friend of the Blog Chewie to build some squads up for me. Later, I would add some assault marines and terminators to this ensemble, as well as bikes, rhinos, and the new Corvus Blackstar kit. I had no intention to play this army competitively, but I wanted to represent many unique chapter bits throughout the army. This army, in its totality, was completely built in 2016, just after the new Primaris miniatures were released. I was rather annoyed with this, thus making my marines rather outdated, but I did eventually commit to painting my marines. I also made a commitment to have each marine come from a different chapter, and to represent many of the more obscure chapters.
In 2021, when the second edition of Kill Team came out, I painted my tactical marines to bring to various Kill Team events. I enjoyed how they played and the straightforward and flexible nature of their strategy. I know they can no longer be used in the current version of the game, but I wanted to make sure that the full army could finally see the light of day. Or at least, the light of my display case.
Two recent purchases made this project possible. First was my new display case, which I’ve shown earlier, which allows me to actually display the full army, rather than have them packed away in some random box for no one to see. The second was a gift I received for Christmas from my wonderful wife – a set of Artis Opus drybrushes. These did wonders for getting the right color on the black power armor and tanks, especially when using the Artis Opus tutorials, which I highly recommend.
Deathwatch Vehicles
I wanted to take a first crack at the vehicles, to get some drybrushing experience before starting on my infantry. Chewie assembled my Rhinos with a detachable top door that can be replaced with twin-linked lascannons to make each a Razorback. A few years back, I purchased some MSP Paints for painting a cool black, so that’s what I used for the rest of the army.
I was able to get a good base coat on the Rhinos fairly easily, but I started to get ambitious with freehanding some design stripes. I wanted to try freehanding an Inquisition symbol on the top hatch, as well as adding in the stripes along the front. While the striped in the front seemed to work well, I’m not entirely pleased with the Inquisitorial symbols. Even still, they give much needed color to the black vehicles.
I also included some script decals along the hulls that I purchased several years ago from Mighty Brush Decals (https://www.themightybrush.com/product/imperial-gothic-script-waterslide-transfers-decals/). I had intended to use these on some Imperial Knights, but I gave up on that project several years ago. I am glad I was able to use these decals on something else I worked on, and I think they worked well.
Secondly, I worked on the Corvus Blackstars. I admit, they were a lot larger than I was expecting, and they proved more difficult to basecost with drybrushing. I ended up getting some unpleasant streaks due to getting impatient and having too chalky of paint on my brush. Contrary to the name, “drybrushing” requires moisture in the paint, just like any other painting.
Next, there was a lot of gold and silver across the miniature, and much less red. I decided against a red stripe on each wing, as I feel like it would crowd out too much of the existing design. I do like these miniatures, but I’m not entirely sure I gave them the love they deserved. They are still quite flashy though, so I’m pleased with how they turned out.
Deathwatch Terminators
Before working on the Terminators, I put a new base coat on the infantry. I was pleased with my improvement in the drybrushing, but after reaching this point, I did feel like this was a bit too light for black armor. After reaching this point, I darkened the color with an overall black wash.
As I mentioned before, I wanted each of the marines to come from different chapters. I already had an Imperial Fists tactical marine, and one of these terminators would be a Salamander, but there were many Imperial Fist descendent chapters to choose from. They were a bit more obscure, but some old hands may recognize some of the chapters from their badges. None of them are DIY, promise.
Deathwatch Assault Marines
Unlike the terminators, the assault marines were designed and built with specific chapters in mind. There happen to be a lot of well-known melee-focused chapters, so it was not difficult to have five from well known chapters among the lore. It gave me some much-needed practice in freehanding chapter symbols.
I’m actually quite pleased with the technique I used for the power blades/axes/claws. Simply a base coat of Grey Seer, overall contrast of Aethermatic Blue, second contrast of Kroxigor Scales near the forte of the blade, and finally a highlight of Blue Horror. Probably something I will use in future projects.
Deathwatch Bikers
Unlike Assault Marines and Terminators, I have never painted biker marines before, so this was a new experience for me. Fortunately, unlike the other two squads, these did not have many extra bits, so I could work on these in batches easily enough. I obviously had to have one of these bikers a White Scars – which happened to be the one with the chain-talwar – but the others I needed to find good chapters they could come from.
Most of these are from White Scar chapter descendants, but I did include two Raven Guard Successors, a different kind of swift strike capability.
Deathwatch Heroes
Finally, I was able to tackle the Deathwatch Heroes – Chaplain, Librarian, and Captain. There was a lot of detail in each one of these miniatures, so they took longer than I was anticipating, but I am glad I was able to complete them before the end of the month.
And, with the heroes completed, the entire army has been completed. After nine years of staring down at me from their perch on my unfinished shelf – yes, I have an unfinished shelf – they have now taken their place of honor in my display case.
Until next month!
Austin B.
The Forces Grow
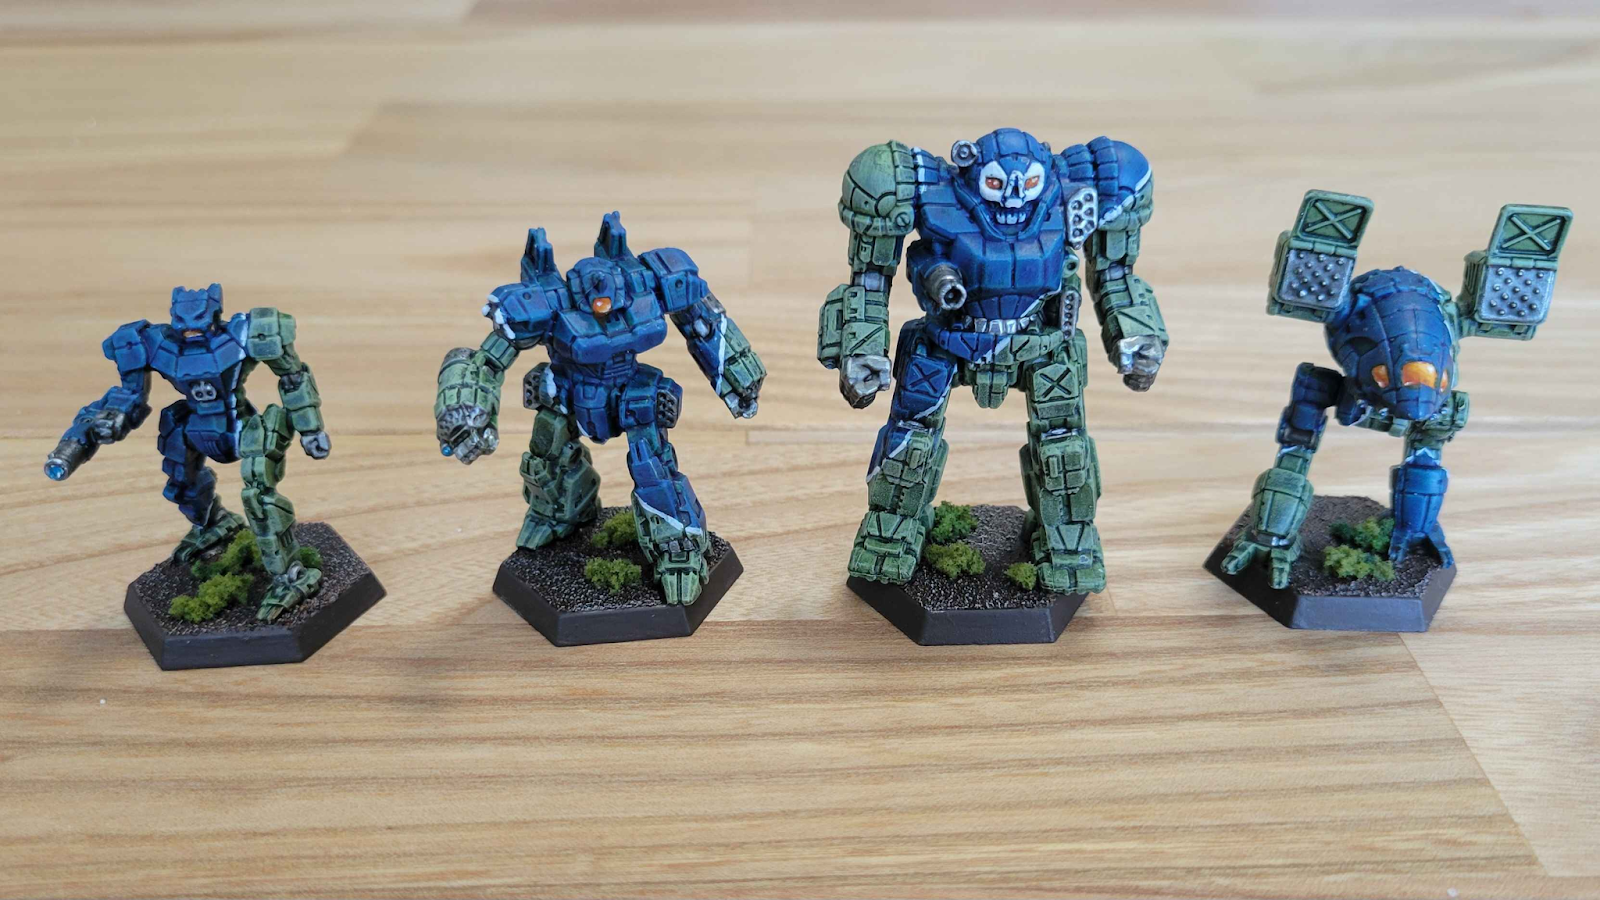
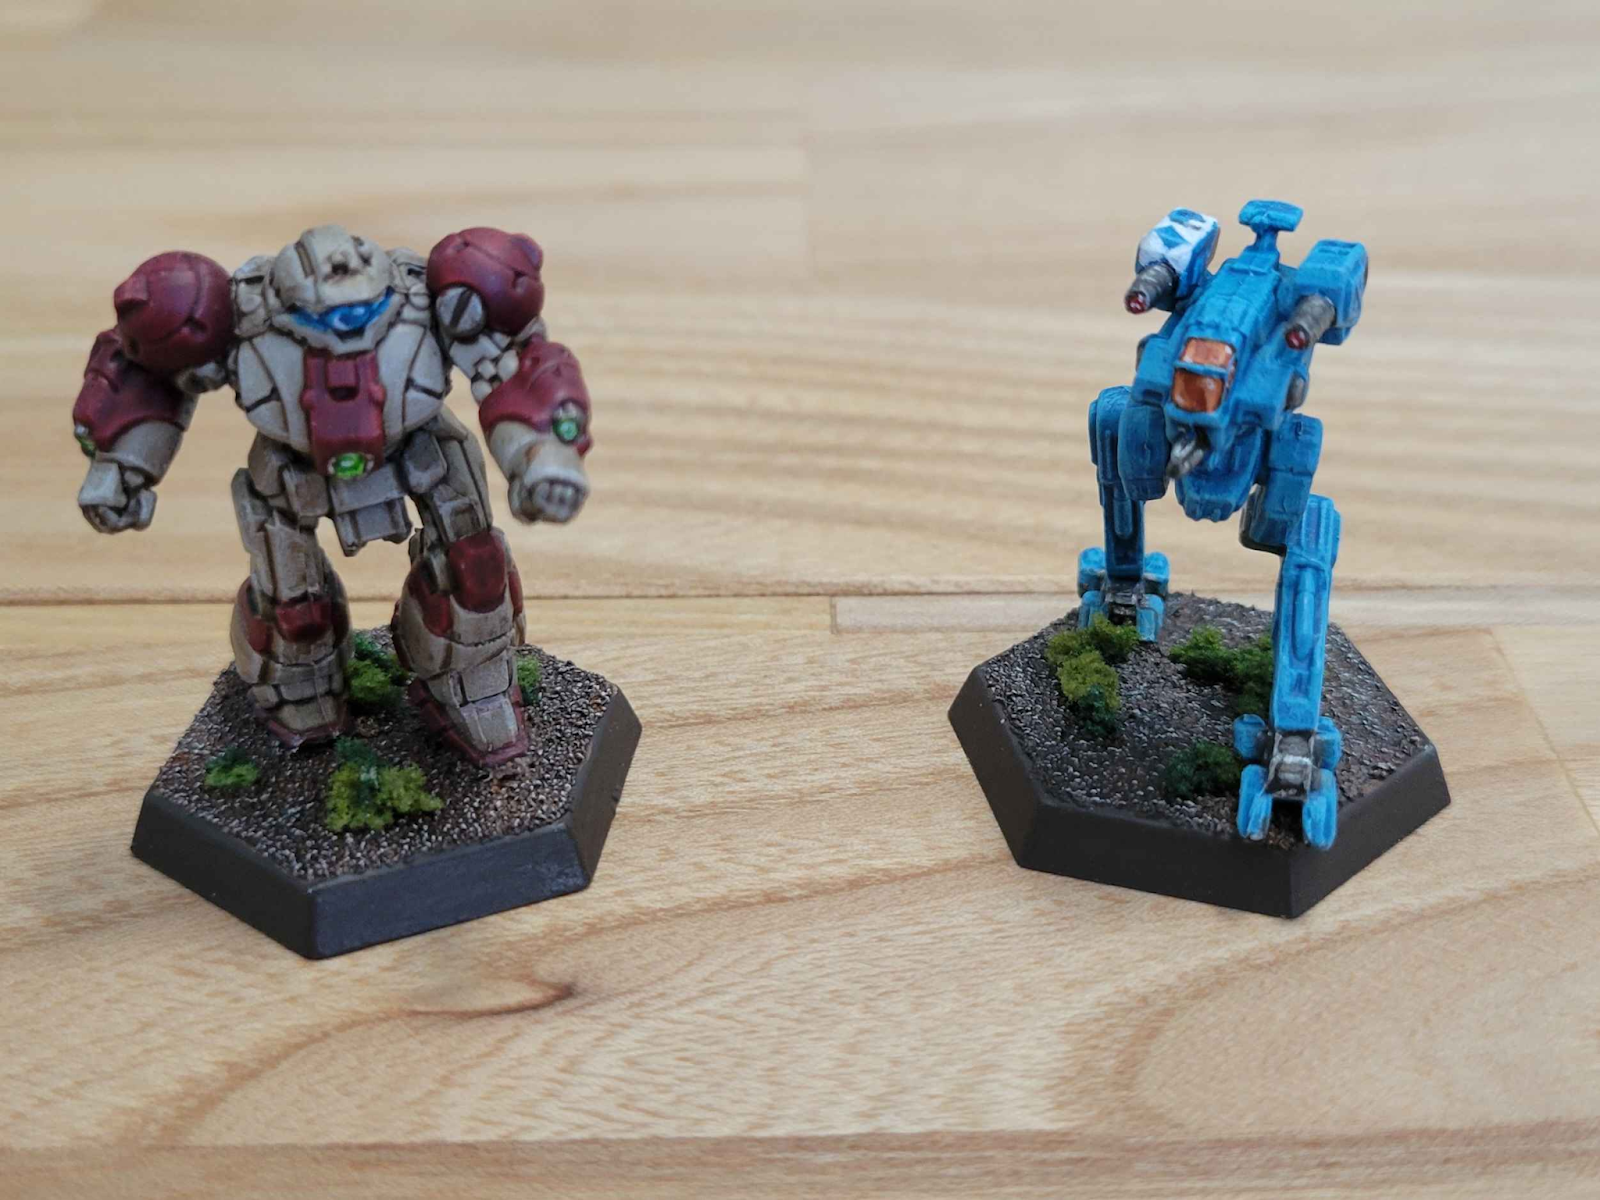
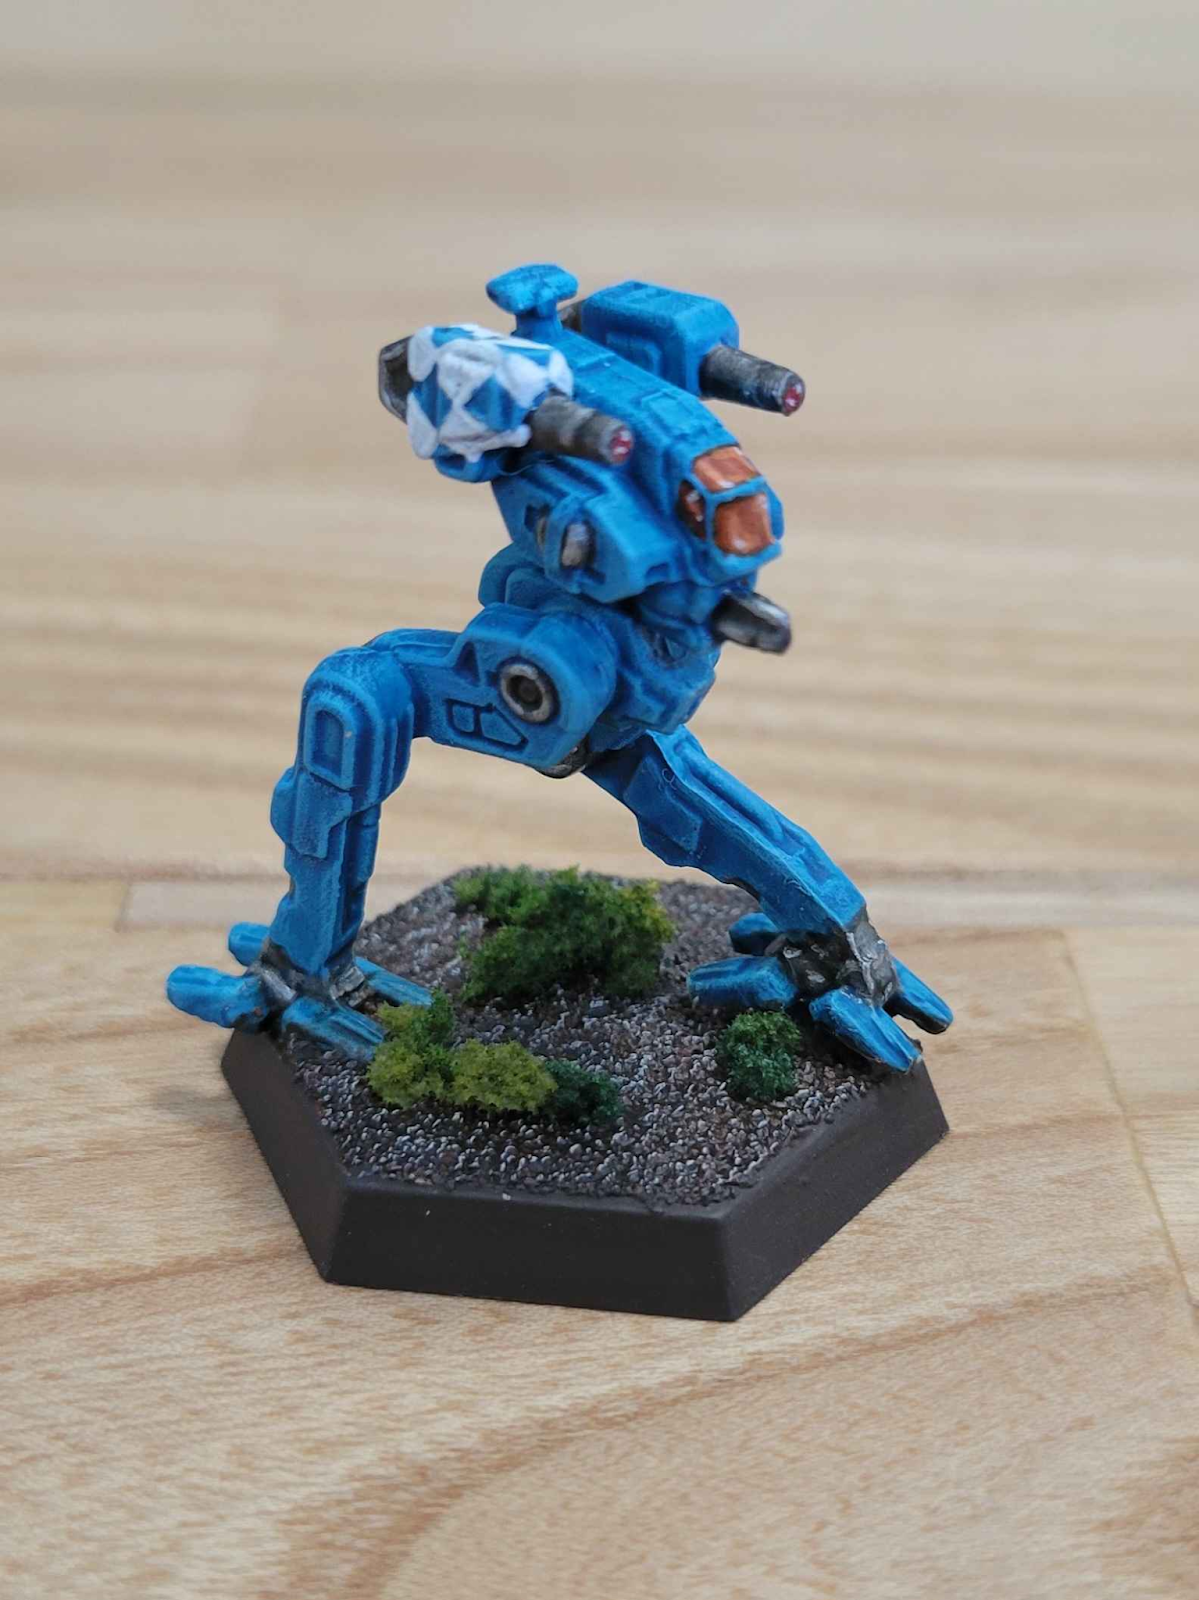
My work on Battletech projects continues! The NAIS Training Cadre I previewed last time have gotten a slight rework of their scheme, and some considerable additions! More than the 12 I had initially envisioned, and with more to come eventually as further Battletech releases creep out into the open markets.
We’re now up to 16 mechs, not including the now-stripped Valkyrie I had done up as the test model. I have plenty more to do for this force, and I quite enjoy the scheme. It is a bit time-consuming though, which is why I haven’t gotten more than these 16 done. Well, that, and I pivoted to another, much easier to paint force: the St. Ives Compact!
Much easier to paint indeed, as it took me very little time to fly through painting 27 mechs! Just over two Companies worth! It’s a fun, simple, and effective scheme, and I have many more sitting on the painting desk waiting to be finished. These are shaping up to be my largest force yet. And with them being intended for some of the more popular eras for Battletech gaming, they’re already shaping up to be my most played force as well. So I have considerable incentive to keep up on this force most of all. That all said, with recent releases, and some recent purchases, I do have some additional things to paint now for my Outworlds Alliance and Clan Snow Raven, so I may be pivoting back to them in this coming month. That, and with new Shatterpoint releases out now, I have some more Rebels to paint. So expect a bit more than just several dozen more mechs for the Compact next month!
Joe R
Those of you with a keen eye (or just eyes really…) may have noticed a distinct lack of updates from me last month. March and April were chock full of travel, both work and pleasure. Additionally, y’all, Red Dead Redemption 2 is really good. REALLY good. It’s like I’m 7 years late to the party or something! Needless to say, hobbying has ended up in the backseat despite the start of the year showing so much promise. That said, I do have a few goodies to share.
The Venison Beach Grindylow – Blood Bowl Goblin Team
The Grindylow are still coming along, but have slowed significantly. I was hoping to have the 9 players from my 7s team painted, varnished, and based. So far, I’ve managed to finish the Looney (aka chainsaw) and put a preliminary basecoat on another Gobbo.
I had some bigger plans to turn this model into a Harley Quinn style character, but ended up deciding to just keep her blonde. I tried to make her mask look a bit like a Tiki mask with the bright and dark browns. Eh, it’s fine. I was pleased with the hazard striping, which I freehanded. Overall, there are a few areas of this model that could use some additional attention but I was happy to move on. Looking at this picture, I think I might take another crack at her eyes.
3D Printing – Necromunda, Trench Crusade
You may think “Joe, 3D printing stuff isn’t really hobby progress!” Fundamentally, I don’t disagree with you. That said, my workshop has been abuzz during April. Even though I don’t make my own models (or even modify them in Blender), I often forget how much time is required to set up and clean the prints. This is extra true for resin prints which require washing, removal of supports, and final curing. Let’s take a look at what’s been cooking…
Kevin (of AToMW fame) and Greg both requested my services to print Trench Crusade models they had acquired. Greg picked up the Trench Pilgrims, whereas Kevin acquired the Red Brigade. Thankfully my resin printer is dialed in, so I rarely get failed prints. However, sometimes the parts for modular models are spindly. In this particular case, I ended up printing the same flail 4 TIMES. It’s now up to Greg to make the final version of this particular piece escape its support prison. Kevin’s models were cake. Westfalia Publishing made some great models with great supports. I even ended up temporarily joining their Tribe on MMF. Here is a mixture of parts for the Trench Pilgrims I printed for Greg.
I’ve also got a Necromunda Ash Wastes campaign waiting in the wings. Terrain has long been a weakness of my ability to prepare a Necromunda table. I have lots of sprues ready to be assembled, but my selections for Ash Wastes are limited. I’ve been collecting files for use in the campaign for about 6 months now, but hadn’t printed a single thing. Well, that has changed!
I’ve had my eyes on David Sheff’s Ash Pocalypse for a while now. He just completed a new campaign where I was able to pick it up for near original price. The crashed bike, jeep, barricades, and tower are all from there. I haven’t even begun to print the series of flexible walkways that “sub” for the official GW terrain (which I’m also preparing to assemble in the near future). The resin pieces are from Print Mini’s Fuel Station. Obviously, I love the Fallout vibe. I’ve been a patron of Print Minis for a long time and have almost all of their Necromunda collection. This includes a WEALTH of interesting terrain pieces and vehicles, especially for Ash Wastes. The Fuel Station is my first effort to actually print any of them. Almost all of the kits are designed for resin (though some of the newer stuff also includes FDM printing), so this is an experience for me. Even with my (relatively) large print bed it takes multiple prints to complete sets. I’ve got an Ash Waste train in my queue as well. Hopefully something we can use for the midpoint of the campaign.
Speaking of, I’ll probably post the ruleset for my Necromunda campaign for folks to peruse. I try to keep everything contained to a single (somewhat overwhelming) rules packet.
Cuckoo Clock Figurines
Now for something completely different! My stepdad recently found a cuckoo clock that belonged to his grandparents. He’s going through the process of restoring it and asked me to repaint the figures that dance at the top of the hour. It’s been a very different task for me!
These figures appear to be made out of plastic and have definitely seen better days. Very quickly, the two on the right have had a few new layers of acrylic paint applied. The fellow with the tuba is about complete (minus brightening the tuba a bit). The other two haven’t been touched, so you can see where things are starting from. The plastic doesn’t take acrylic paint particularly well, so I find myself applying a few coats just to get halfway decent coverage. I’m not planning to do a lot here. I’m basically going to repaint them, maybe provide a tiny bit of depth, and call them good. It’s been fun to reinvigorate the models and see them come back to life though! The addition of eyebrows really made the tuba model come to life. I’m hoping to have these 4 done by the end of May. When the cuckoo clock is finished, I’ll include a video of these fellows in action.
Well, that’s all for now folks. There are a lot of projects in my near future. My Escher need some TLC and those terrain pieces aren’t going to paint themselves. I’ve also got a quick Blood Bowl project that I’m hoping to finish by the 3rd Saturday in May. We’ll see how it goes! Wish me luck!
So to start this month off, I want to show you guys the Non-Adepticon related painting that I completed this month. Its a short list though so don’t worry, you’ll get your Adepticon coverage shortly!
The first and only model that I completed outside of Adepticon prep was the below Deathwatch Space Marine. I inherited a small Deathwatch army and combined it with my already existing (unpainted) Deathwatch force last year with the intent to (someday) paint it. My plans were moved forward as fellow warlord, Kevin C. has been painting up his Deathwatch and having so much fun doing it that I simply had to join in the fun!
You’ll see the first test model completed below, with the rest of his Kill Team not far behind. I really didn’t want to spend hours edge highlighting these models so I pulled out the airbrush to test my limits and get a nice deep black color.
I’m pretty happy with this tester, it really pulls off the “Special Forces” vibe that the Deathwatch are known for, but I think I will be punching up the grey highlights just a tad on the future models! I’m hoping to get the first 10 models done this month then hop over to finish those Old World Chaos warriors I showed off last month.
Adepticon
Next up we have the main event, Adepticon! I’m going to start out with a quick overview of the army I painted up for the event: My beautiful Ultramarines Boarding party for Horus Heresy! I’ve always wanted to build, paint, and play a force of marines all decked out in boarding shields, and this year’s Adepticon was the perfect opportunity! I didn’t grab any pictures of these lads on the table as I actually only played 1 game with them (I skipped the games to hangout with a couple of British chaps as you’ll read about down below) but they looked marvelous and will definitely be on the table again soon!
Other than Horus Heresy, I was able to play in the Lord of the Rings Doubles Tournament on Friday and partnered with my steadfast companion Middle Earth Mike, we brought a company of 50 Warriors of Minas Tirith to battle…3 battles to be exact!
It was a great outing for Gondor as we pulled out 2 major wins with only one loss! More importantly, we had 6 fantastic opponents and shared many beverages over the course of the day!
If we’re going to be honest, it was a miracle we stayed standing all day, and as such I won’t regale you with tales of the battles, I’ll just leave a nice gallery of pretty pictures below for your viewing pleasure!
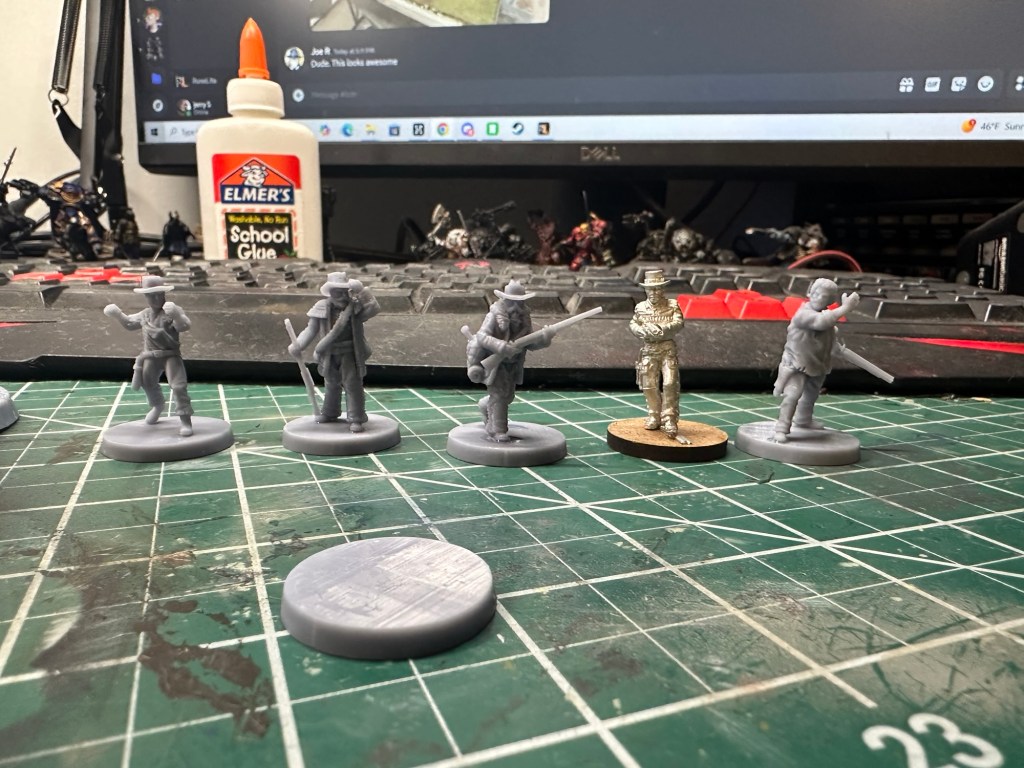
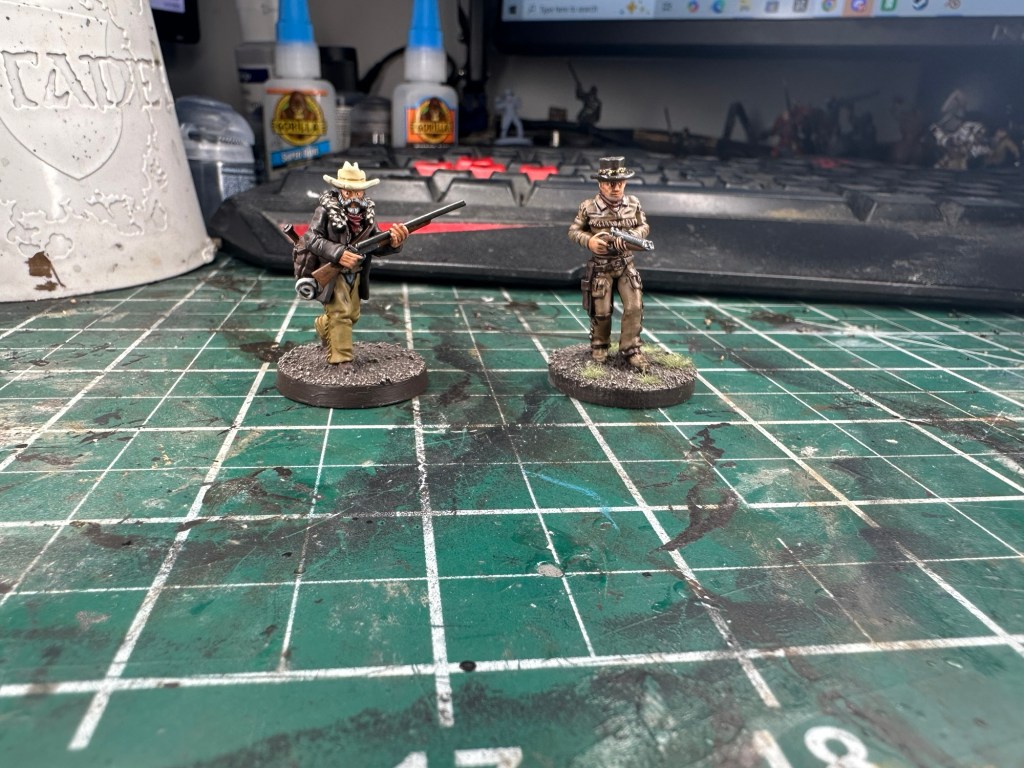
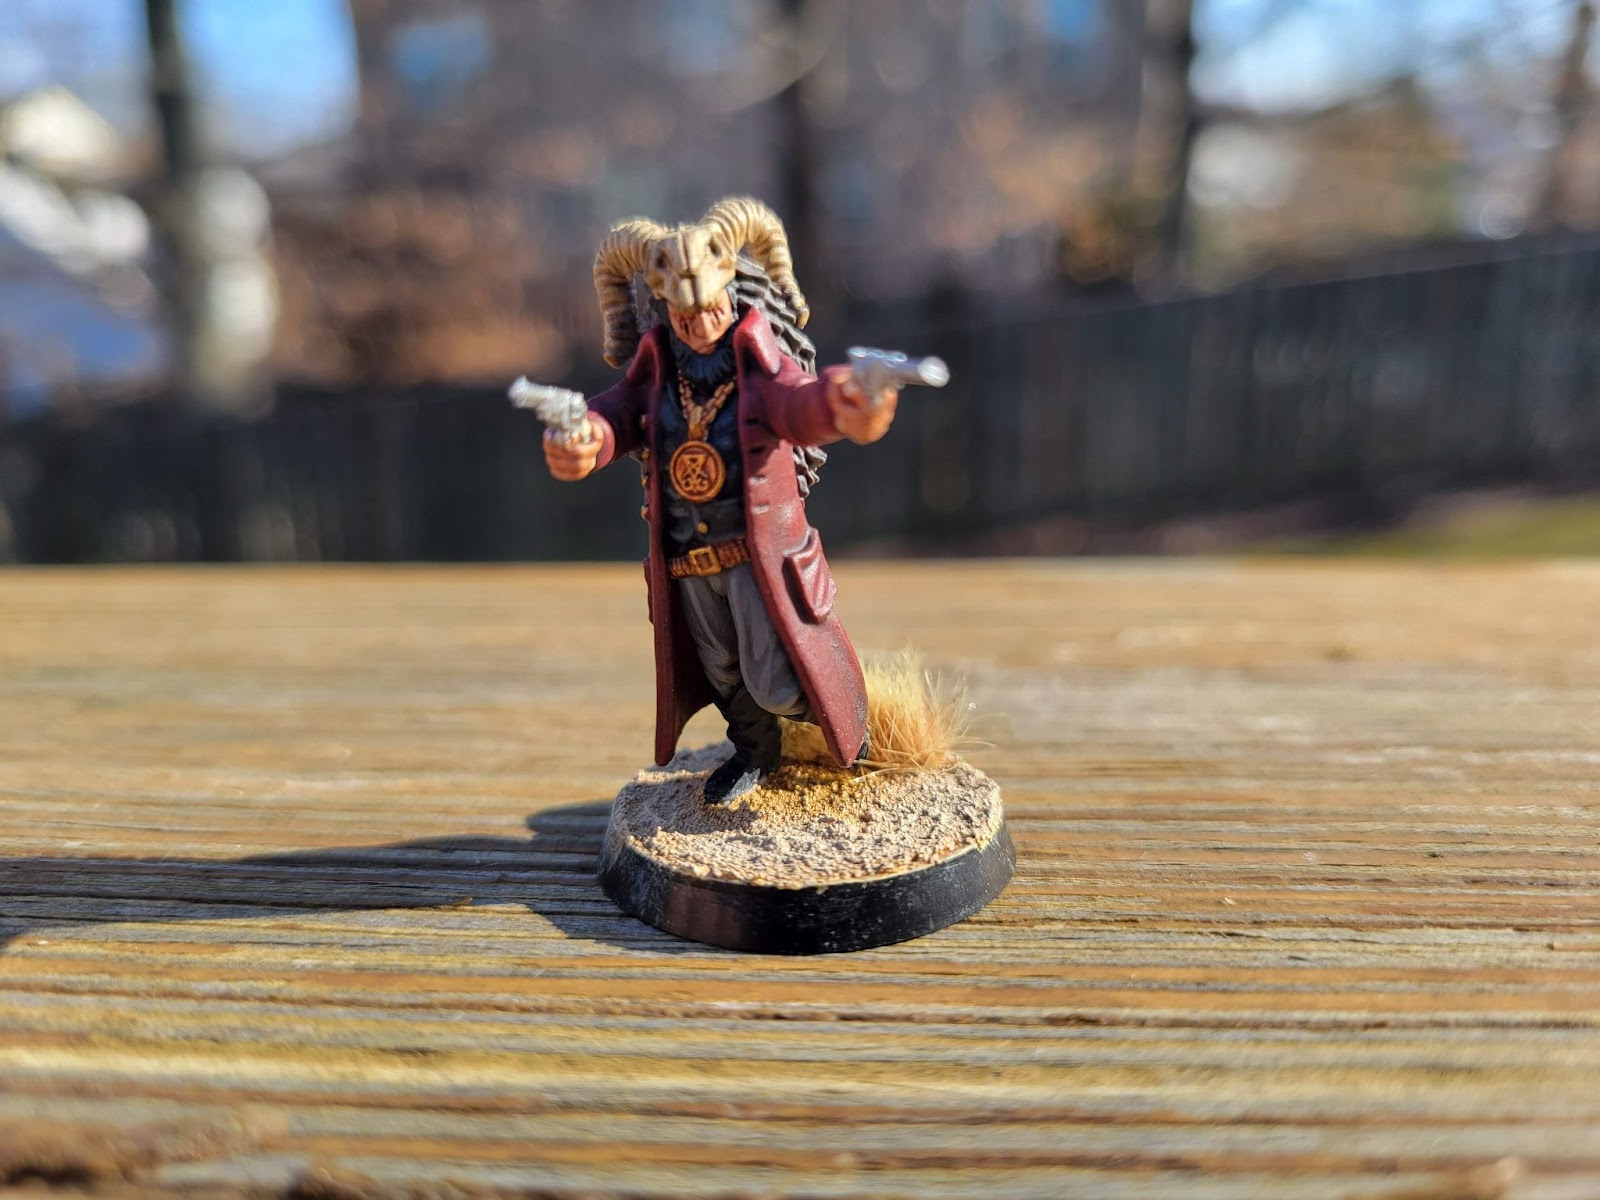
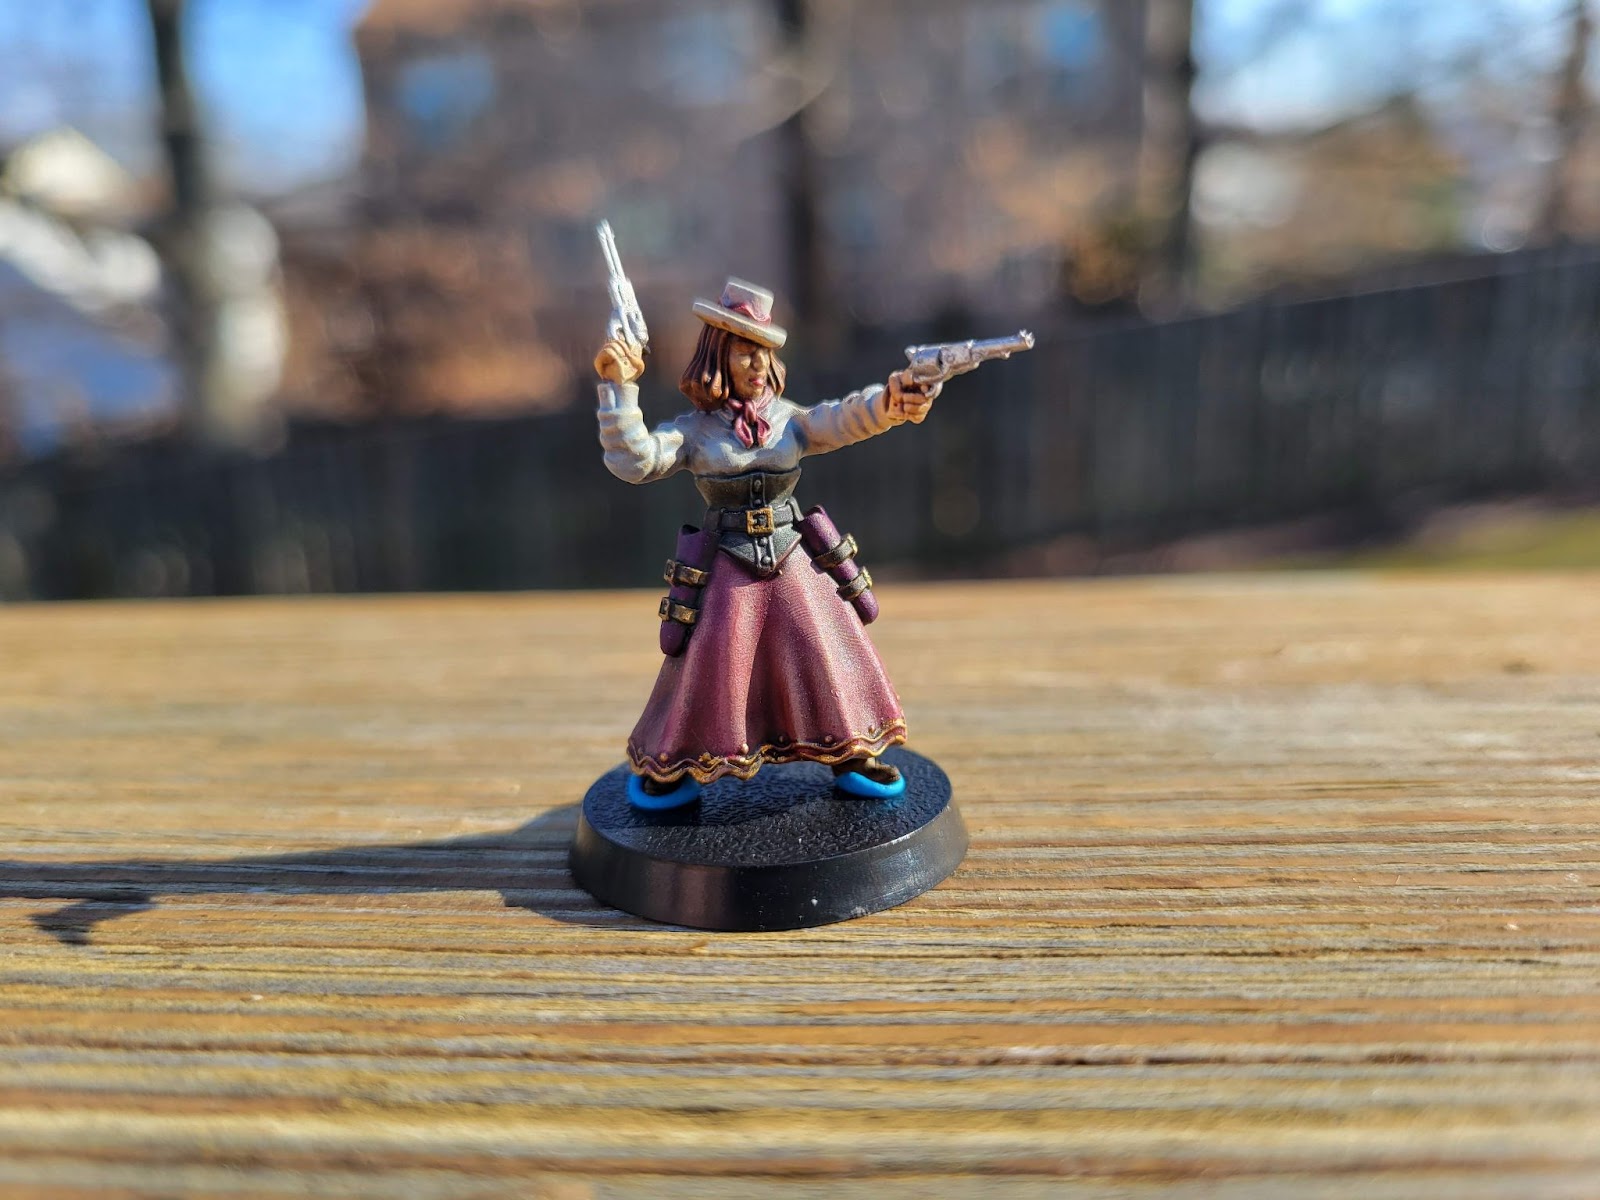
I finished Adepticon off with a couple new skirmish games that I shamefully have now fully invested in. Below on the left, you’ll see a picture from a game of What a Cowboy! that I was able to demo, a fierce battle between a Mormon family and a small group of Confederados! You can read more about this showdown here on Goonhammer.com
The right picture above was taken during my first ever game of Warzone: Eternal, a brand new remake of an old wargame from the 90’s that was brought back last year via kickstarter. I walked by their booth in the vendor hall and was immediately smitten with the cool 90’s technopunk vibe of the models and the fast-paced game play. As I mentioned above, I am not fully invested in this game so expect to see some techno-samurai showing up on your hobby feed shortly!
As I continued my (very hungover) stroll through the vendor hall on Thursday, I came across a booth where you could test out the Two Thin Coats paint range, there was no way I was going to resist the opportunity! While I sat there, I was able to chat with a nice British chap about his new business, his new wife, and all of the exciting hobby projects that he is looking forward to over the next few months…oh and then another nice British chap came by and I just had to memorialize it as you can see below next to a nice little frog I painted up at the booth.
Once I was bitten by the painting bug (curse you Duncan) I absolutely needed to paint some more. I wandered around Adepticon forlornly for about an hour before I stumbled on a FREE hobby area! Adepticon yet again proving that it is Disney for wargamers! I grabbed a cheap brush from one of the many vendors around (I later found out they had free brushes, oh well!) and sat down to paint the event model that I received from Victoria Miniatures as part of my Adepticon swag bag!
As you can see, this model turned out incredible! I only had the one size brush and I knocked it out in just a few short hours but I am tremendously happy with the results!
Coming off of the Adepticon high, I am again so thankful for the ladies and gents that throw that incredible event every year. Every time I go I love it more and more- I feel like I still discover new and exciting new ways to enjoy the convention and I will definitely attend again next year! The discovery of Warzone: Eternal(more to come), Duncan’s Two Thin coats, and the Adepticon hobby area have me absolutely buzzing about the next convention…All of that on top of my normal excitement to play my normal games and explore the convention!
Until Next time, Adios!
Austin B.
Short-cuts Make For Long Delays
Well what started as a small detour to break up my painting and prevent burnout has turned into my primary focus. Having examined what I had all in my attic for Battletech, as well as the new releases coming out, plans for the two forces I discussed in the last article have ballooned to many now, as I split up my backlog between factions and try to fit the new releases into the mix as they come out. And, most hilariously, I have even detoured from the two factions I detailed last time in favor of others! No further work has been done on Clan Goliath Scorpion’s Omega Galaxy, or the Bavarian-inspired RDF2 of the Hanseatic League. Instead, others have taken hold of my attention, of whom I shall now regale you!
The first and most far-in are the first of my two custom Mercenary bands: the Solar Knights. Initially planned as a bit of a joke, I quickie decided I actually wanted to move ahead on them in earnest. The idea behind them is rather fun and amusing, with most of the mechs’ names being suitably ‘medieval,’ with such options as the Warhammer, Black Knight, Templar, or Longbow. My other Mercenary company is similarly themed, though I am far looser with theirs than here. Painting all of these took up the majority of the first half of the month, while I worked out more detailed plans for how to divide up my remaining mechs. AT this point, most have actually been allocated to one project or another, and I have only a few spares with no home. For now…
The second of my Mercenary bands, and far less completed than the first since they are a more recent project, again spun out of a joke. The theme this time around is the Wild West, with Scorpions and snakes (the Adder), and eventually Gunslingers, Marshalls, and Enforcers.I really quite like sticking to a theme with most everything. It can be quite fun and ground otherwise absurd projects. Hopefully I will get some more of these guys done this month. Perhaps polish off all the models I currently have for them. There are only about a dozen more to do!
Exiting the Inner Sphere, I’ve also found myself working on two complementary forces: Clan Snow Raven’s Zeta Galaxy, and the Alliance Grenadiers of the Outworlds Alliance. Both come together to form a combined Raven Alliance force, though they remain separate just as their two militaries still do in the lore. In larger games of Alpha Strike I may play the two of them together, but really they’re just two tangentially related painting projects under the Battletech umbrella. Technically Zeta Galaxy shouldn’t be around for the era I am intending to depict, but I’ll let that slide for what is a very cool and fun paint scheme. Best depicted on the Black Python, each mech actually has a jade rhombus painted on their torso. It’s just that for most of the mechs the shape wraps from the front of the torso to the back.
And last of all, heading back to the Inner Sphere, and back to my first Battletech faction, I have a single test model finished for yet one more project: the New Avalon Institute of Science’s (NAIS) Training Cadre, of the Federated Suns/House Davion.
For this unit my plans have not been totally finalized, but I don;y want to push much past a Company (so 12 mechs). I have about 8 models already picked out, so it’s just sorting out the final 4 or so. This unit was more born out of necessity, as with some of the new releases there were several cool mechs that I didn’t really have an appropriate faction to give them to. And with my initial Davions complete, for all extents, I decided that a new, smaller project to eat up some of these mechs would be a fun idea. Plus it was a great opportunity for some wild camouflage! I am hoping to complete a few more of these guys within just the next few days. But otherwise, stay tuned for much more mechs to come next month! That, and perhaps a detour back to Shatterpoint, with the new releases on the horizon…
Kevin C.
Cawdor Rehabilitation
Last year, fellow painter and blogger Austin traded my Nomads from the Ash Wastes box (which, honestly, I only got for the Orlocks and the terrain) for an abandoned project of his – Cawdor gangers. While my Orlocks will always be very near and dear to my heart, I’ve often felt that Cawdor epitomizes everything Necromunda – numberless, filth-covered gangers running around with weapons made out of literal trash.
This was the condition of the miniatures that I received from Austin – eight mostly painted, five with some paint on them, and about seven more that were not even assembled. I went about assembling and priming the unassembled ones, as well as an additional box of Redemptionists that I received for my last birthday (more on them later).
With the miniatures that were mostly painted, I just changed the robes color that he painted from a burgundy-purple to a brighter red, to give it more contrast. This was deliberately to unify the paint scheme for the entire Cawdor gang. I also based them and added some flame tufts on the base because, you know, Cawdor.
I next tackled some of the partially painted miniatures, which proved to be more difficult than I was anticipating. I couldn’t do an exact match for colors, so I ended up trying to unify the miniatures with some Agrax Earthshade, to at least cover the differences in grime and gradient. I also started playing around with different colors for the masks, and added some green for the eye lenses, since that will contrast well with the red and beige.
The miniatures that had no paint on them, I used some modified versions of what I had already painted, as well as some tips from online. I did not like the setup of the tutorial, so I will not post it here. Suffice to say, the video used the base – wash – rebase – highlight formula in the most obtuse way possible, reusing the same wash multiple times in contingent regions of the miniature. This really slowed down the painting, since I had to, unnecessarily, wait for the wash to dry before continuing. Not a fan.
Cawdor Redemption
As mentioned previously, I received a box of Cawdor Redemptionists for a birthday a while back, so I decided to add them to the painting queue. It proved… more difficult than I had expected to replicate the paint scheme I used for the gangers with the Redemptionists. I suspect this is because they were much less scraps and tatters and more robes and metal frames.
The final result was quite a bit shinier than I had anticipated, only partly due to the Chrome highlight I used (similar to what I used on my Word Bearers a few years ago which I really liked). They will definitely stand out against the rest of the gangers, but I lost quite a bit of the uniformity that I was going for. Maybe I will give the Redemptionists names, and then use the gangers as chaff in games.
RPG Miniatures
As a bit of a palette cleanser, I decided to take up two miniatures I have used in my ongoing in-person RPGs, Pathfinder and D&D. For Pathfinder, I play as a slightly older rapier-wielding swashbuckler, and I only had one miniature that met that scheme – Janus Draik from the Blackstone Fortress set.
I am quite pleased with how he turned out, and he really stands out as a flamboyant character on the table.
My second miniature was not a Games Workshop miniature, but one that I got from PAX Unplugged last year (https://dmminisus.com/products/dragonborn-paladin-krimmdar). I am playing as a gold dragonborn paladin in the D&D game that my college buddies have going on, so I tried to replicate what equipment my character has – adamantine plate, sun blade, etc.
I’ll be honest, I was not terribly pleased with the sculpt. A lot of detail was missing in the miniature, and so a lot of the contrast I was trying to put into the miniature just didn’t work. Even still, I was able to get a good adamantine effect using watered-down Talassar Blue Contrast over Leadbelcher, with some selective highlights of Chrome. The skin was inspired by this really great video on painting textured gold from Artis Opus (https://youtu.be/i7FeFkvcb38?si=me_c7yh3ckDpB1s-), and the sword was an adaptation of the tutorial on Demonic Hellblades using only Contrast Paints (https://youtu.be/ajZhDsrGa-A?si=T1qrBrFdAkRBAz_8 ).
Deathwatch Incoming
For my April project, I plan to complete my Deathwatch army, which has had quite the storied history. I was able to get a Dreadnought completed before the end of the month, so consider this a teaser.
Until next month!
Michael S.
This month I have more Imperial Fists to add to my slowly growing army and am finally getting back around to Old World. Recently I have been spending a lot of my hobby time playing other board games and card games, but towards the end of the month I got back into the saddle.
I took the better part of a Saturday morning this month to prime and basecoat a bunch of models, including some Hellblasters and a load of skeletons for my Tomb Kings
Basecoating Imperial Fists, even with an airbrush, is quite the test of patience. Many people like to prime in pink/red, but I prefer to work my way up through orange browns as it is much easier to color match in the event you make a mistake later during painting. It also brings out the shadows nicely without oversaturating them, leaving me with a nice muted yellow. These Hellblasters are still sitting primed alongside some other half-painted models, but they are at LEAST primed 😊.
I did manage to get some good work done on a unit of 5 scouts. For the first time, I was happy with the way the fatigues on the scouts turned out. In my long history of painting I have always attempted cream-colored fatigues, only to be disappointed with the final look. The bright yellow of the armor gave me an opportunity to go with a darker, near-black for the cloth.
I incorporated some extra urban rubble into the bases with a simple color pallete of black, browns and greys. The leather pouches need some attention, and the armor needs to be pinwashed, but these guys certainly look good enough to hit the table for now.
While I didn’t have a ton of progress this month, my curio cabinet is starting to come together and is at least all yellow, and only a few intercessors didn’t catch the muted yellow memo. Seeing this small army start to take shape has me excited to paint even more!
Tomb Kings progress has been limited to giving the dragon some proper jewelry and a drybrush. I was initially worried about the model looking too boring, so I tried to work in some reds and purples into the shadows. Not much, but just enough to add some visual interest. So far so good!
Unfortunately I was still rather busy through the month of January, so my progress then on hobby stuff ground to a screeching halt throughout that month. I only got done with a few figures, in sporadic bursts. And just as I was getting back in the groove, I fell ill in early February, putting another stop on painting plans. Only recently have I gotten back into the swing of things, and with these various hiccups, some plans have shifted, and new projects have sprung forth. But that does not mean previous ones were abandoned!
On the MESBG front, while the Rohan has been temporarily shelved, I was able to finish the last dozen-ish models I needed to convert my completed Ugluk’s Scout’s over to being playable as Lurtz’s Scouts – including Lurtz himself! Twice over, actually! A second banner bearer and Captain join him, as well as all of the metal Uruks from the Amon Hen boxed set – including the lovely pair carrying Merry and Pippin!
I haven’t pictured all of the finished models. There were a few additional plastic Uruk-hai Scouts that needed to be painted up as well, to round out the numbers. In-fact, of the two total boxes I have of the Scouts, I still have about another dozen left to finish them all – plus some ancillary pieces. Maybe I will finish them all someday, if I ever feel so inclined to bring this army to a larger event.
Now what was rather interesting about this project was actually returning to it. I had completed Ugluk’s Scouts back in 2018 or 2019, following (with some edits) a painting guide on the GW website at that time. With the relatively recent website change, that article disappeared! And so I had to go through the painstaking process of reworking what the paint scheme was to match. Though interestingly, I did figure I was able to trade out the basecoat + wash for the majority of the brown cloth in favor of the Cygor brown contrast paint, and it worked! The newer models are by no means an exact match, but they look close enough, especially at a distance. Here I have my two captains. The one on the left is new, while the one on the right is the one previously painted several years ago:
Atop the MESBG progress, I was also able to put some more work in on my ever-growing Shatterpoint collection, putting paint on both the newer Veers box and the Chiss Grand Admiral himself. While I have yet to finish the Snowtrooper Lieutenant (he’s on the painting desk, waiting to get done), I did get both Veers and his two Snowtroopers completed. I had a lot of fun with the Snowtroopers in particular, trying to work out two different colors of “white” to differentiate different bits of cloth.
With Thrawn completed, that polishes off his box in totality. I’ve posted his other box-mates before – the ISB and Agent Kallus – but here they are again, together! Hopefully the Veers box can join them shortly in the vastly increasing list of completed boxes for Shatterpoint.
After the Lieutenant, the plan is to return to the Rebels (and friends) I have remaining, especially with the newer releases about to hit in the coming months. I secured myself a full set of the Spectres wanted poster alt art order cards, so I do feel rather obligated to get the remainder of their members finished up now! And perhaps also polish off Lando’s box while I am at it.
And now speaking of the same old things, I have taken another detour towards Battletech as a bit of a distraction, finishing some more models for one long-running project, and planning two (really three) new forces. Firstly, I completed another Lance of mechs for my 3rd Proserpina Hussars of the Draconis combine. I am not sure I have posted this force before here, so perhaps I will detail them in a later article. But it is a rather fun scheme to do. These four more Mechs join the 20 already finished in this color scheme, making for a nice even 24 for two full Companies. I am hoping to finish the full Battalion (40 mechs) here in the near-ish future!
Atop those, I did test models for two other forces I am going to be working on. The first is for the Scorpion Empire’s Omega Galaxy, and the second is for their competing element: the Hanseatic League’s Regional Defence Force 2. I know, what an inspiring name! But it is a fun little scheme with some influence from older German states – in this case, Bavaria. All of RDF 2’s mechs feature the diamond-checkered Bavarian flag on one of their arms. Meanwhile Omaga Galaxy’s tan and red provides are rather different-looking opponent.
Plans for Omaga Galaxy are rather large. I already have a little over 30 mechs in my possession earmarked for them – including many IIC designs, plus some IS mechs fitted with clan-tech, and other second-line clan mechs.. Plans for RDF 2 are comparatively smaller. A “mere” 16 mechs. Though It is reasonably likely I’ll end up with more than that, when all is said and done.
This is all I have for now. I hope to have some more progress to show you all next month!
Joe R
The streak for 2025 certainly continues. Hmm… why would anyone desire a relaxing hobby and escapism in this day and age? Hard to say.
The Blood Bowl tournament scene is already in full swing in the Virginia area. We’ve already had three tournaments, but I have been unable to attend any so far. However, a crown jewel of our Blood Bowl scene is The Gritty Goblin Blood Bowl Games (often referred to as Gritty Goblin) which takes place at Gritty Goblin Games in Columbia Maryland. This is a Blood Bowl 7s event (which I still argue is the best way to ENJOY Blood Bowl) which has sold out every single year. I believe it sold out in less than a week this year. At this exact moment, assuming Jerry indulges me, I am planning to do a tournament recap. We’ll see if that happens. HOWEVER, the special sauce of this particular event is to complete actions with Goblins to gain goblin points. Whoever ends with the most goblin points earns the coveted Goblin Cup. I love the coaches that attend this event, I love that so many people play to the theme, I (mostly) love the organizer, and I enjoy the venue.
So, if you hadn’t guessed already, this month I have taken a short break away from Cowboys to focus on preparing a team of 8 Goblins + 1 Troll in about 3 weeks.
The Venison Beach Grindylow – Blood Bowl Goblin Team
While you, humble reader, probably weren’t desperate to know the details of how this team came to be… I’m gonna tell you anyway! Some people are called to play Goblins. I am not one of those people. In fact, Goblins are the only team I’ve ever quit mid-season. So obviously, I have two Goblin teams.
My first goblin team was part of the Star Bowl Indigogo from probably a decade ago. The team featured Star Wars Jawas as the Goblins, droids as the secret weapons, and Jawa-piloted robo-trolls. I call this team the Tatooine Technographers and they made an appearance at GGG ‘24. I don’t love this team. The sculpts are kinda funky and the pewter is garbage. The second is a pirate goblin team that I purchased from Big Child Creatives/Massive Dragon during their kickstarter a few years ago. STLs for these models were recently released, but I already had the whole team cast in resin. I actually had to go find the receipt for this team to determine what I had purchased in preparation for painting them. Always a good sign. This team had tentatively been named the Finneytown Foulers (after a Cincinnati suburb I used to live near) and were going to be colored Red/White. That has changed!
I had the exquisite pleasure of meeting fellow Blood Bowler, Seamoose, at the Amorical Cup last year. We had an amazing battle of the Halflings that might go down in history as one of the loudest Blood Bowl games on record. His team, the Venison Beach Surfing Birds, has lived rent-free in my mind ever since (Curse you Danny “Summer Lover” Zucchini!). When I failed to complete my own TMNT-themed comic-style Lizardman team for Chaos Cup, my friend Neil saved the day by offering his beach themed Sharks. I asked Seamoose if I could also have a team from Venison Beach. He agreed, and the Venison Beach Tidal Waves were born. One day I will paint my own version. The Surfing Birds and Tidal Waves faced off at Chaos Cup to crown the King of the Beach. This was the best match of Chaos Cup, hands down. I mean really, the Chaos Cup Championship pales in comparison to the King of the Beach.
That was quite the exposition dump. All that to say, the Finneytown Foulers have become the Venison Beach Grindylow. The main color is still red, but white has been relegated to an accent color.
In Pathfinder, grindylow are depicted with blue or aqua skin. I wanted to apply this to my goblins. After reading a few Reddit posts and watching a few videos about Tau skin I decided to try a contrast mix of 2:1:1 Medium:Tassalar Blue:Magos Purple. This was fine, but didn’t provide the “life” I was expecting. I may try this again by doing the Tassalar Blue first then applying full strength Magos (Update: I did this. Still didn’t like it). I had recently purchased the entire 6 paint series of Blue-Grey from the Army Painter Fanatic line and used this to highlight up from here. I largely tried to pick ideal highlight colors by eye. If the highlights became too stark, I would just glaze them back down. This generally worked well. I also tried starting with Vallejo’s Oxford Blue then highlighting up (my preferred method at the moment) and starting with Thunderous Blue and highlighting up. In both methods I used Magos Purple to “black line” the skin, which provided some purple “life” to the models.
I also experimented heavily with reds. I also purchased the entire 6 paint series of Warm Reds from Army Painter Fanatic (I was tired of trying to make my Reaper reds & blues do what I wanted). Initially I started by highlighting up from a dark red to pink. This was fine… but it didn’t pop. Then I remembered reading Figopedia V1 where Jeremie talks about this specific problem. So I eventually ended up highlighting with a red/orange mix. I liked the result. I had also tried applying a contrast “wash” with 2:1 Medium:Flesh Tearers Red. This works great, but ultimately wasn’t needed later in the process. Now, I move from Basilisk Red, up to Flat Red, then my red/orange highlights.
I also tried out some freehand on my punk rock ‘Ooligan. I was extremely pleased with the results, even though it doesn’t really pop on the table. This was the first time I had decided to try a checkerboard, but I had watched videos in the past about how to apply it. Applying “Punk” over it was not planned, but I figured one freehand experience deserved another.
Overall, I was extremely pleased with these models. I worked diligently to finish a model before moving onto the next. As a result, I only made it through 6.5 of the necessary goblins (the chainsaw is only basecoated and my pogoer was a non-starter) and didn’t even get the shark-Troll primed. I also didn’t get any bases ready (as you can see!). I did 3D print some beach bases (thanks Neil!) but I haven’t primed or painted them.
I varnished the heck out of the completed models (and even did a layer on chainsaw to save my work). I used Vallejo Ultra Matte Varnish through my airbrush in a roughly 2:1 varnish:thinner ratio. It feels like you’re spraying magic dust on your models because you can’t really tell anything is happening. I am pleased to report that my models made it through 5 games and suffered zero battle damage. Huzzah!
The siren smell of gunsmoke is calling me back to my Old West minis, but I think I’m going to finish this team (including the troll) just to say that I completed this specific project (even though there are 9 other models to paint for a full Blood Bowl team). Besides, it would be really nice to put something in my display case that I can officially classify as done.
The Contrast Paint Dropper Bottle Project
As mentioned last month, I have been using contrast paints again. I was inspired by these Warhammer Community articles (here and here) to revisit what I can make them do. However, getting the recipes consistent has always been a challenge due to the paint pots. So this month I decided to buy fifty 20 mL vials, some ball bearings, and 12 tiny funnels to transfer all of my contrast paints into dropper bottles.
I didn’t realize how many contrast paints I had. Several came directly from the first formulation of these paints. I would casually transfer 6 or so bottles a night, clean the funnels (the contrast paints will leave a film! That’s their thing!), and transfer the labels. Overall, the process took about 2 weeks. My daughter even helped with a few. I think it was worth the added time and effort. The dropper bottles are much easier to mix (I’m looking at you Apothecary White!) and control.
After working on the Goblins, I definitely prefer the layering approach to painting. That said, since my paints are so old, I’m not sure they are performing at their optimal level. I’ve been finding ways to use the paints to help with specific problems instead of using them as an “easy button” to finish quickly. As other folks have noted, they do provide a great foundation for a base coat (provided you can avoid touching it too much!). I will continue to experiment using the Old West models, but I have found myself repainting many areas that started as contrast.
Well that’s it folks! Hopefully next month I will show you a completed and based Blood Bowl 7s goblin team. Then I can get back to these horse bios (as my wife has taken to calling them).
Kevin C.
Genestealer Cult
As I posted last month, I assembled a Genestealer Cult Combat Patrol Box at the end of last month. I have never done Genestealer or Tyranids, so this was an interesting departure from my usual paint schemes, with lots of grey and purple.
It turns out that the reason I built and painted these miniatures, to use in our Necromunda campaign while one of my other gaming buddies used my Orlocks, ended up being moot – the friend in question has chosen not to participate, along my Red Belts to ride again into the Ash Wastes! That being said, the miniatures were assembled and ready, so I figured I should get them painted and done.
Vehicles
I realized early on that I did not have much experience with painting actual vehicles, aside from my Titans for Legions Imperialis. I chose to follow the tutorial Duncan Rhodes had posted all those years ago for painting the Atalan Jackals (https://youtu.be/pdUS0F8BJ3c?si=aMUDgLIZKdtpcRpn). It ended up being a great tutorial, and I was pleased with the result.
I ended up getting sick in the second week of this month, so it took me a while to get to the remaining Jackals. I eventually finished them, although not quite at the same quality as the first Jackal, using the same paint scheme as the first one.
Finally, I attempted to copy this same paint scheme to the larger two vehicles. These were somewhat draining, as painting large models tend to be. However, I did get some good experience with trying out some drybrush techniques that I plan to use on my Deathwatch later this year, especially the large vehicles.
I am reasonably pleased with how the driver’s helmet plate ended up working (Balthazar Gold → Agrax Earthshade → Sycorax Bronze → watered down Nihilakh Oxide). I plan on using that same technique on my Votann Scavengers, who all have helmets down. I find that personally more realistic.
Showing this to the group, they made the perfectly legitimate observation that the vehicle color is a bit too close to the Ash Waste base. I was hoping the flame tufts would have helped to offset this closeness in color, but it did not quite achieve the effect I was looking for. Still, with the vehicles done, I moved onto the Acolytes.
Acolytes
These guys were far more alien than what I have usually painted, so it was a nice new experiment. That being said, I kind of rushed through this paint scheme, as I only had five days to paint these guys to get them done by the end of the month. Also, work has been kicking my butt this week (I’m writing this during my lunch break).
I ended up using the paint tutorial provided again by the great Duncan Rhodes (https://youtu.be/AWHtci5sSl4?si=awWAWFRnTPq68dRp), although I am not sure I am entirely pleased with the results. I feel like the color contrasts, especially on the face, were too stark (Slaanesh Grey → Pallid Wych Flesh), and I probably should have added a mixture first before the final highlight.
I tried using a smaller method of drybrushing for the blue armor scales, and I am pretty pleased with the results. It certainly made painting the armor scales a lot quicker.
Up Next
For my March project, I plan on continuing (?) with Necromunda miniatures. About a year ago, I received some Cawdor Redemptionists for a birthday present. At about the same time, I exchanged my Ash Waste Nomads with Austin for his old Cawdor miniatures. Apparently, it was a project that he was unwilling to finish. Heaven knows I have a ton of those.
So, I will be working to get this gang up to tabletop quality by the end of this month. I won’t be playing these guys in the new Ash Wastes campaign that we have planned, but I’d like to have this on the backburner for future use.
Until next month!
Jerry S.
Hello readers! Long time, no talk! I am sorry to have missed last month’s post but the start to this year has left a lot to be desired on the hobby front. I’ve painted a couple one-off characters but I’ve been struggling to really make any serious progress with any of my hobby projects. I’m hoping to turn the tide in March and really show some serious progress, but more on that later!
Starting with what I have accomplished so far this year, I’ve got a fun smattering of models to show you below
The Old West
Not to leave Joe alone out in the old west, I’ve also started working on a small gang of cowboys, I purchased a couple 3d printed outdoorsmen from Etsy in January and immediately got to work painting them! Unfortunately, 2 of the 5 figures I bought were either damaged in shipment or broke soon after arrival – VERY disappointing….
I was able to finish two of the gang though, a model based on James Caan’s famous character “Tex” and another, more regal woodsman that yet remains unnamed…any suggestions?
Warhammer 40,000
Next up, I’ve been sitting on an old deamon prince model from a Made to Order offering a few years back. I had the whim to start painting the old boy up earlier in February and you can see my Work in Progress below! I really wanted to use fun, vibrant colors on this model and really push myself to improve my blending abilities, I think its turning out pretty good so far but there is still much work to be done on this model. I eventually aim to have the sword completed with a nice orange glow effect. I hope to get this guy done soon!
Warhammer: The Old World
Next up on my Hobby carousal, a stop in The Old World. I had an old warrior priest that was waiting patiently for a couple paints of coat. He’s an ugly model but he’s got a great charm and I’m happy with him.
Next up we have the bulk of what I did in February, I won a nice little lot of used warriors of chaos with a chaos lord on steed. I’m really excited to get started on these guys in earnest, I rebased them all onto 30mm bases and managed to paint a couple test models before being called away to work on my Adepticon army. I’m hoping to get some progress on these guys in March, so long as I can finish my Adepticon force.
Lord of the Rings
In the realm of Middle Earth this month, I painted up a Fellbeast (soon to be ridden by the Witch King, parts on the way) and a group of Osgiliath Veterans to round out my Minas Tirith revitalization project!
The Month Ahead: “We March for Macragge”
The Horus Heresy is where I should’ve focused my efforts this month but as you’ve seen above, I’ve been quite distracted with all of the other fabulous items on my workbench.
I say this is where I “Should” have focused my efforts on because I am headed to Milwaukee Wisconsin later in March to participate in Adepticon yet again! The main focus of my Adepticon will be yet again on the Horus Heresy, playing in a variety of Zone Mortalis events!
For these events, I plan to bring an elite boarding force of Ultramarines, all armed with shields. I’ve always, loved the idea of shields being used in the grim darkness that is the Warhammer universe and the Ultramarines have the most options for shield bearing madness so This will be a great opportunity for me to live out one of my hobby dreams.
Below you can see the Work-in-Progress status of the army, I’ve got 17 of the 43 models done to start the month of February…not great! At least they are all assembled though, that’s a start!
The complete list of models is:
1 Praetor
1 Legion Champion
10 Invictarus Suzerain
20 Praetorian Breachers
10 Breacher Marines
1 Contemptor Dreadnought
To start the project off, I painted up the below Ultramarines Champion, an old 40k model, It was a great and easy conversion to be used in Horus Heresy! I look forward to watching this guy chop his way through enemy characters!
I’ve got a really long way to go with this army as you can surely tell but with 3 weeks to get these guys finished, I think I should have enough time so long as I can stay focused on the task at hand!
Well, it’s safe to say that I am fully invested in purchasing, printing, and painting Old West miniatures. At this point, I have gotten the chance to play What a Cowboy! (By two Fat Lardies) and Dracula’s America (Osprey Publishing). I’ve also got the rules for Dead Man’s Hand (Great Escape Games) and Dead By Lead (Electi Studios). DMH is very similar to The Chicago Way, which I’ve already played. It has the benefit of having factions with specific rules, which might be interesting. Dead By Lead is a very intriguing system which allows you to craft your own gunslingers by selecting classes and adding traits. This will probably be the next game I attempt.
I currently have this master plan to run a 1-day Old West campaign. All of the models will be provided (with appropriate stats) and folks will be able to drop in, draft their gang, and play with minimal investment. I’m currently trying to figure out how to “get” a few tables of terrain. I’ve been looking at a neoprene mat from Front Line Games and printing some very nice terrain from the Wild West Rush Kickstarter. I’ll post some of that when I actually take a crack at painting it. Right now, printer go BRRR. I’m also considering trying to make some boards (a ravine, a homestead, etc.) but I have zero experience with this. I’ve watched some videos, but the activation energy still seems too high at this point.
Back in December, I showed off a miniature from Dead Man’s Hand (one of the Lawmen) that I had placed in a recessed base to “fix” the metal base he was attached to. I then filled the base in with Stucco to create a flat surface for basing. I’ve finished this process for the rest of the DMH Lawmen. I also 3D printed several models. A majority of these came from 3D Breed’s Wanted line. I’m a BIG fan of these models (and nearly all of them have a mounted version!), but I did scale them down about 5%. I also printed some models from Skull Forge Studios’ official Dead by Lead line. These were definitely 32-35mm scale models. They needed to be scaled down by 20%, but the proportions are more realistic compared to the other models I have so they stick out a bit. Electi Studios also has several models that I picked up (I think still by Skull Forge?), but haven’t printed yet. Finally, I printed a few models from Cast’N’Play’s Wild West Mayhem. These models are VERY cartoony! I scaled these down by 10%, and they certainly stand out, but they are very entertaining models with great detail.
Painting Old West minis has been such a breath of fresh air. I can’t place exactly why I’ve had such a good time, but I have a few guesses:
Every model is an experiment. I’ve returned to under painting my models and applying a base coat using contrast paints. I’ve even experimented with brown underpainting (using a brown ink, followed by a heavy tan dry brush, then a light ivory dry brush). I still end up coming in with acrylics to fix mistakes, but it’s great to “finish” models in an hour and spend time cleaning them up as desired.
A very different color palette. I’ve been using a lot of neutral colors, which isn’t my typical style. Each model still has a pop of color, but trying to get the neutrals to be interesting is a new challenge.
I’ve really been trying to up my basing game. This has involved a lot of research and the acquisition of several new products!
LOW STAKES. I don’t know why these miniatures “don’t matter”, but they don’t! They’re mostly for me. They can be as pretty (or ugly) as I’d like.
I don’t know if it’s necessary for me to specifically discuss every model I’ve completed in January. Instead, I’ll showcase the models (and their bases) and highlight a few of the key features that were most interesting to me.
The first model (DMH) is an example of the underpainting process I’ve been trying for these Old West models that I grabbed from this video by Eric’s Hobby Workshop. I had put underpainting + contrast behind me in favor of layering, so it was a nice homecoming. However, I still cannot get contrast paints to work for jackets and dusters! The second model (Wanted) was the first cowboy finished. I actually came back to it a few weeks later to try painting jeans on it. I think it worked out okay. I’ll definitely be trying again. This third model (DMH) is my 2nd favorite of the bunch (and the first to be based!). I freehanded the pinstripes and was pleased with the result. I will definitely try that again.
The (literal) white hat rifleman (Skull Forge Studios) took me much longer than expected due to all the leather. I ended up trying about 3 different approaches. They all blended together to create the result you see. The cultist and devil (both Wanted) were both needed to playtest a Crossroads Cult gang for Dracula’s America. The cultist is probably one of my weaker models, but I was very pleased with the pants and coat. I ended up dropping this model and breaking one of the guns. I used a piece of wire to fix it. I don’t think anyone can tell. The devil took me a LOOOONG time. I spent a few hours playing with the reds, which really ended up getting away from me. I think he needed some more black. That said, I was very pleased with the dark red of the suit.
The lady (Wanted) is almost completely done in contrast paints. I underpainted her so starkly that I was able to complete her during an extremely unproductive meeting. Her skin needs some work, but I was otherwise pleased with the final result. I especially love her dark purple holsters. Finally, the fellow on the right (Wanted) is perhaps my best model to date. He has actual contract (between lights and darks, not the paints…) going on and looks sufficiently nefarious to serve as the boss of an outlaw gang. This is the first time I’ve tried layering on the folds of a jacket or cloak. There is more to be done, but I was very pleased with the results. I’m planning to have mauve/red be the color scheme of my outlaw gang.
Finally, I’ve been looking at several desert basing tutorials. Some of these are extremely detailed. I ended up focusing mostly on the advice from HeresyBrush when they reviewed the Ammo Wargaming Universe 01: Deserts box (found here). I was VERY tempted to buy this box, but upon review, I ended up having most of the materials included from one brand or another. So I decided to pick up some desert pigment, some crackle medium, and some dead static grass.
You can see from above, my bases are still pretty simplistic. I have some boulder sized rocks, some smaller rocks, a desert sand texture paint, and some dead grass tufts. I’ve played around with painting, shading, and drybrushing the sand. I’m still not sure I’ve found the right mix yet. Several tutorials recommend shading with Seraphim Sepia, but it ends up making the sand look very red. I’ve also had a hard time making layers of drybrush seem unique and interesting. I will continue to test and refine as I watch more videos. Hopefully the inclusion of some dead grass and cracked earth will augment the effect.
Speaking of cracked earth… instead of picking up GW’s Agrellan Earth (to save a few bucks you see), I purchased Vallejo Crackle Medium. I am… not impressed. I’ve followed the advice of some guides online (Vallejo’s own guide isn’t particularly helpful unless you’re airbrush focused), but so far this is the best result I’ve achieved.
Not particularly noticeable or impressive. So I ended up buying Agrellan Earth anyway. Oh well. I also decided to pick up some Base Ready materials from Gamer Geek Scenics.
I particularly like how easy they are to apply and the varied effect you get without much additional effort. You’ll see some bases with these next month!
Well that’s all for this month! 7 models in the first month of the year! Wow! Only… 30 more cowboys to go?
Michael S.
Tale of Many Warlords – February 2025
This month, my hobby time was largely dominated by a single project: an Imperial Fists Storm Speeder. It’s almost ready to take to the battlefield—almost. The base remains unfinished, but I’m particularly excited about it. I used 3D-printed rubble pieces and texture paste to create an urban ruin aesthetic that should complement the model perfectly once painted. Once the base is complete, I’ll attach the speeder and call it done. I’m quite pleased with how this one turned out—the decals really tie everything together, giving it that extra touch of polish.
Beyond the Storm Speeder, I made significant progress on my Tomb Kings collection. I built the first of two 14-man Tomb Guard units, assembling them in their full skeletal glory. But the standout piece from this month’s work is a converted Liche Priest. I would have picked up the official model, but I haven’t been able to find it in stock.
This model was an interesting challenge—I wanted to capture the desiccated, near-mummified look of a Liche Priest rather than a simple skeleton. To achieve this effect, I used Green Stuff, a Tomb Guard body, and miscellaneous bits, then applied several layers of sprue goo to build up the skeletal frame, making it appear more like dried, ancient flesh clinging to bone. I’m incredibly happy with how this conversion turned out, and I can’t wait to see it painted.
Adding to my growing Nehekharan force, I also assembled a resin Battle Standard Bearer and a retro metal Tomb King, the latter destined to be on a chariot. There’s something deeply satisfying about working with these old metal sculpts—the weight, the detail, the nostalgia. That lasted for about 5 minutes before remembering how much of a pain dealing with metal mold slips and lines is.
On the 40K side of things, I also continued a bit of work on an Imperial Fists Librarian. Right now, it’s just in the early stages, with only a few base colors blocked in, but it’s a promising start. He’ll be a striking addition to my growing Fists force once completed.
And finally, I took a moment to survey the growing block of tomb guard on my desk. Sitting there in all their unpainted glory are 14 Tomb Guard alongside various other Tomb Kings models.
The immediate goal is to finish the Storm Speeder’s base and get it fully completed. Then, my focus will shift back to the Tomb Kings, getting some paint on the Liche Priest and hopefully making progress on the Tomb Guard. With so many projects in motion, there’s never a dull moment in the hobby queue.
Until next month—happy painting!
Kevin C.
Battle of Edoras
“Per my previous post…”
As a “reward” to myself for finishing the whole Rohan army, I was able to pick up a boxed set right when it was released. I had these guys assembled practically hours after receiving them, but it just so happened that we had more than a week of miserable rain, sleet, and otherwise yucky weather, preventing me from priming them until after Christmas. Therefore, I had to wait until January to paint them.
Warriors
These new warriors were an interesting challenge to tackle, as they are clearly more detailed. I wanted to try, as close as possible, to replicate the paint scheme I used for the previous warriors. I mostly succeeded, but there were some elements that I had to deviate from considerably, such as the armor (leather versus metal) and the helmets.
Heroes
The heroes were an interesting challenge. Similar to my Theoden miniatures, I used the Warhipster painting tutorials for Haleth and Hama, but with different horse colors. I had already committed to putting heroes on white horses to pick them out in the battlefield, and I think it helps them stand out in a cavalry force.
I will admit, if you could not tell already, that in the very last step where I glue flock on the models, I broke off half of Hama’s arrow. This is quite possibly the thinnest piece of plastic that GW produces (especially since this is true scale, not epic scale like 40K/AOS) and I broke it off. After much cursing of the gods, I was able to half-heartedly glue it back on, although I have little confidence that it will stay on in the long run.
Houses
I actually managed to finish these houses in the last few days of December, but I figured I’d keep these in the update for January. I am somewhat pleased with how they turned out, especially after copying the painting tutorial Jerry sent me here.
I am admittedly very surprised at the scale difference between these houses and the miniatures, which I suppose is the difference between true scale and epic scale. While true scale miniatures are naturally smaller than their epic scale counterparts, if anything, these houses feel bigger than most of the terrain I have painted in the past for 40K. Strange.
The Muster of Rohan
So, after about three months of painting, I have completed my entire Rohan host. I may add a character or two to the army (banner bearers, captains, red-headed warrior princesses, etc.) but for now I am calling it done and moving on to other game systems.
In Other News
First, in preparation for a Necromunda campaign that will be starting soon, I purchased a Genestealer Combat Patrol box. Odd choice I know, but this campaign is expected to have heavy use of vehicles, and I’ve got to be honest, the GSC vehicles as some of the best-looking vehicles in the game. The Achilles Ridgerunner is just *chef’s kiss* so good. I am hoping to have the entire force painted by the end of February, but here they are assembled.
Second, I finally assembled a fully lit display case. I am very excited, as it is more than twice as big as the one I had previously, so I can more effectively store my armies in this one. That being said, it is already full, so I may be in the market for a new one…
For any interested, I got the display case off Amazon here, and it took me about four hours to build.
I sit here editing and collating the fantastic updates by our diligent warlords, the final ones of the year, on a bullet train heading south from Tokyo. Not the most typical of the locations I’ve been known to work from but a fitting place to tie the bow on this fantastic year of hobbying by both myself and the fantastic warlords that have shared their work with us over the course of the year.
I wanted to take a minute before diving into the incredible work of each of the artists to thank the incredible team here at UCH. Each of these men has inspired me and made me work to be a better hobbyist. I started this series in an effort to get more done over the course of the year, and I have accomplished this in spades. I was thankfully not alone in this, dragging 5 other hapless fools onto the year-long journey that you have read through this year. I am incredibly thankful for their writings, and insight. I hope that we can continue to entertain, and maybe even inspire you into 2025 and beyond!
Austin B.
November Progress
Before I move onto December, I actually have to catch you all up on what I was able to accomplish in November! Not that it was very much, hence in part the lack of a post from me in the last month. But I got some work done on some of the new – and older – Shatterpoint boxed sets. I am hoping to get a bit more done before the next set of Rebel and Empire boxes drop sometime in Q2 2025. And I have a bit more to paint up for an event in February. (Events are a great motivator…)
With all the holiday preparation as well as some business at work, I didn’t get as much done as I had hoped, though finally finishing off the “This is Some Rescue” box was nice, and Lando’s box is actually pretty close to completion as well, with the Wing Guard half-way in progress.
December Progress
Now paradoxically, December ended up being a much more free month for me, despite having yet another holiday to prepare for. While it’s also not as much as I have done in some other months, I did get a good few heroes done for my Middle Earth armies in preparation for the new edition, including the Three Hunters: Aragorn, Legolas, and Gimli. Mounted, even!
Gamling joins them, as does a mounted Rohan banner bearer – his dismount having been painted over two years ago at this point for my footslogging Rohan army (that I showed off in the first ever post, actually!). I was unfortunately unable to get Theoden done as I had hoped to, so he remains unfinished (unprimed, even), as the model did not arrive till after I returned from my holiday celebrations. Expect him in January, alongside some fitting foes!
Atop those, I actually finally finished my Vampire team that I have left lying unfinished since before the start of this year! (Another item I showed off in the first post, as something “to be done!”) I painted them up to participate in a local event, and even walked away with Most Touchdowns! (Again, events are a great motivator…)
This is a bit of a cheat, since 9 of the models had already been completed (the Vargheist and 8 Thralls) last year. As was Wilhelm Chaney, who is here posing for the family photo. But I had to get those 6 Vampires done eventually, and actually base the whole team, and it was finally done! The project and event also finally got me to base Chaney, hence his inclusion in the photo, despite the fact that he’s been fully painted since his release in 2021!
Year in Review
And that’s it! That rounds out the year! Honestly, for what I wanted to do when I started on my posts, I have admittedly failed. My initial task was to get an army done for Warhammer: The Old World, and I have made significantly little progress in that regard. But as a general motivator to paint, I’m fairly happy with what I have been able to accomplish this year. I have abandoned some projects, most notably that Old World army (for the moment…), and I have certainly hopped around a lot in regards to what I am painting (how many times did I say “this is what I’ll be painting moving forward” only to change it the next month, or come back with some Shatterpoint models instead?), but posting for this blog has at least kept me painting, which isn’t quite something I could say about myself in years prior. Why do you think I have so many incomplete projects? I haven’t always posted consistently, either because I’ve felt I haven’t done enough, or because I was just too busy to get a post ready in time, but every month I have at least done something.
But to sum up what I have done this year:
-10 Squigs, 5 Squig Hoppers, and a Big Boss on Squig, all for The Old World (and all that was done for that game…)
-A whole, rather large Bolt Action army in the First Special Service Force, which consisted of 80 infantry, 2 mules, 2 guns, and 4 vehicles and their crew, completed in a month. As well as another tank and a few accessory pieces completed for the British (which I may have not shown off, oh well…)
-Three whole Blood Bowl Teams (Shadow College, Gnomes, and Vampires), and a small selection of Star Players and accessory models.
–A staggering 46 models for Star Wars: Shatterpoint, in an eclectic mix between Rebels, Imperials, and some Scoundrels.(Though I still haven’t finished those Ewoks…)
-A small handful of Necromunda models.
-Two random mechs? Haha!
-48 Landwehr and some Commanders for my Prussians (most of those never made it on these posts either, woops! Maybe when I do another army update… I also have some cavalry in progress, so perhaps they’ll make it in the next posts in January or Feburary!)
-Plus the above 8 models for MESBG!
I have also built those several dozen German infantry and vehicles, also for Bolt Action, but painting has been delayed as I reassess how I plan to actually paint them, unhappy with my few test models thusfar (hence why they haven’ty been shown). That, and the army book coming in late January means the army will be getting some revisions and new additions.
So my hobby progress has been very mixed, jumping around as I usually do.But it’s still fairly impressive. I certainly managed to churn out more in some years prior, when I was less busy (or at least pretending to be), but I am happy with how far along I have come on some projects, such as the Prussians and my ever-growing Shatterpoint collection; very happy with what I’ve completed, in the various Blood Bowl teams, and especially the FSSF; and fairly interested in what I have planned for the new year. Though I won’t spoil too much of that just yet…
As for my favorite model of the year, it was a bit of a three-way tie for me between Lando, Legolas and Gimli on horseback, and Darth Vader, but I have to say that the Darth Vader I painted way back in June remains one of my most impressive models. It was really fun trying to get some subtle differences between all the different blacks and really make the miniature read and pop without looking too dull, and I am very happy with what I was able to achieve with such a reduced color palette.
I’ll leave you all on that. Happy New Year! Hope to have more for you in the next!
Kevin C.
Dismounted Warriors of Rohan
I had a lot of older Rohan miniatures that I purchased from a friend, and I figured I should finish painting them before getting new Rohan miniatures. These miniatures were quite old – one even had a broken spear point – but I was determined to paint them in the same scheme as the riders. While they are not my best work, they will be good pieces to have in a scrap.
Hail Theoden King!
My friend ended up selling me not one, but TWO Theoden sets (so four miniatures total – two with helmets, two without helmets). I decided to do a little experiment in painting tutorials.
In my painting, especially this year, I use a lot of online painting tutorials. My academic conditioning has trained me to be as forthright as possible in citing them. There are two online painters that I have used, and they both happened to have painting tutorials of Theoden – Warhipster with Contrast+ (https://youtu.be/HYLbQpBF1fI?si=kic1rImVIe4m3X0W), and Pete the Wargamer (https://youtu.be/4vVjtCGy9RY?si=ByF2r_g0mJrcmhP7). I’ve used Warhipster for some of my terrain pieces, and I’ve used Pete for some of my earlier Blood Bowl teams. So, I figured I would compare the two and see how I felt about the results.
For the helmeted version, I used Warhipster. Admittedly, I was nervous about the free use of contrast paint all over the place, and it made it hard to control much of the borders between colors. That being said, I really loved how the miniature turned out, especially the steed.
I used Pete the Wargamer for the unhelmeted version of Theoden, which I suspect was made before the advent of contrast paints, as none were used. I was less pleased with this result, and I found it more frustrating to paint in his style. A lot of this frustration was due to hard-to-reach places and difficult effects to accomplish, such as lightening the raised designs of the armor.
All in all, I believe I liked the Warhipster scheme more, and so I used his method for some of the other miniatures I painted this month (more below).
Eowyn and Merry
I only had one set for Eowyn and Merry, so I decided to wait until after the experiment and copy which paint scheme I liked best. Even though Warhipster did not have a video tutorial for this specific miniature, I used his scheme for the horse, and more or less copied the method I used for the regular Riders of Rohan for Eowyn and Merry.
One thing I did change from the film adaptation is that I maintained all heroes’ horses as white. I plan to continue this with Haleth, Hama, and Hera (coming soon!). This is different from the films, which have the heroes on all different color horses, but I want this to be a visual cue for me when playing pieces on the board.
Battle of Edoras
As a “reward” to myself for finishing the whole Rohan army, I was able to pick up a boxed set right when it was released. I had these guys assembled practically hours after receiving them, but it just so happened that we had more than a week of miserable rain, sleet, and otherwise yucky weather, preventing me from priming them.
I finally did prime them right before Christmas, and I am excited about painting them next month. As an interesting study, I compared one of the new footmen to one of the old ones that I had just completed.
The new ones are clearly more detailed, and just seem much more interesting in scale and posture. I am sad I didn’t have the time to paint these guys this month, but I am excited about having them finished next month.
Gaunt’s Ghosts
While I wasn’t able to finish my Rohan Warriors in time, I was able to knock something off of my shelf in the meantime – my Gaunt’s Ghosts. I have had these guys on my shelf since June 2021, so it was nice to finally complete something extra for me.
As I discussed earlier, I decided to use the Warhipster video tutorial on how to paint these guys (https://youtu.be/MqviEDV03SU?si=GfGTk256Gzi0KGhO). I admit that I was a little disappointed with how the video was laid out. There was a lot of screen time spent on applying the layer, and not a lot of time explaining how one should paint the deviations from Gaunt and Rawne (the two that got the most screen time).
I still think I did a decent job, but I was hoping they would be fantastic. Instead, they are okay, and I am glad that I have them ready to play.
Now, if I could only use them in an actual Kill Team…
Year in Review
I have done more painting in 2024 than any other year previous, which is quite an accomplishment. I have assembled and painted two full armies, nearly completed a third, and gotten a lot of painting projects off my chest. All in all, I painted over 350 miniatures this year (counting those LI infantry 5-on-a-base as one miniature, by the way).
Assembled and painted the entire Bretonnian Army Box
12 Knights
3 Pegasus Knights and Lord on Pegasus
24 Archers
32 Men at Arms
Assembled and painted a huge Legions Imperialis Army
Three boxes of Solar Auxilia (12 Sentinels, 12 Ogryns, and 48 Infantry)
Three Support Artillery Boxes (36 Rapiers, 36 Tarantulas, and 12 Cyclopses)
Baneblades, Malcadors, and Valdors
19 Dracosans
6 Lightnings and two Marauders
Assembled, magnetized, and painted Titan Maniple (Warlord, two Reavers, and four Warhounds)
Painted four Blood Bowl teams (Norse, Black Orcs, and two Halflings)
Painted Kasrkin Kill Team
Painted Rohan Host
36 Rohan Riders
12 Rohan Warriors
Theoden, Eowyn, and Merry
Random Terrain Pieces
That being said, I still have many other projects on my workbench, so my queue for 2025 is already full.
The Best
My favorite miniature that I painted this year was actually one that I never posted. Austin and I went halfsies on some Brutes for Necromunda, and I am really pleased with how mine turned out. Granted, it died on its first campaign game, but that’s how Necromunda rolls.
The Worst
I have an unending hatred for that stupid Duke on Pegasus model. The paint scheme was eventually okay, but I really hated everything about this model – assembling, priming, painting. Glad it’s done with.
What’s Next Year
As far as what I have planned for next year, I already have the queue figured out.
Finish painting Battle of Edoras
Paint my remaining Necromunda miniatures (Cawdor and GSC) in time for our next campaign
Finish painting my old Deathwatch army (had this on my desk since 2016!)
Assemble Meduseld
I have a few more projects, but that will last me a while yet. I also got some new drybrushes for Christmas, so I am excited to try these out.
Until next year!
Jerry S.
Solar Auxilia: No More Lasrifles, Please.
This year has been very exciting for me, the release of plastic Solar Auxilia has been incredible and I have enjoyed every minute of it. From building, to painting, to playing; my hobby journey with Solar Auxilia has been a blast, even if a little longer than I would’ve liked in the end. As you can see here, I was prolific in my Solar Auxilia painting, the total count of infantry clocking in at 115 models in just 8 months, wow! I was able to finish the last 20 infantry this month, something I am very grateful for as I think I am mentally done with this particular scheme for the time being.
I thankfully still love the muted scheme I created for these models, the dark blue coupled with the greys and worn metals of the fatigues and armor plating really lends itself to the so called “dark millennium” and I think really captures the dearth of hope that is to be found on the battle fields of the Horus Heresy.
Bolt Action
I’ve continued the progress on my Bolt Action American force this month, focusing on completing a couple more Weapons teams, a Medium Machine Gun team and a medium anti-tank team that will hopefully help keep my GI’s alive as they navigate the battlefield. I’ve always loved the idea of overwhelming the enemy not in bodies, but in firepower, just as the American Army preferred in WW2 and these last two teams really help accomplish that idea on the tabletop.
Continuing Adventures in Middle Earth
The last of my true hobby progress was again in the realms of Middle earth. I have along with several others, began forming a regular group of MESBG players at a local hobby shop, playing weekly on Mondays and beginning to attend/plan events across the region.
One of those aforementioned events was a Helm’s Deep mega-battle. With 6 people on each side and hundreds of minis on either side, this was a spectacle indeed. It was tremendously fun seeing the many, many models I’ve painted for both Rohan and Isengard featured on the tabletop together. Indeed the Hornburg was manned almost entirely by Rohan models I myself painted! How cool is that!
This has been a great experience thus far and I hope that we can keep this progress moving forward into 2025. Speaking of 2025, the first month of 2025 I will be attending a couple events, hoping to bring a force of Gondor using the Reclamation of Osgiliath army in the new edition. I’ve always loved this part of the books and movies and using the Brothers Gondor together is always a fun time. In past editions, I had not used my Gondor in one force, opting to either use the Rangers of Gondor, or the various defenders of Minas Tirith and had based each force differently. This isn’t inherently an issue but I know it would bug me seeing an army on the table using 2 different basing schemes. As such, I set to work rebasing my warriors of Minas Tirith to match their Ranger pals. I gotta say, I love the results too!
To finish this year off, I spent the last week not at my hobby desk, but traveling around the islands of Japan. That being said, I am still a Warhammer junky through and through and as such, made sure to visit the Warhammer cafe in Tokyo. This is a sweet little spot to stop at in Tokyo, a larger than normal Warhammer store with a variety of incredibly well painted “miniatures” to gawk at while awkwardly trying to explain to your friends the differences between a warlord titan and whatever an “Age of Sigmar” is. Something I undoubtedly failed to do even as my friends tried as hard as they could to understand.
I snagged a couple snapshots of some of my favorite displays which you can see below. This was only a fraction of the total displays and if I ever was able, I would love to play a game and enjoy a coffee in this lovely store. In the meantime, I did snag the delightfully odd “Slaves to darkness” book and a lovely hoody only sold at the Cafe.
Closing thoughts on 2024
The year has flown by, and it was a great one by all accounts! I painted around 400 models this year by my counting:
115 Solar Auxilia
112 Tomb Kings
28 Arnor
42 Bolt Action Americans
35 Word Bearers
A Thunderhawk!
A 6×4 Middle Earth board!
Various miscellaneous characters and one offs.
An absolutely prolific year by numbers and something I am immensely proud of. Even with this wildly productive year, I still have much to do in 2025 and beyond. I was lucky enough to purchase a friend’s entire 40K and 30k collection this year, a great bargain but unfortunately adding to the backlog nearly as many models as I finished this year! UGH!
My favorite part of this year has been the Thunderhawk pictured below. This was an incredible journey, really challenging myself as a hobbyist. I don’t know how I’ll top it in 2025! (Please don’t ask about the Reaver Titan in my closet)
Enough of 2024 though, it’s 2025 now after all! In 2025, I’ve been thinking of what I want to accomplish, and although this list will undoubtedly change, maybe even in the first couple weeks of the year, It’s always a good idea to to start the year with a plan!
Finish my Solar Auxilia army! This should be relatively easy as I’ve only need to paint the tanks still
Finish my Tomb Kings Army. Again, this should be an easier task as there is only the various monsters and characters yet to do.
Paint MY 40K Deathwatch Army. I’m copying Kevin on this, this project needs to get done this year lol.
Tie up the various odds and ends for the various projects I’ve not finished. This is a broad goal, I just want to finish some of the odd characters and squads I’ve picked up over the years for my various armies.
Finally finish painting my Zone Mortalis board
Build and paint either my Warlord or Reaver titan.
Do more character and one-off projects. I’ve been doing a lot of Army painting the past few years and I think it would be rewarding to spend some more time on fewer models, challenging myself in new ways.
Expand the Urban Cowboy Hobbies network. I’ve often thought about starting a YouTube or podcast arm of my media Empire, maybe this is the year to do so!
Until next time!
Michael S
As the year comes to a close, it’s the perfect time to reflect on the progress and joys of hobbying. The last few months have been a busy time for me, balancing a new job and the holidays has left less time for Warhammer. December hobby time for me was mostly 30 minute chunks after work and I was pleasantly surprised with how much I was able to accomplish by adding one or two coats of paint each day. Despite the lack of dedicated time, I was able to paint up and build a few miniatures this month to show off.
December’s Work
My Imperial Fists have taken most of my attention this month. I was able to build a set of terminators and scouts I’ve had on sprue for a while now. I am also about halfway through a squad of Hellblasters (not pictured) bringing the model count up to 15 for the month.
For painting, said Terminators and Scouts received a heavy spray of yellow. 4-5 passes with an Airbrush was the price of a consistent coat of Bronze Brown. Another pass with Golden Yellow brought some color and saturation to the muted yellow-brown basecoat. One final highlight was applied to the most raised surfaces using Light Yellow to push the highlights.
Once I got the worst of the painting behind me, I went in by brush to apply the rest of the colors. The Terminators took around a week and a half of periodic work. Batch painting for 30 minutes every day made short work of this squad.
The Scouts were a bit different, since I was unsure how I wanted to paint them. In the end I settled for using a mix of colors for fatigues boots and leather. The sergeant came out nicely with pretty minimal effort. My next goal will be getting the rest of the squad to the same spot before moving on.
Year in Review: Finish the Damn Model
2024 has been a great year for me in hobbying! While I still find myself flitting from one project or model to another, I’ve painted more complete units this year than in most years I can remember.
Not counting basing, I’ve managed to fully paint the following units.
5 Imperial Fist Terminators
5 Imperial Fist Sternguard
1 Imperial Fist Apothecary
5 Black Templar Assault Intercessors
5 Black Templar Terminators
1 Black Templar Terminator Captain
5 Death Guard Tactical Marines (25 more of them just need me to apply some weathering; Missed opportunity to cash in BIG on hours of work.)
5 Death Guard Terminators
1 Imperial Guard Sentinel
20 Tomb Kings Skeletons
1 Lumineth Light of Eltharion
Furthermore I’ve built the following models, but haven’t had the chance to paint them fully.
Imperial Fist Command Squad
Imperial Fist Impulsor
5 Imperial Fist Intercessors
5 Imperial Fist Hellblasters
1 Black Templar Marshal
20 Imperial Guardsman
Imperial Guard Command Squad
2 Imperial Guard Heavy Weapons Teams
5 Kitbashed Fire Dragons
20 Tomb Kings Skeletons
36 Tomb Kings Skeleton Archers
16 Tomb Kings Skeleton Horses
1 Tomb King Necrolith Bone Dragon
While the list of unpainted models is still long, I’ve been way more engaged with the hobby this year and am looking forward to 2025! I can safely say this is the most productive hobby year I’ve had in a long time if not my entire history playing Warhammer. My goal moving forward is to just finish the damn model!
2024 Superlatives
A final article of the year wouldn’t be complete without a visual review of some of my work and things that stuck out in my mind. I’ve got a few superlatives to award…
Favorite Single Model:
My Imperial Fists Apothecary turned out so much better than I expected white armor to. This was one of my first forays back into oil washes in some time, and I loved the fact. The armor looks crisp but still has definition from the recess shading. I was most proud of the tabard, including a nice helix symbol and freehand outline that looks believable. A first for me in painting cloth!
Favorite Unit:
The first unit of skeletons I painted were a ton of fun! The old style kits brought back a ton of nostalgia from my entrance into the hobby and painting these was a breeze with speedpaints. I loved how the colors came together and am looking forward to getting the rest of them ready to paint in 2025.
Least Favorite Model(s):
After converting these characters up for my Death Guard force, I was really excited to get them painted up in white and green. After starting to paint them, my enthusiasm really dropped away as I felt they didn’t quite look the way I had hoped. My captain simply converted from Narik Dreygur I found is below. The model just hasn’t captured me the way it did once I started painting.
I haven’t totally given up on these three yet. I do eventually plan to get back around to these knowing a complete paint job will go a long way toward making them look a bit less “meh”.
Favorite Base:
This sentinel almost overtook the Apothecary for favorite model, but really the base is what I fell in love with. I put quite a bit of work into building some believable rubble and liquid pigments really helped tie everything together and up the soot and grime needed to sell the effect.
Most Painful Legends Casualty:
These Iron Golems (and 2 units of Untamed Beasts) took me lots of time and work to get looking spiffy in bare steel and the blood of their foes. Despite looking their best, an unfortunately timed retirement via Warhammer Legends meant they never got to see the tabletop with the rest of my Chaos Warriors. Time to start playing Warcry?
Least Fun Model to Build:
It’s a tie between the Skeleton Horsemen from my Tomb Kings and the old Chaos Knights I picked up early this year. Both of these have a lot in common: old models, mould lines, cavalry bases, mould lines, poorly fitted parts, did I mention mould lines?
Upon finishing both of these units, I had to take a sizable break from the hobby to retain my sanity. Enough said.
Favorite Model That Mysteriously Remains Unpainted Despite How Much I Like It:
In contrast to the other Death Guard characters, this captain doesn’t make me disappointed. I still love the conversions and use of a spare Eliminator helmet to give him a hood befitting any good officer of the 14th, but he still remains mostly unpainted.
I blame the result of the other characters I put together, and my frustration with metallics at the time of painting. Instead of powering through, I just left him to sit forever incomplete. I am starting 2025 by pushing him to the top of my priority queue. Hopefully I’ll be able to share a fully completed photo next month!
Looking Forward
In 2025 I am looking forward to another great year of hobbying. My goal is to continue to make progress towards fully completing projects and models instead of leaving them 80% complete for an eternity
A stretch goal would be to have my display cabinet only displaying completed miniatures… Maybe I’ll surprise myself?
IF I can complete that, I also want to branch out in media creation for the hobby and at some point create video tutorials for painting and other aspects of miniature painting. Who knows what the future may hold.
Cheers and happy holidays!
Joe R.
Well, you might have noticed it’s been a few months since I last participated. I fell off the wagon, got back on the wagon, fell off again, brought some paints on holiday, and here we are.
Blood Bowl – The Half-Shell Universe All Stars – Lizardman Team
This project changed dramatically. I got VERY tired of cleaning and assembling the metal models from Greebo (FYI, Greebo has since switched to resin which is much nicer). So, I decided to switch over to a set of 3D printed lizardmen models from BruteFun. It was faster to 1) download the files, 2) arrange and slice the files, 3) print the files, 4) remove the supports/clean the models, and 5) prime the models than it was to assemble a single metal model. I had hoped to finish these in time for Chaos Cup in November, but that did not happen. My friend Neil let me borrow his excellently painted Beach Shark team instead.
These are still very much on my TO DO list, but I do have a huge highlight from this work. I tried my first ever comic book style miniature! I had tried comic style late last year on some Necromunda bases, which worked out okay, but this was a whole model!
I follow Thunderbrush on Patreon, who releases guides on comic book style miniature painting. I still have a long way to go, but I was REALLY pleased with how this turned out.
Pathfinder – Keller Feelgood, NG Cleric of the Endless Road
I started painting this model while I was back in grad school (pre-2015). The model was used as one of my many Pathfinder Society miniatures when I was playing 2-3 times a week. He wasn’t one of my favorites, but the name Keller was cemented along-side his affiliation with Desna (the goddess of dreams in the setting).
This year I was asked to join a Pathfinder campaign in progress by a colleague I met in Kansas City. Turns out she was in DC now! I was a little apprehensive. My gaming group in North Carolina was really exceptional, and I was intimidated to find my place in another group. Thankfully, this has turned out to be a really wonderful group. I decided to revive Keller in Pathfinder 2nd Edition. Keller became a cleric of the Endless Road (a pantheon which includes Desna) with the edict to travel, explore, learn, and help. This incarnation also became an herbalist and brewer, striving to find new ingredients to improve his brews.
Since joining, I’ve worked on this model a couple of times. Each time he moves a little closer to being something I’m proud of. He’s also great for experimentation, since I’m really the only one who cares how he ends up looking on the table. Everyone else is using pre-painted D&D miniatures, so he already feels a little special.
Necromunda – The Junktown Jesters – Escher
I decided to take my paints with me for the holiday. It was a bit of a bust, BUT I did end up working on two additional models for my Batman villain themed Escher.
These are still a work in progress, but I think you can see my progress as a painter reflected in the model on the left. She represents Punchline, a relatively new Batman villain. I got this all done in… 2 hours? And that included playing around with some highlighting. The other one, if you can’t guess, is Mr. Freeze inspired. The skin needs some work still, but I’m fairly pleased with the “bones” of this model. I’ll even try doing some actual plasma effect (probably with dry brushing) and see what happens!
What A Cowboy/Dracula’s America
I got really into western miniatures this year. I don’t know why exactly, but my friend Neil is ALSO into western miniatures. We played a game of What A Cowboy and have aspirations to try Dracula’s America, Dead Man’s Hand, and Dead by Lead in the New Year.
I picked up a batch of metal lawmen from Dead Man’s Hand and was kindly gifted some Wargames Foundry western miniatures for X-Mas. I think this is going to be my next project.
I have already cleaned up the Dead Man’s Hand miniatures (including some shotgun repair work). I really DO NOT LIKE that these miniatures come attached to a mini metal base. So I took a 3D printed base file and messed around with it in TinkerCAD to remove a section. I then put the miniature in and applied Stucco to fill the rest of the hole. Not bad eh? Now I just need to do this for… 25 other western minis. I will still apply some basing materials over this Stucco base.
I also 3D printed a ton of western miniatures. I test printed several to get them in scale with the traditional models. I think it worked out alright. I’ll be mixing and matching as I get things ready to play a mini campaign with Neil. Or maybe all the Warlords will decide westerns are cool and clammer to join in on the fun.
Some Light Reading
I finished off this year by doing some light reading.
Both of these books came highly recommended to help advance novice painters. They have both been exceptional for completely different reasons. I will need to read Figopedia again to truly retain the knowledge it contains, but I walked away understanding significantly more about light and color theory. Tommie Soule does a great job of walking step-by-step through lots of things I’ve ignored over the past several years of painting. He also does a great job encouraging you to play, not stress.
A Year in Review.
Even though I missed participating in the last few months, 2024 has probably been one of the most successful hobby years I’ve ever had. Let’s recall what got accomplished this year.
I arbitrated my first ever Necromunda campaign and played in another!
Joined a Pathfinder Campaign! And ran a 3-session Super Hero adventure
6 Escher styled after various Batman Villains
Necromunda bases for said Escher
Dipped my toe into Comic Book Style
1 Chaos Chosen Ogre painted almost entirely through glazing
1 Blood Bowl Dwarf Team
1 Blood Bowl Chaos Dwarf Team
1 repainted Blood Bowl Halfling Team
Assembled several MDF kits for Necromunda
Assembled Ork Kommandos for Kill Team
Assembled Angels of Death for Kill Team
Assembled Hernkyn Yaegirs for Kill Team + Necromunda
When you look at what the other Warlords have done, this list seems pretty paltry. However, this is probably the most engaged I’ve been with my hobby since moving to Virginia 5 years ago. Much of that comes down to the wonderful community of gamers I’ve surrounded myself with. It’s been wonderful to hang out here, with the other Warlords, and grow into a fledgling painter.
The Good
My two favorite projects this year were the Chaos Chosen Ogre and the Halfling Team. The Ogre is the only model I “finished” all year, meaning I varnished him with no intent to ever adjust him again. I wasn’t able to get the Halfling Treemen where I wanted them, but those Halflings popped during that whole tournament. It didn’t hurt that I went undefeated either! 😀
I’ve also gotten much better at playing while I paint. When I just decide to work on a model and try something new (instead of rushing towards a deadline) I end up really enjoying myself. My skills have definitely improved because of this.
The Bad
I still struggle to find time to finish my models. I’m able to basecoat fairly well and provide some interest around the model, but I rarely have time to highlight a model to the point I call it finished. Out of all those dwarves I painted for Blood Bowl, I think 2 are actually done. That doesn’t even include their bases (see below)!
Thankfully, I’ve come a long way with regards to highlighting. I used to be scared to even attempt. Now I’m willing to do it and just see what happens and learn along the way.
The Ugly
I am bad at working on bases! Those two or three Necromunda bases are the best I’ve ever done. I am barely finishing the models, let alone spending any time on the bases. However, I have started keeping my models separate from the bases so that I can more easily access hard to reach spots on the model. That’s some progress right?
Next Year!
Another Necromunda campaign is in the works. Hopefully it’ll be done in Mid-January. I might even share it here if Jerry lets me! And with that, I want to thank all the other Warlords for their support over the year and for letting me bask in their greatness.
Special thanks to Jerry for being so enthusiastic about my participation and always working to keep us all on task!
Happy New Year!
Mike P. Painting My Empire Army for Adepticon: 12 Weeks, 102 Models, and a Dream
With 12 weeks left until Adepticon, I’m staring down a monumental challenge: painting 102 Empire models to complete my army. Thankfully, my general on griffon is already done, and he’s looking fantastic—he’s the centerpiece of the force, and I’m using him as the visual anchor for the rest of the army. Now, it’s all about getting the rest of the troops ready in time for the big event.
Week-by-Week Strategy
I’ve broken this project into manageable chunks: about 9 models per week. It’s still ambitious, but it’s doable if I stick to a plan. My approach is to focus on one unit or type of model at a time. Here’s how I’m structuring it:
1. Core Troops First: I’m starting with the infantry. They’re the backbone of the Empire, and getting those blocks of state troops painted will give me a sense of progress early on. I’m batch painting them, working in groups of 10 to 15 models to keep the momentum going.
2. Special Units and Heroes: Once the bulk of the infantry is done, I’ll move on to the knights, artillery, and their crews. These models have a bit more detail, so I plan to give them some extra attention. After that, I’ll tackle the heroes and other supporting characters, which will be fun because they let me experiment with more intricate techniques.
3. Final Touches: The last few weeks will be all about basing, finishing details, and making sure everything looks cohesive.
Staying Consistent
My general on griffon has set the standard for my army’s color scheme: rich reds, deep blues, and gold accents inspired by Altdorf. I’ve painted a couple of test models for the infantry to make sure the scheme translates well across the army. The key is to keep things consistent while still adding variety with unit markings, banners, and other small details.
Weekly Workflow
Here’s what a typical week looks like for me:
• Monday-Wednesday: Prime and base coat the models. I’m keeping it simple with a black primer and working up from there.
• Thursday-Friday: Apply washes and highlights. This is where the models really start to come to life.
• Saturday-Sunday: Focus on the details—faces, weapon hilts, feathers, and any other bits that make the models pop.
The Challenge and the Fun
It’s easy to feel overwhelmed looking at the sheer number of models left to paint, but breaking it down into smaller goals keeps me motivated. I also remind myself why I’m doing this: to field an incredible-looking army at Adepticon. Seeing the blocks of troops come together and imagining them charging into battle makes the effort worth it.
Looking Ahead
I know the last few weeks will be intense, but I’m already planning for that final push. Once the army is done, I’ll add some finishing touches—like weathering and flocking the bases—to tie everything together. If I have time, I’d love to create a display board to really show off the army.
There’s a lot of work ahead, but I’m enjoying the process. Every painted model is a step closer to the goal, and I can’t wait to see my Empire army in action at Adepticon.