¡Hello and bienvenido! it’s been a pretty wild August for me. I’ve been on the road for over half of the month which has been a real roller coaster. Taking some time hanging out in Orlando airport to write up some of my hobby accomplishments this month and put some goals for September out into the world.
Legio Tempestor Reaver Titan epic scale
First up, we start small. This was my first mini in this scale, I’ve always enjoyed the Reaver titan and this was a great introduction to the scale. I’m looking to pick up some transfers before I add some weathering details so expect to see this guy again.
Little disappointed that the rest of the minis for new Epic are delayed but realistically I was never going to find the time to paint anything in the meantime.
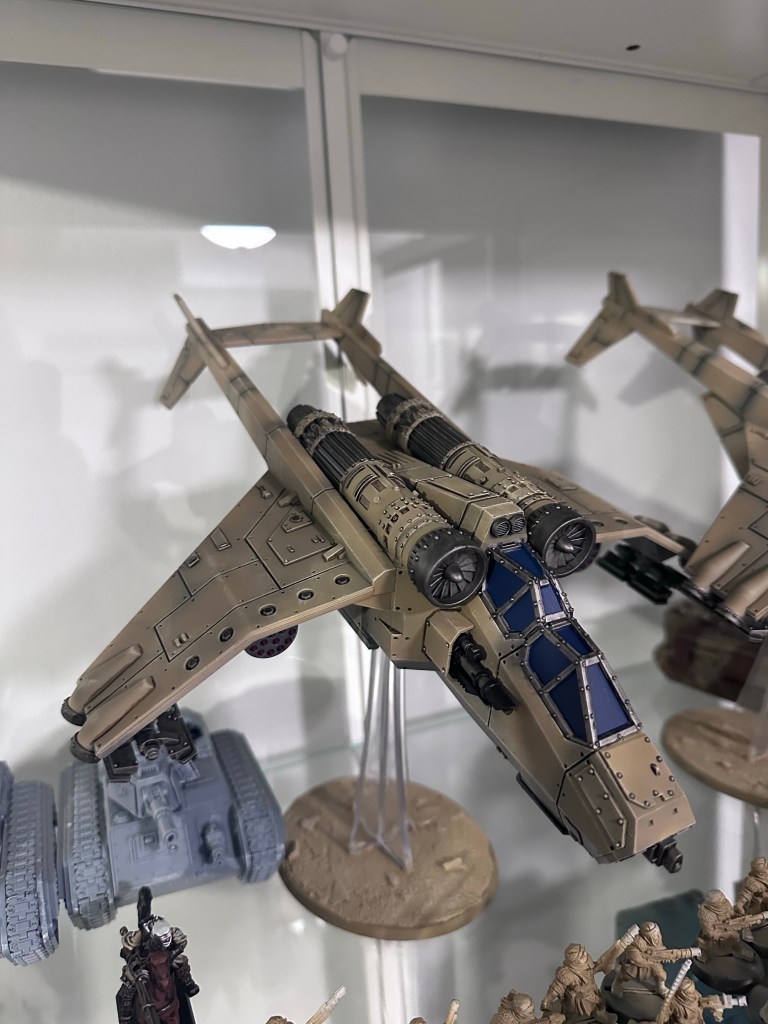
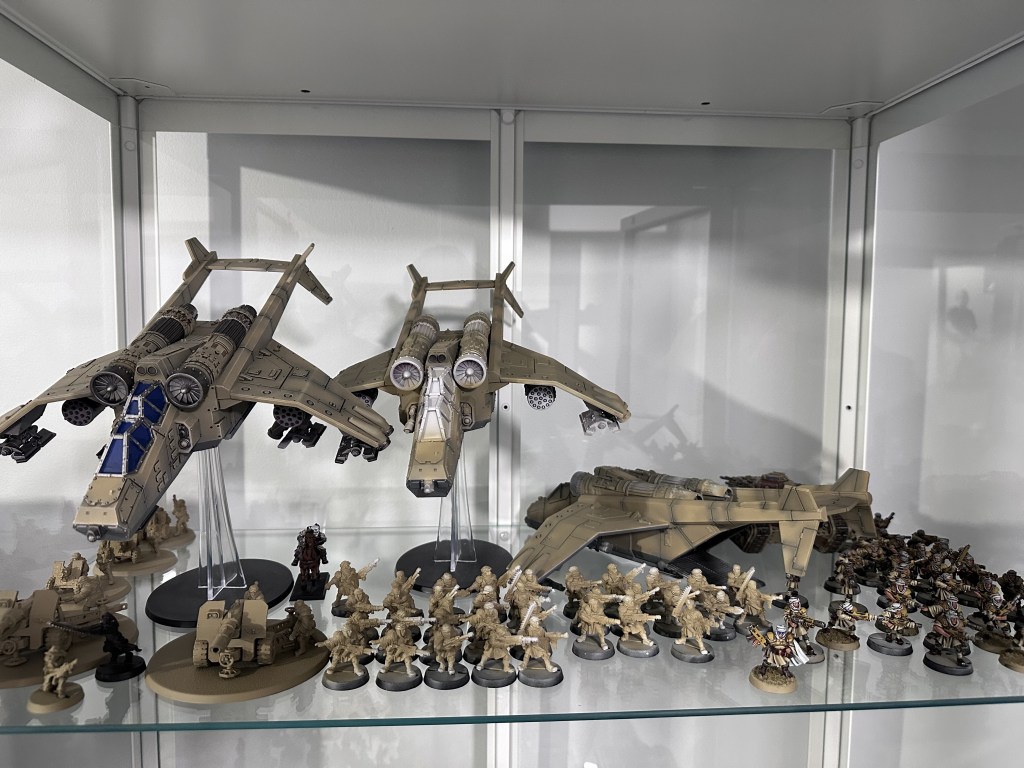
Next up we have the bulk of my painting progress this month. I’ve had the below Valkyries sitting in my display waiting for me to find the time to paint them all year. Well I finally got tired of looking at the three unpainted aircraft.
Flight of the Valkyries
The first of the three planes had been finished to a tabletop standard but not yet based as I, as typical, could not make up my mind on how I wanted to set the scene for my project. First thing I did then was get my bases sanded and then painted. I’ll try to grab some better pictures in my next update as I’m quite happy with the desert feel these bases portray.
Valkyrie #1
I snagged a couple more pictures of the first two completed Valkyries above and below, as you can see I stuck with a very basic khaki color for the hull. I utilized my airbrush to spray zandri dust over a grey primer. This yielded a more worn look to the paint, perfect for sand blasted metals.
Valkyrie #2
You cannot tell as well in the pictures but I worked to create a transition on cockpit glass but I think I’m going to increase the vibrancy of the blue, hopefully bringing out the effect even further. Stay tuned for more updates for these planes as I still have one more flier to add to this squadron.
Next up we have the beginnings of a Horus Heresy White Scars army. Big fan of these guys in the novels and I wanted to challenge myself to paint some white miniatures.
Starting the building process, I decided to build a squad of tactical marines, always a good choice. Led by Qin Xa, a beautiful model that I picked up from the Warhammer Cafe at the demand of my girlfriend- a real keeper she is.
To finish off this month’s building efforts, I started with the real meat and potatoes of a White Scars horde- Bikes! Three of the awesome plastic jet bikes and 6 resin outriders to start. I’ve got 21 total outriders so stay tuned to see those as I’m sure I will be working on this force off and on to finish up the year.
Hello! This weekend I was left on my own by the lady and in a desperate gambit to avoid housework I decided to build my second Warhound Titan. This has the double effect of opening space in my closet of shame for my inevitable Legions Imperialis purchases, as well as giving me a little extra practice with resin ahead of my Reaver titan build (ETA December).
Almost every warhammer fan who has ever seen a titan in person before has fallen in love with them. In the lore, on the tabletop and in a display case, these massive models really showcase the scale, and absurdity of the Warhammer universe to the fore.
I have been lucky enough so see quite a few titans in person, and even luckier to acquire 3 of my own. 2 Warhounds and a Reaver titan. The two Warhounds titans are now built and I’m planning out the task of painting these incredible models now. The Reaver titan, my pride and joy, still remains in its box waiting for the day I’m brave enough to assemble it.
I picked up my Two Lucius pattern Warhounds about 18 months ago right after Adepticon 2022. I built and “painted” the first one last September in 2 weeks ahead of NOVA here in Virginia but tore it down to add magnets for stability and ease of transport about 2 months ago. The lessons I learned during that first build have gone a long way to helping me in this build.
I’ve always been drawn to the blocky shapes of the Lucius Pattern that you are about to see take shape but the Mars pattern that is more commonly seen is also stunning in person!
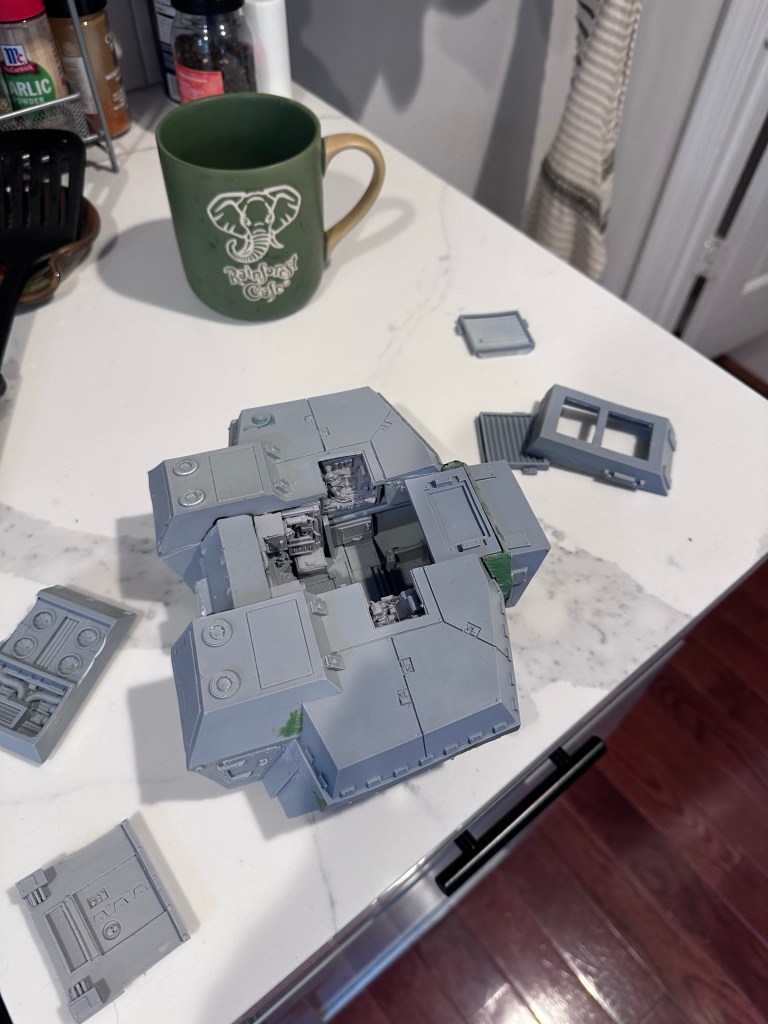
All the parts (wow that’s a lot) drying after their wash
The first step when dealing with resin models is to wash them in warm soapy water. This removes any mold release that has stuck to the parts. This mold release will hurt the adhesive properties of any paint that you use later in the painting phase.
The torso being dry fitted before adding pins and some more of the interior detail.
I personally like starting with the torso with my warhound titans. The instructions and common school of thought is that starting with the legs is the wiser move. I think a completed torso is easier to pose on top of the legs and helps you get a better idea of how the finished model will look.
Something to note, I don’t add the head or arms until the end as you will want to pose these after seeing how your legs are positioned.
The completed torso
The Lucius pattern has a tendency to warp pretty bad on these torso parts so make sure you dry fit these pieces before setting them together.
As you can see here, there are quite a few panel gaps that I have needed to address with green stuff. This is normal in my experience. These older Forgeworld kits were made without the benefit of CAD software and as such don’t usually fit together as well as we would like.
Next up- the feet! Now the feet on the Warhound titan are awesome. The possibilities are endless with the posing as each toe joint needs to be posed individually.
With this incredible range of choice comes difficulty though as there is I believe 27 parts in each foot. Each of the main toes requiring 6 resin parts and 3 brass pins to come together.
The feet are probably the most tricky part of this model due to the aforementioned part quantity as well as the simple fact that the feet must support the whole model’s weight. This means that pinning is essential for this step. I’ve seen a few Warhounds without pinned feet and after months or years of tension, the resin begins to sag.
This means that you shouldn’t follow the age old adage “measure twice cut once”. Measure thrice cut once. (And use JB weld not super glue to be safe)
The feet are done and now it’s time to build the legs
As you can see in the above pictures. I’ve decided on a striding pose for this Warhound. This titan is supposed to be quick and I want it to look like it’s running. I wouldn’t recommend this for your first titan as there are some more challenges associated with it but I’m not your father.
The legs are relatively quick compared to the feet. I like to use a sticky tack to help me dry fit all the leg joints to give me an idea of how the joints will be angled in the finished product.
Once you have your pose, time to bring out the JBweld once more. I like to do each joint individually, letting each dry fully before moving onto the next. This helps keep me honest and prevent any major mistakes with posing as you can always correct any slight errors on the next section.
The finished legs, fully striding. Perfection.
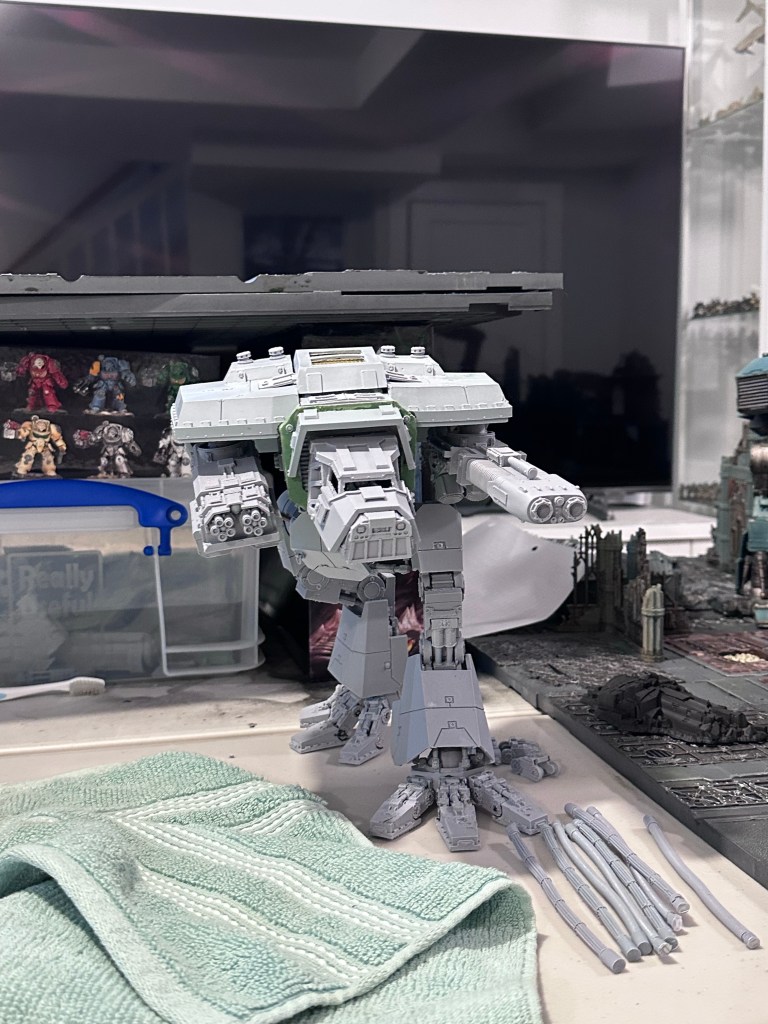
As you can see, the legs are done! I’ve kept the hips pistons and the leg armor off for the time being. I like to add the pistons on last as they are dependent on how the legs are posed. whereas the armor will only be attached with tack until I get this painted.
You can also see a hole on the top of the hips. This is for a quarter inch magnet that will secured the legs to the torso. If you have any intention in gaming with your titan, I suggest magnetizing the hips and arms for ease of transport.
The torso on the legs. PerfectA better picture of the pose, as well as a size comparison with one of my ultramarines.The mostly finished product. (Hoses still need to be attached)
The head and the arms are the last steps and once you’ve gotten through the legs they are a cakewalk. Since we’ve decided to magnetize them all that needs to be done is to JBweld your magnets in place. Be careful with the polarization, you don’t want to mess that up.
I hope this guide has been helpful. I love these older titan models and after this model I am feeling much more comfortable ahead of my reaver titan build coming up this winter.
Hoping to get this beauty painted along with its partner in the next few months.
Hello all! A smaller update this week, mainly due to technical issues.
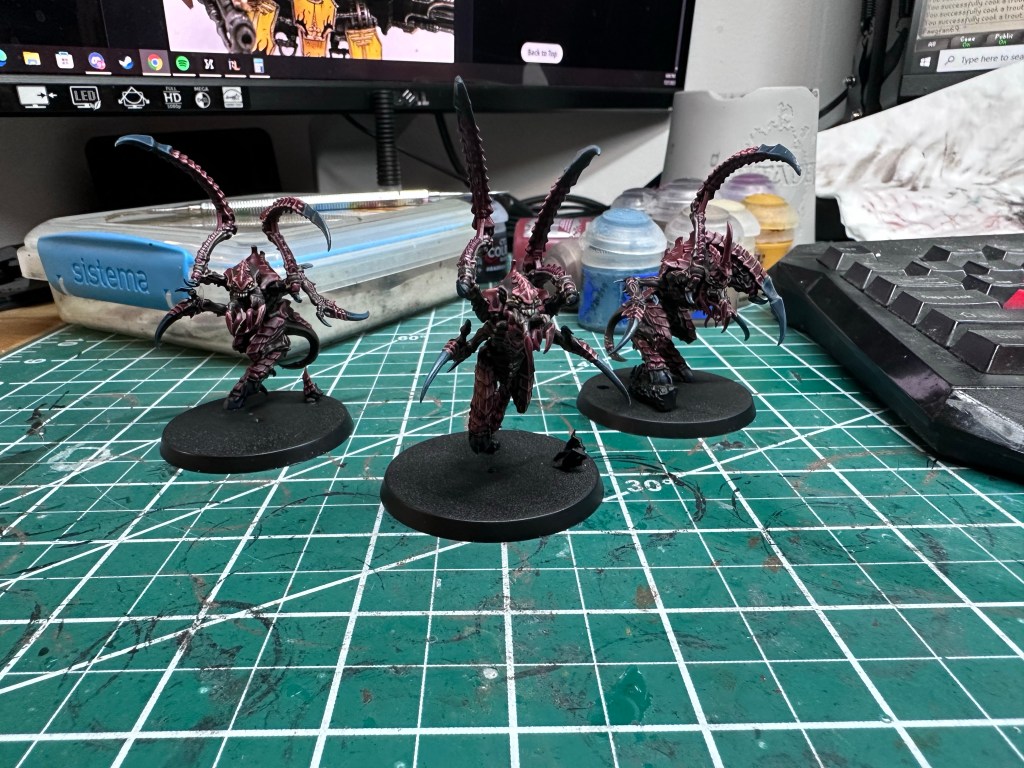
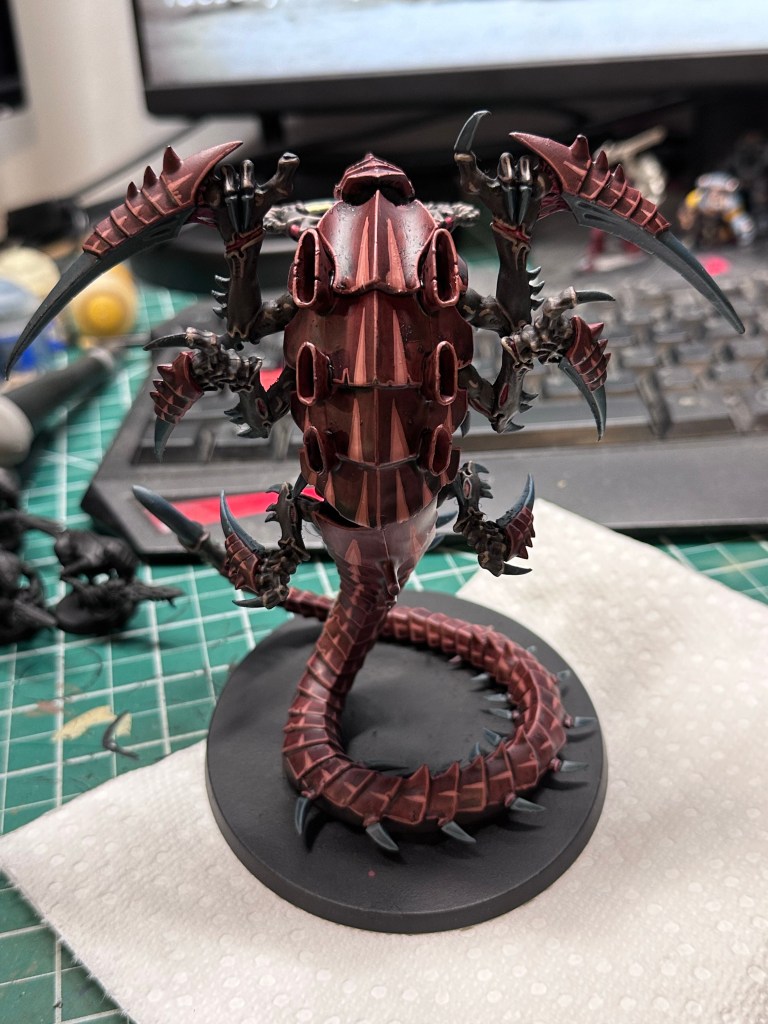
Tyranid Trygon
Finished the Trygon for my ongoing Tyranid force. The biggest of all the bugs I’ll be painting. Liked how he turned out, this model has been a favorite of mine since it came out in the early 2010’s.
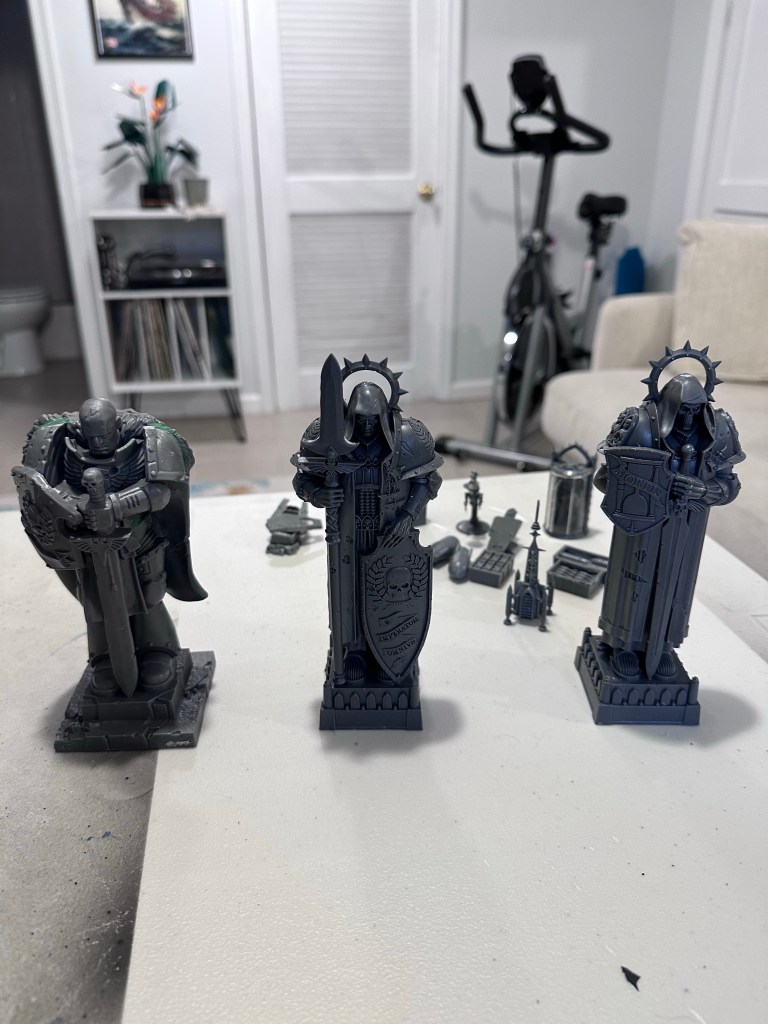
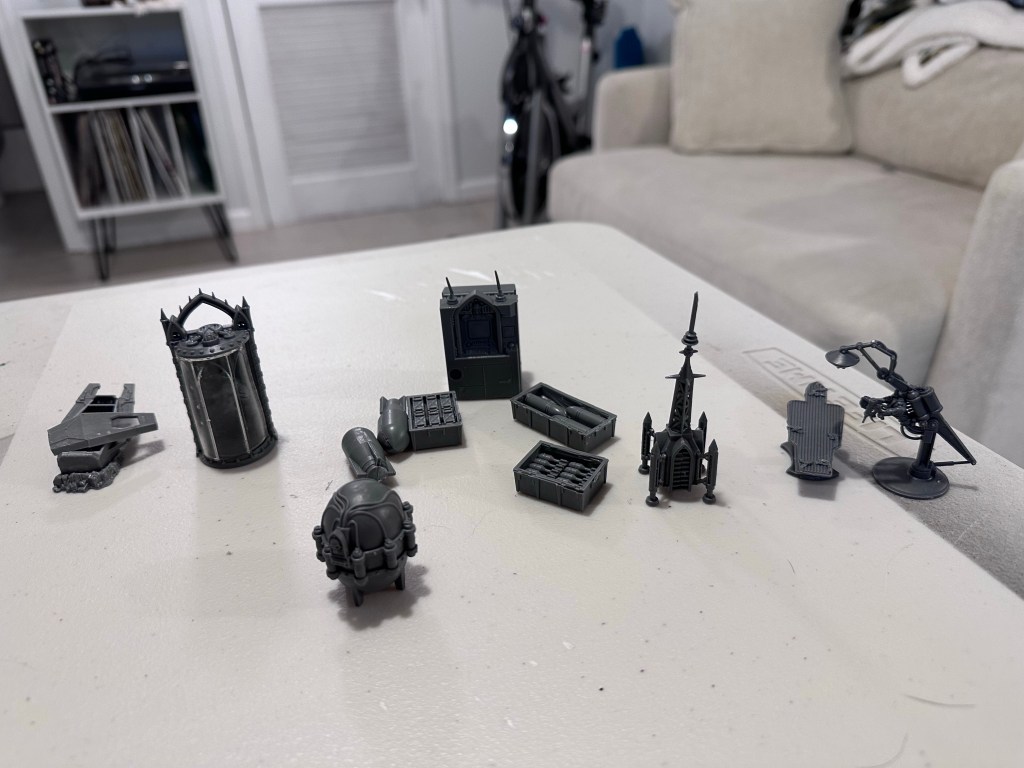
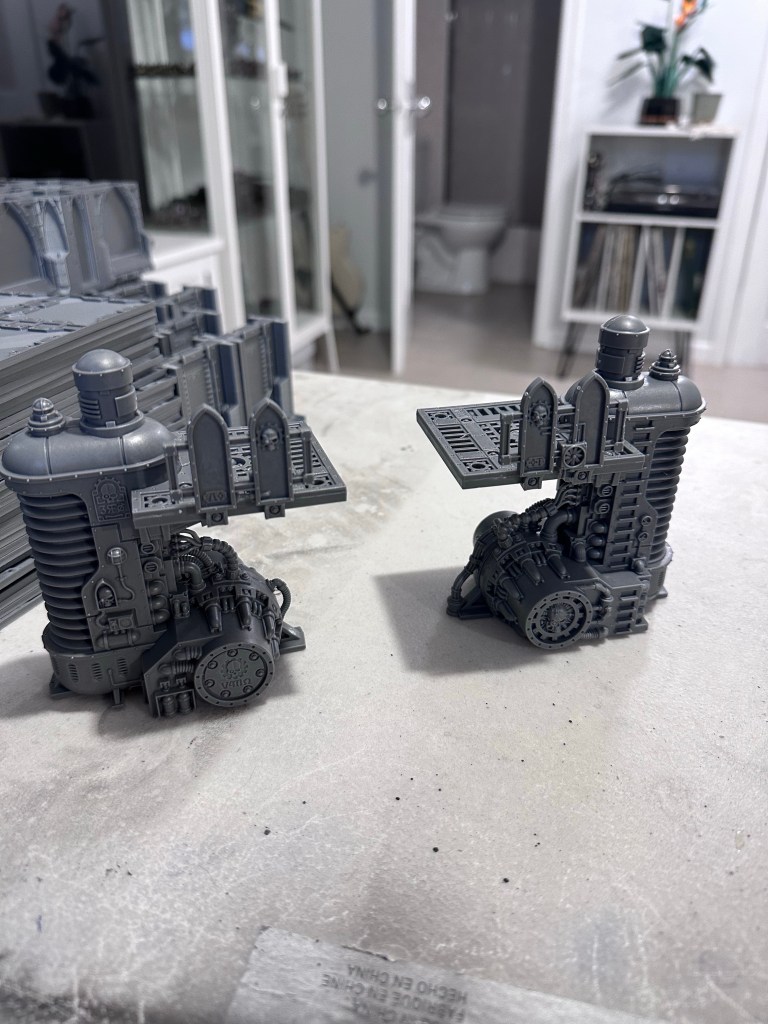
Terrain Build
After each finished Tyranid unit, my goal is to work on some of the ever increasing terrain backlog. Hopefully before the year ends I will have it all done…hopefully….
3 Statues
Sector Imperialis Objective Markers
Thermic Plasma Regulators
That’s all I got done since I last posted. Hope to get some more done this week. Working on another gaggle of Gaunts this week. My desk lamp died last week so I replaced it with a much brighter, larger model. Hopefully I see some improvements from that. Let me know what you guys think below!
Well it’s been awhile since I’ve written about wargaming. I wish I could say that was due to my time being taken by painting and gaming but honestly, I hadn’t gotten anything done until last week. Being WFH really does give me so much more time to get personal tasks done…
Some big stuff has happened since I last spoke to y’all so let’s get started!
Rebuilt Warhound Titan #1
I’ve decided to put this as first for one reason. This was the easiest task I did and it resulted in the most visible progress of all. The ruined hill of my Warhound titan has sat in my display cabinet since NOVA of last year. The victim of my rushed attempt to get it onto the field of battle in time for the event. A 20 day sprint to build and paint the model forced me to cut some corners. This hack job inevitably meant that I used no magnets for ease of transport and during event transportation the model crumpled at the waist and arms. Going back to remedy this issue, i magnetized the waist, feet, and arms of the wounded behemoth, making it stronger than ever, ready for anything that could be thrown at it.
While I can now say that the titan is standing strong, I need to work on the paint job. Originally painted in the colors of the Sons of Horus, I have since grown to think that my titans should wear the blue of Legio Astorum. Keep on the lookout for the inevitable blog post where I detail the repainting of this massive “miniature”.
Hit the halfway point on my 10th edition Tyranid army painting journey
A little update here for the folks at home. I finished painting my 36th gaunt and have fully built the models (other than the hive tyrant that arrived this weekend) I have for this army so far! Having a ton of fun painting these models, the color scheme I’ve picked is absolutely awesome.
Half the gaunts down, another 36 to go….
Return of The Independent Characters
Really excited for this one. I started back into the hobby during my junior year of college. A time when I didn’t know anybody in the hobby. This podcast made me feel apart of their group like none other. The energy and enthusiasm that these guys radiate motivates and excites me like no other podcast has been able to replicate. Missed them for the last 3 year, glad they’re back and looking forward to listening to them on my morning commutes for the foreseeable future.
Hype for 10th Edition
Man, this is an obvious one. I didn’t play much of 9th and honestly the barrier to entry to learn and keep up with the new rules was too much for me to overcome. I’ve been playing 40k off and on for 15 years now and I’m not going to lie, I’ve been missing it. The universe, the models and some good ole nostalgia has me yearn for a return to 40k being a staple of my game nights once more. Whether or not 10th is a return to form for this wargaming flagship remains to be seen, but I cannot deny my excitement.
New list building add on tool
Found this sweet tool that converts BattleScribe rosters into readable unit cards. This is the change I’ve been looking for, making rules recollection easier than ever.
The update I am most excited for. Forgeworld dropped Zone Mortalis in 2012 when I was in high school. I was instantly hooked, the stories of the Badab war supplements along with the incredible tiles output by forgworld just had me hooked. Only problem was I couldn’t afford it, a full table costing more than my car at the time. For the last 11 years I have thought about, dreamed about, and yearned for the chance to own a Zone Mortalis Board of my own. Well dreams do come true boys and girls. With the popularization of 3d printing, the chance to own a Zone Mortalis board of my own has finally come into being.
I ordered this board last October, finally arriving 7 months later, I can finally claim that I own my own zone mortalis board. Hoping to break it in soon, in the meantime, bask in its glory
Absolutely over the moon for this board
Let me know what you guys think in the comments below! Hoping to get some more hobby time in the weeks to come. Hoping to post more frequently as well!
As march fades into April, and April into summer I look back at this year’s building, painting, and gaming. Catching the blog up for what promises to be an exciting year for my tabletop wargaming career.
This Year So far
Let’s start with a recap of this year’s progress:
Last year Gamesworkshop (GW) made the decision to remake their whole Imperial Guard product line… a line that some of you may know is what got me into the war gaming scene. This, combined with my discovery of the old Imperial Armour campaign books, proved disastrous for my saving account as I quickly became inspired to build, and paint an airborne desert recon force. This force’s main objective being to participate in a campaign against my longtime hobby-homie Mike (you’ll hear about and from him a lot I reckon). This army was quickly assembled and promptly wiped off the table at every game they fought in. No matter, guardsmen are meant to die.
As the new edition of Warhammer 40k looms in the not distant future, expect to see these guys often as I bolster their ranks in the coming months.
The Tallarn so far
The second, and more important project was the completion of my Ultramarines Horus Heresy (aka Warhammer 30k, or 30k for short). A labor of love over the past 2 years I managed to finally compile the 3000 points necessary to participate in all of the Adepticon events I was interested in.
My Completed Adepticon Ultramarines
I’ve got a feeling there will be a large addition to those ultramarines coming in the next couple weeks…
Adepticon: The big show
For those of you that don’t know, Adepticon is the largest wargaming convention in the world. Widely regarded as a holy pilgrimage for the biggest nerds in the country. This was my second time making the trek to Chicago for this massive event, and while I lost my usual gaming partner due to work commitments, I was determined to make the best of it.
Day 1
The opening night of the con is always exciting, Games workshop again bringing an exciting preview of the months to come. Whereas last year we got to see the trailer for the new edition of Horus Heresy, this year’s headliner was 10th edition 40k. The crowd was absolutely electric this time around, and as an added bonus I ran into a group of guys from Philly that I ended up spending most of the con hanging with.
The first vendor as always, always a good place to score rare models
Day 2
Day 2 was my big game day, with 2 Horus Heresy games and a massive game with dozens of titans on the table-only problem was I had no titan of my own… In steps my main man Mike. His first, but not last, legendary act of weekend being his purchase of the below Reaver titan.
Absolute beauty, the first of the two Reavers that would be headed home with me this weekend.
Day 2’s games proved to be as fun as previous cons, the event organizers doing a bang up job with the event.
Game one, my massive Falchion tank chewed through his armor with the highlight play of the day. That’s a lot of titans!
Day 3
While days 1 and 2 were fun, day 3 proved to be the high water mark of the convention.
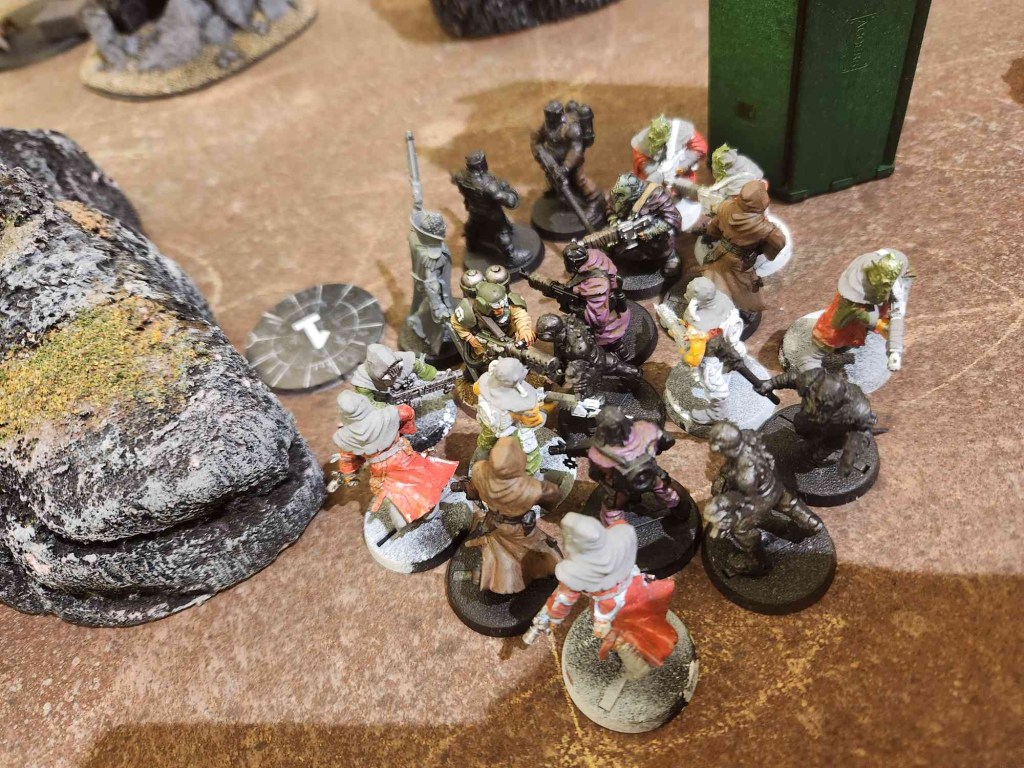
Restarting his own wargaming Journey, one of my oldest and best friends Sam came by to see what Adepticon was all about. After taking a couple laps around the convention floor, we settled down and had our first 40k game in nearly 10 years.
I can confidently say that Sam used his decade to prepare for our rematch a lot better than I did. The game was a total slaughter, wiping my Imperial Guard right off the table.
The setup.This brave Guardsman held the line for 3 turns against Sam’s Chaos scum
With almost perfect timing as our game ended. In flew my main man Mike. Escaping from the prison of his old job, he made his way straight to Chicago. Once our twosome was upgraded to a threesome, the night only went uphill from there. With the drinks and stories flowing, we tied one off. I even managed to muster the courage to challenge Sam to a rematch -which I promptly lost. Better luck next time!
Look at these Studs
I know this was a total ramble but I just wanted to get everything down before I forget it
PS- Mike’s Reaver Titan will NOT be the only Reaver we see on this blog this year