Michael S.
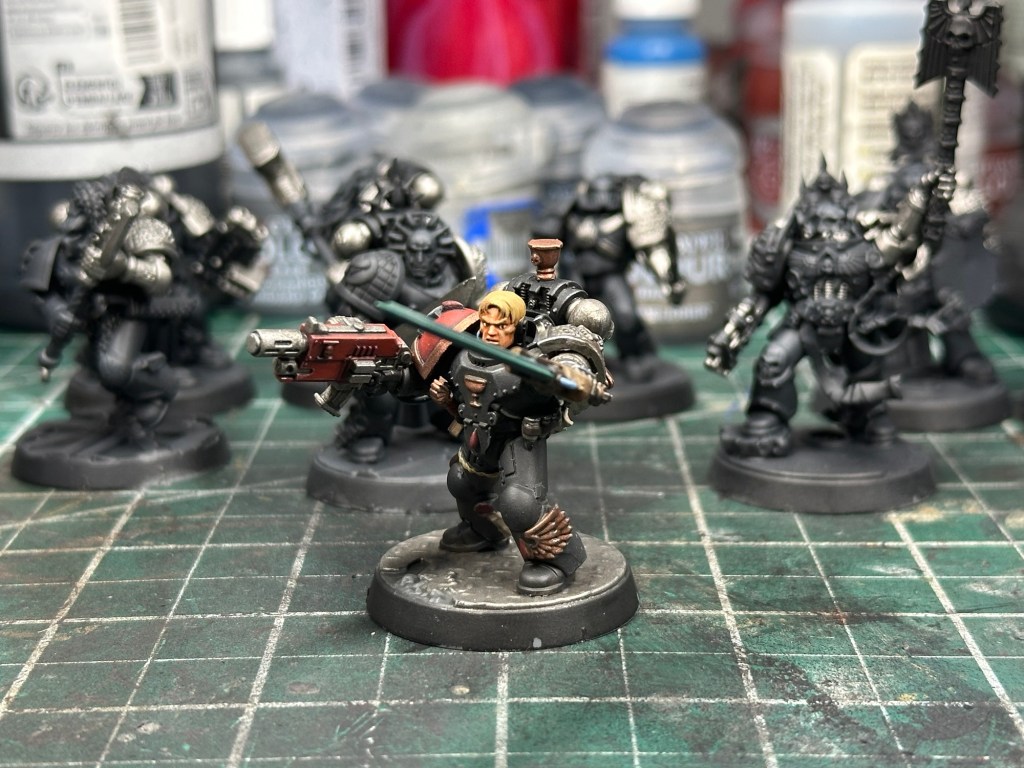
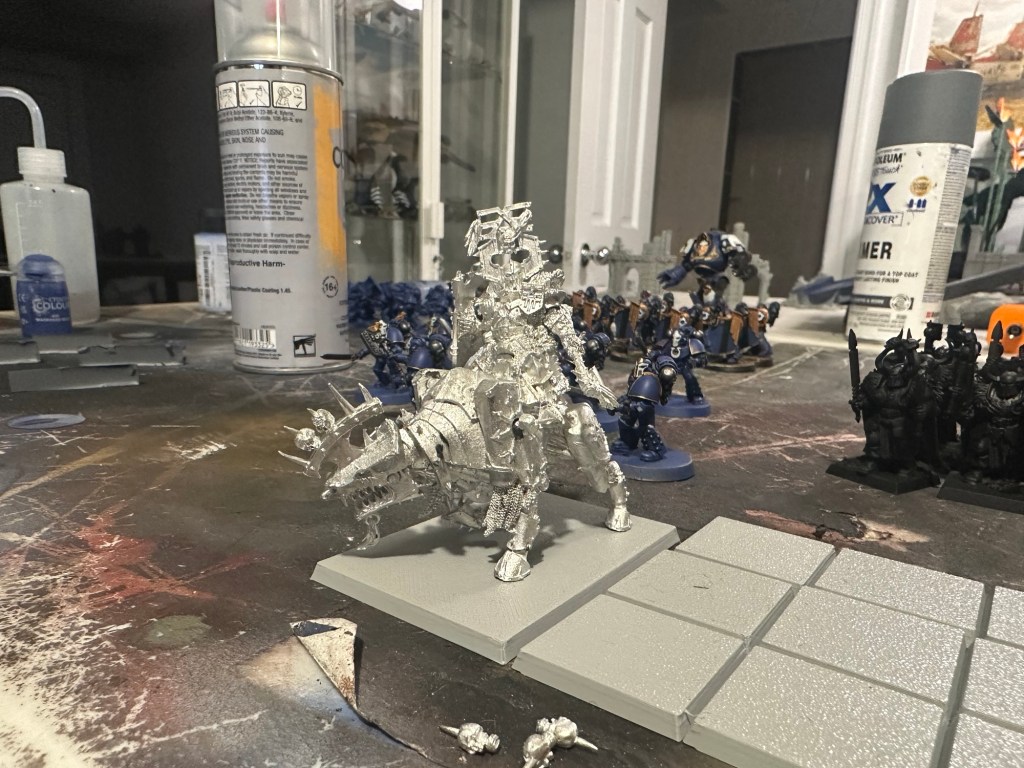
This month I wanted to take my hobby time to work on a character model for my Black Templars. I’ve always had a soft spot for retro game pieces, and I found this old Captain Draco model on eBay a year or two back for cheap. Something about holding a pewter mini just feels so nostalgic.

That’s about all the good things I have to say about pewter minis. Any major mouldlines are a huge headache, and luckily this model came in okay shape. I’ve always had issues surface quality of metal minis affecting the final paint job, so I was meticulous about cleanup. I took a micro-file and some fine sandpaper to lots of the flat surfaces to help smooth out any irregularities. After a good bit of manual labor, I was ready to start painting. I don’t have a picture of the cleaned model, but the pitting is visible in the original shot.
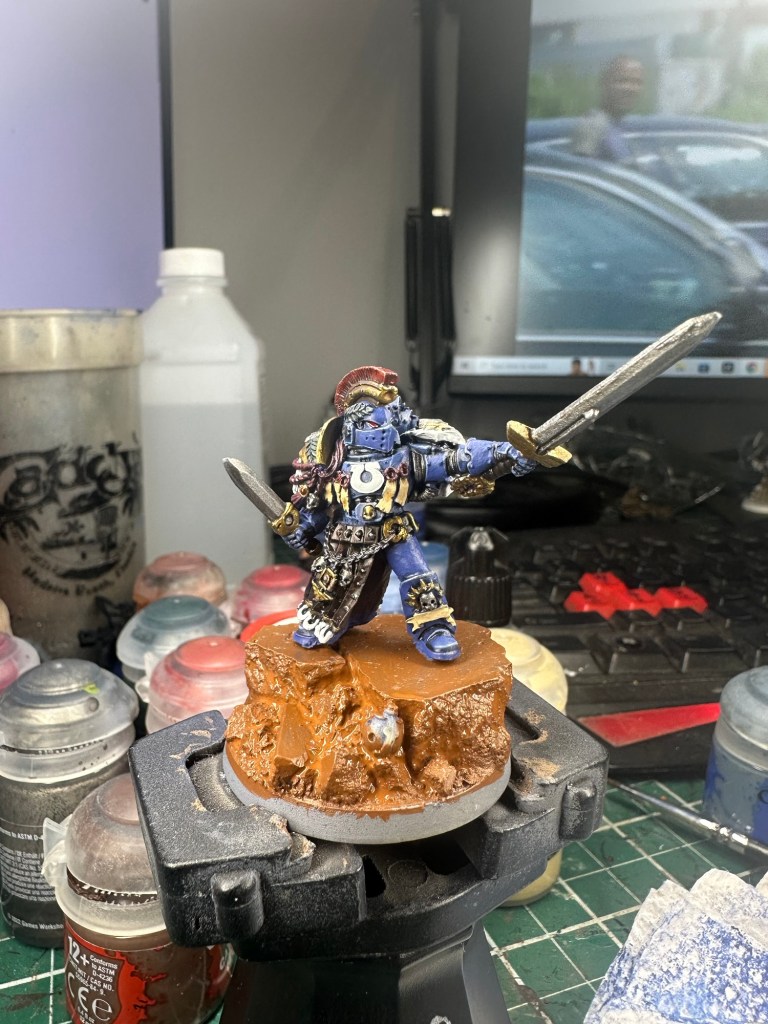
For the robes I worked with muted browns and ivory. I tried to put some texture on the fabrics using crosshatching, but I found that this didn’t quite give me the effect I wanted. I tried my hand a freehanding a Templar cross, which is easier then it sounds. By following the pattern below, you can consistently get a symmetrical cross as long as you have a good brush point.


There are plenty of ways to paint black armor, but for a centerpiece mini I wanted to put in the extra mile to make it pop. I decided to paint the model using non-metallic metals, and followed a similar method for painting the black armor, albeit with less pronounced reflections. .
For the NMM metal, I researched some potential recipes for various metal tones and chose about 4-5 colors for the progression. For the golds I started with dark brown, to a pale yellow and finally a highlight of off-white. For the silver and steel, I used a dark gray, then progressed up to pure white leaning more towards the cooler midtones. I started by sketching out my highlights and blending them in using several thin glazes.

At first I wanted to scrap it, but the final step of applying specular and edge highlights really turns on the effect. It was a great excercise, though I’m still not sold on how the Bolter is turning out. There was still some residual texture which I found made it hard to get a good clean color transition. All in all though I am glad I really pushed myself to try new things.
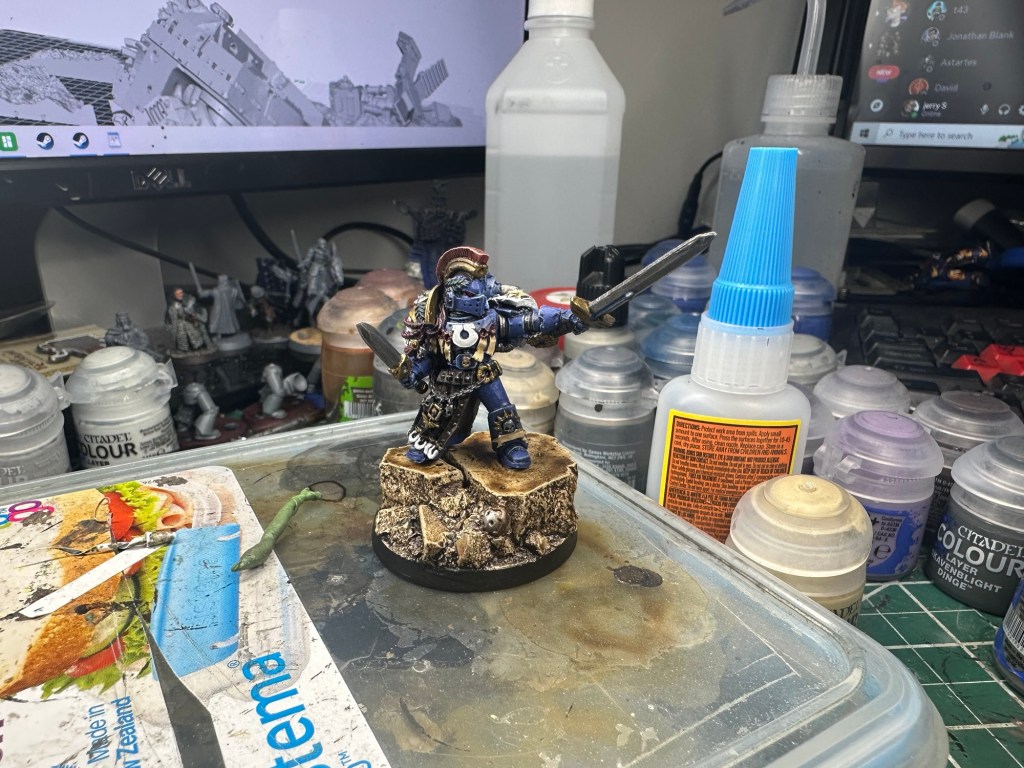
I am not quite done with this model yet, but I am looking forward to finishing it up and getting him based!
Cory E.
In the far future of the 41st Millennium there is only…. Nostalgia ?
From Wizkid’s Mageknights to James Workshop’s Warhammer, I’ve always loved plastic minis and spending money. My Jr. High School days saw my fleet of red Eldar facing off against Necron Monoliths, Space Marine Dreadnaughts, and Tau. ….getting shot off the board by Tau.
I genuinely don’t know what edition it was and if we even played by the right rules but boy-howdy did we roll some dice!
I have to shout out my old spot as being an absolute kingdom to first be introduced to the game. This was an official Games Workshop store, but I swear it used to be a pool hall before that. Walking into the store you’re met with two rows of 4-5 wargaming tables to the back wall that goes left with 2-4 more tables. A couple vending machines in the back for a Mountain Dew & Funyun fix because YOLO. The other half of the store had the product shelves and then there was a U-Shape bar top with stools for painting. (I think I saw my first men’s butt crack there….) You could bring your own paints and brushes but this was the early 2000s and GW employees were cracking open fresh paint pots for patrons without a care in the world!

We got in a lot of 40K but as happens, one of the guys got into Warhammer Fantasy so we all did. My Dark Elves & Cold-One Riders got somewhat painted up and I probably played two games. It was fun but I was more enthralled with the new Lord of the Rings tabletop game. I think my 1st or second purchase was a Mumakill because who doesn’t love a giant elephant??
Much more a collector than a gamer at this point, I amassed a sizable LoTR army before slowing down and eventually putting it away in my trademarked GW foam cases.

But that was the past. I had put it all away and rid myself of my plastic addiction until I picked up Middle-Earth Strategy Battle Games a few years ago after a 15 year hiatus. (I would admittedly look at the models every 2-3 years and say that I’d get back into it but never did.) But love it or hate it – Rings of Power got me back into Tolkien’s world and I found a great east coast community to play! I’ve got stories and updates from modest LotR hobbying, but this is about 40K, right?
“Just when I thought I was out – they pull me back in.”
-The God Emperor of Mankind, 31st Millenium. Probably.
So the 40K relapse isn’t entirely my fault. I’ve got this buddy and I tried to get him into LotR. We played a practice game and he even kicked my ass just like you’re supposed to let happen when introducing a friend! So I’m introducing him to Mr. Workshop, show him the website and -uh-oh those sci-fi boys are looking pretty sweet. Chainswords, lasers, TANKS … it’s hard to compete. Ok, ok I know the 40K 2k pt army rabbit hole so I try to prevent this with things like Age of Sigmar Spearhead and Kill Team: buy 1-box and you’re all-set kind of games. And it works! We’ve got some Spearhead games under our belt and even a game of Kill Team!


Then comes that dang Death Korps of Krieg box. And then that Space Wolves Army Set came out. And then Audible had an 80% off Black Library sale. So 2 pre-orders, 5 Horus Heresy books and a Space Wolves Omnibus later and we’re back!
(Disclaimer – my friend got the Krieg box… which is what tee’d up the Space Wolves purchase so I think we can blame/thank him.)
So I don’t have a picture of my first model for comparison but you know the type: 1 thick coat, heavy nuln oil wash and two big white color-outside-the-lines looking eyes. This time we’re gonna do it right. I’ve better tools, better patience, and an endless supply of youtube videos telling me what version of the slapchop method is meta right now.
This month I took to the icy shores of Fenris and assembled the Space Wolves Army Set. I got the Blood Claws and Grey Hunters assembled and sticky puttied onto their bases. I’ve got big plans for making some frost bases and I want to be able to take them off. I also built the Head Takers and these are some sweet models! Being new to 40K, I didn’t know if I’ll need a shield or two swords so I magnetized. I got out my dremel tool to hollow out each arm and added some greenstuff for the magnets to sink into. The Head Taker shoulderpads are built into the torso & cape so I added the inside magnets first but otherwise it couldn’t have been easier.


Time for some paint! Now if these models were following my traditional pattern, they’d stay assembled and unpainted while I order Logan Grimnar…(okay he is on the way). But this time is different and this time I’ve got better tools – like Jerry’s airbrush! I did a classic black prime with a grey “Zenithal” to get all the guys staged. We used the airbrush to paint the shoulderpads yellow and this was game changing and a vast improvement from my layer-painted Blood Claw I got from the Adepticon preview. I generally like layer painting and want to improve but I get fatigued when painting a whole army.

This is my Adepticon Blood Claw I test painted before all the rest. Although it’s perfectly acceptable, it was painstaking and I’d like to do better. The shoulder pads were a paint to layer paint with yellow. The recess shading with a pinwash was a bit messy. You’ll see in the next pictures that I opted for airbrushing the new shoulderpads white first then painting yellow. And I opted for an overall contrast paint with sponging on top for the power armour.
So instead I opted for speed paints – a 50:50 mix of Runic Grey and Cloudburst Blue. This turned out to be a sweet deep blue that is totally wrong for my Space Wolves so I sponged on some Vallejo Steel Grey and it looks great. The speed paint + sponging made the speed paint stay in the recesses like a wash and offers a sort of chipped battle damage underneath so I’m going to say that it all worked out according to plan. I have a Fenresian Grey that I’ll use to push the highlights up whenever I get the courage to edge highlight.


Time to add the shoulder pads. These were left off so they’d be easier to airbrush and paint. I stuck them to some painters tape that I looped to be double-sided and then airbrushed them grey/white. Then I took imperial fist contrast paint and airbrushed that as well. Much easier than brush layering the yellow and a cleaner look than my fist go around.

So with the shoulder pads and the rest of the bodies ready I put them on and painted the trim. I’ve been loving the Space Wolves books surrounding Ragnar Blackmane so I’ll be running his chapter. So I’ve got some MicroSol & MicroSet on the way so I can do those transfers. I’ll also need to search for my sharpest/thinnest brush so I can do their Blood Claw pack markings!

And that’s where I end with my Space Wolves success so far. It feels great being back in the world of 40K with a bit more patience for all this painting. Tune in next month to see the Blood Claws completed hopefully alongside their Grey Hunter & Headtaker brothers. That or I’ll fully pivot over to my Mortisan Elite Spearhead that I just built…. Oh the choices we make!

Okay full disclosure: This article is coming out about July hobby progress… but I did start this in June. So I’m a bit ahead. Which means that I’ll be sure to have more for y’all next month. Here’s a quick spoiler:
The Whistle Stop Whisper
*Legal Distinct from all other machines that convert circulating stories into hype*

Joe R
While I would say that July also turned out to be a great hobby month, this particular recap isn’t going to be all that impressive. This is a situation where the end products don’t necessarily communicate the activation energy that was required to FINALLY start some of these projects. However, I am extremely pleased with both results, even though there is more work to be done on both.
Ash Wastes Terrain – Necromunda
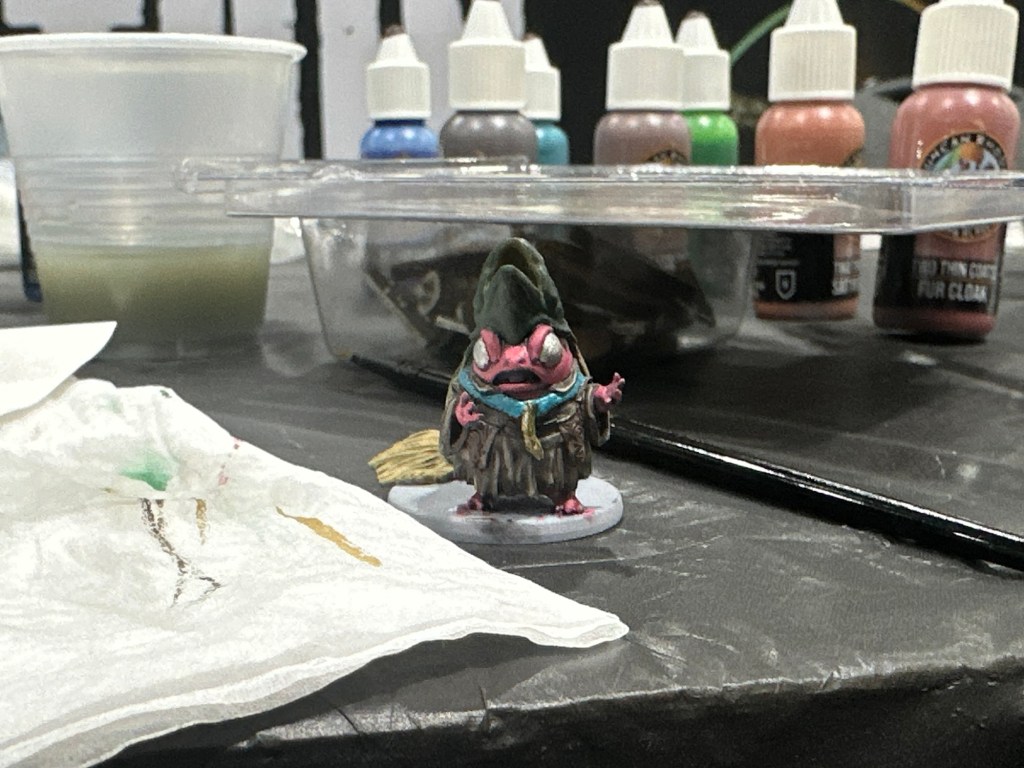
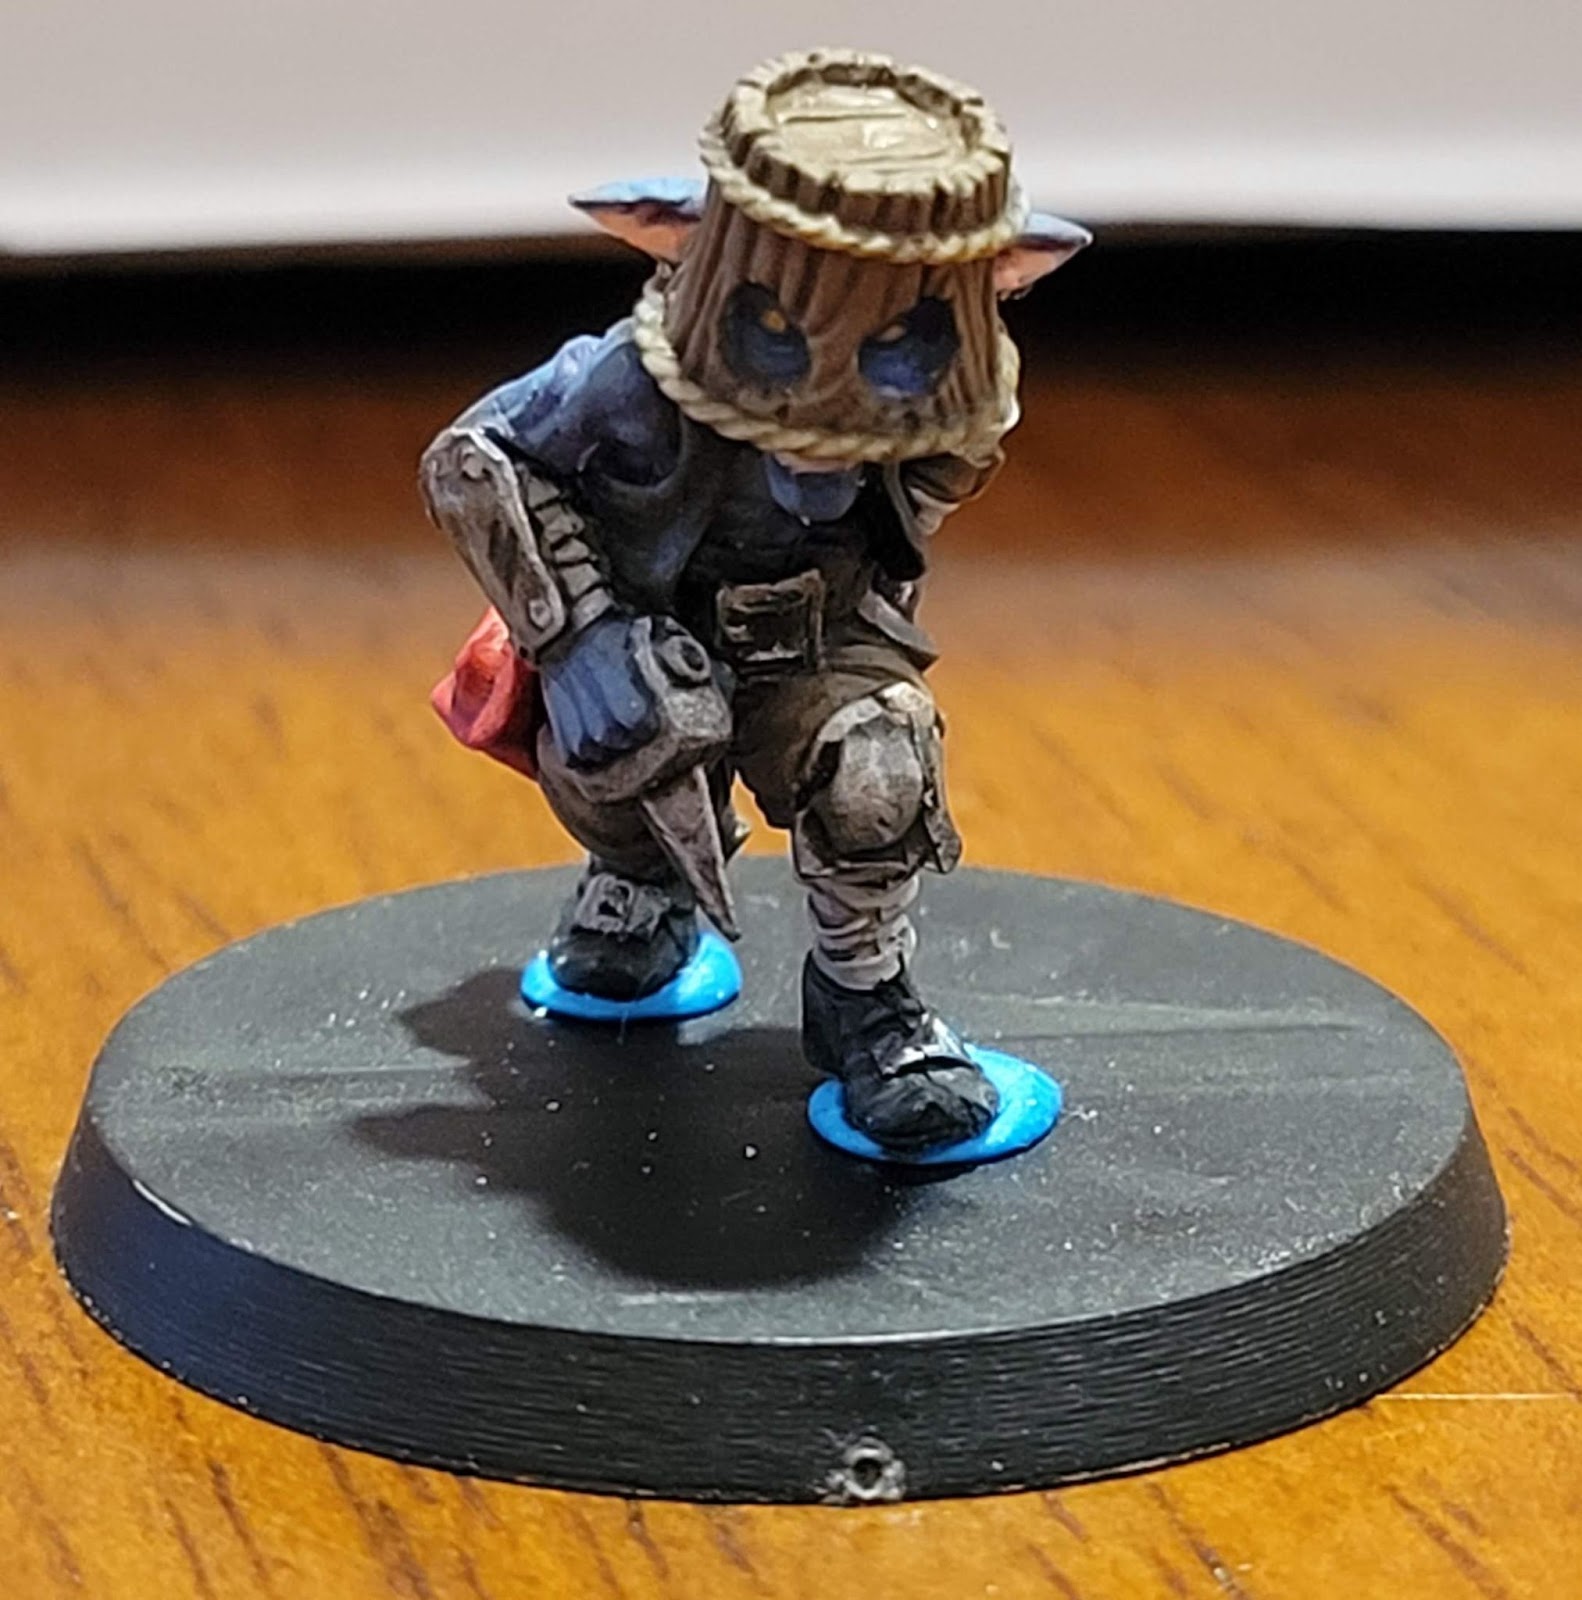
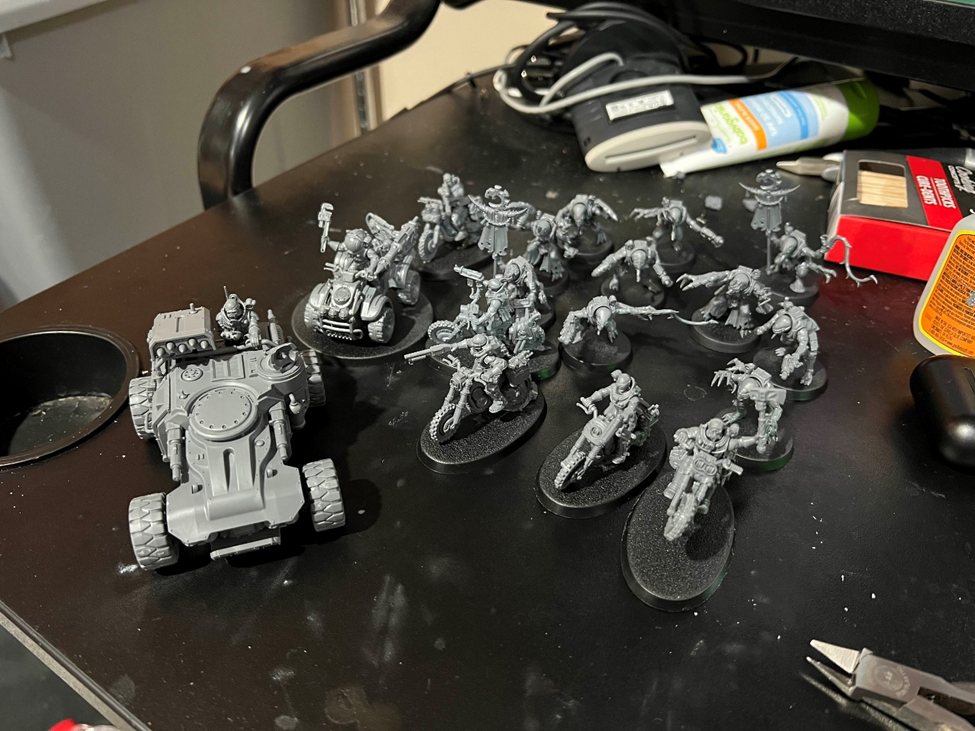
Look at that, a single header. Everything I did this month was in support of Necromunda. Let’s start with the “Prof” Pyggi, the newest addition to my Junktown Jesters.
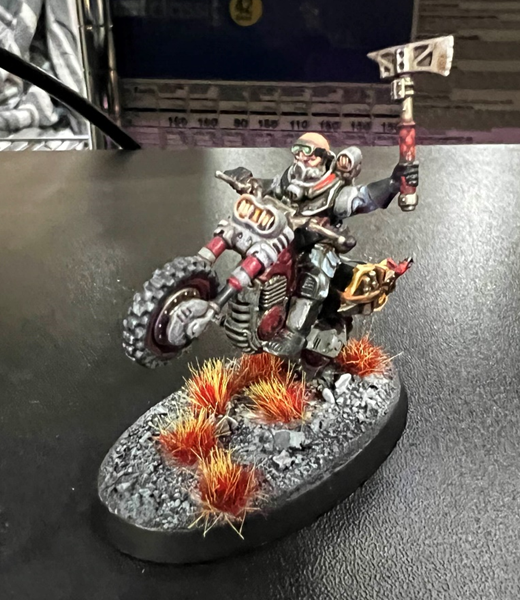
Since I am the arbitrator of my Ash Wastes campaign, I am inclined to run a gang that is fun for me to play but not designed with every optimal mechanical choice. It’s also my first time consistently playing Ash Wastes, so I wanted to try out some options that I’ve never gotten to the table. One of these is the Waster Dirtbike. Now, folks on the internet will tell you that the bikes tend to be a liability instead of a benefit. The Junktown Jesters do not care! So I slapped an Escher on a dirtbike with a chainsword and decided to model her after Batman’s Professor Pyg. I was not willing to spend actual GW models on this experiment, so I used parts from various Print Minis sets to assemble my vision. The bike is from Sedona Bikers, the rider is from the Sickles (though in hindsight I should have used the one from the Bitter Nightshade Vehicle Kit), and the chainsword arm is from City Outlaws. I would select a different bike next time (the railing is hard to paint) and I would prime everything black instead of white, but overall I am very pleased with Pyggi!

I was very pleased with the pinks on the model. I started with Reapers Punk Rock Pink for the base. This paint is very thin so it took several coats. Then I used Vallejo Old Rose to highlight up to a midtone. Finally I did some targeted highlights with Vallejo Salmon Rose mixed 1:1 with Old Rose. It took a little time to understand the lower half of the model. I’m not sure if some of the details didn’t come out, or I just didn’t know what I was looking at. Regardless, eventually I got there. I used Reaper Leather White for the straps and came back through with some Vallejo white to provide some limited highlights. I also tried to do a gem effect on the boots. It looks okay. Once I seal the model (as far as I’m convinced, she’s done!) I’ll go over them with a gloss finish. I also freehanded the hazard stripes! I’ve done better, but they look good enough on the table.
The bike is still a work in progress. Priming it white was the wrong decision. I ended up going over it with a black ink so that the metallics would work better. This has been a somewhat frustrating bit of work to fix my initial priming mistake, but it’s getting there. I will eventually add some weathering powder to the rider, bike, and base to reflect the dust kicked up from the ash wastes.
One of my favorite things about 3D printing is producing my own bases. Here I used Txarli’s Dry Ground. While I am pleased to have “finished” a base for this model, it didn’t turn out exactly as I hoped. I’m currently using a red rock battlemap for my Ash Wastes campaign (mainly so I can overlap with my Cowboy shenanigans!). I should have gone for an orange approach to the base (like the rocks I painted) instead of the dried dirt approach I took. Oh well. I have since watched a few videos and will be prepared next time.
Next up, the Fuel Station from Print Minis that I showcased recently. This has been sitting on my desk, primed, for at least two months. Why? Because I’ve never painted terrain and I was scared. How do I get over that? Sponges. Holy Moses, I love painting with a sponge. I originally started with one of those egg shaped sponges everyone on YouTube is using. I could not get that sucker to work well for me. I either wasn’t adding enough water or I had added too much! I will revisit this sponge, but instead I started ripping apart make-up wedges and using those little pieces with a pair of tweezers to do my painting. This worked out much better for me.

Frequent readers may recall that I wanted to paint my fuel station like a Red Rocket Fuel Station from Fallout, so I knew that red was going to be the primary color. I started by doing the whole model in Army Painter’s Basilisk Red. Then I came back with a liberal helping of Pure Red everywhere except the bottom. Then I provided some limited highlights with Raging Rose. Overall, I am VERY pleased with the results. Some touch ups will be required, but for now it’s gorgeous. I am considering using this for my first oil wash because, well, why the hell not. I think it will bring out some of the dents and add to the atmosphere of a functional, but poorly maintained, fuel station.
Next I started working on the roof and awning. I did these almost exclusively with Two Thin Coats (TTC) Sir Coats Silver with little highlights of Mythril Blade. To do the rust I combined Rust Orange with Wasteland Brown in various mixes. I think I went a little crazy with the rust spotting, but it was fun. Next time I’ll be a little more targeted.


The most important thing about this project though? I had a BLAST doing this. Sponging was easy and the results looked great. There are still several pieces to finish before I’m done with the Fuel Station. I’m going to continue to use this to experiment with different techniques to help it reflect its environment, but I will continue to use sponging as my main terrain tool.
That’s all for my July folks! Next month is the Nova Open! Let’s see what we can get done before then, alright?
Kevin C.
For the first week of this month, I spent in the sunny mountains of Colorado, celebrating my parents’ 50th anniversary. I am never able to get much hobbying done on vacation, but I was able to get some riding in, this time on horses rather than bikes.
While not a painting project, I was able to get my second display case assembled and anchored, so I will be working hard this year to fill this up. Only with fully painted armies, mind you.

Empire Rebasing
So, a bit of a backstory. In the old days of 2009, my fiance (now wife) was out of the country for several months, giving me time to work on a new army. Having recently finished my first Bretonnian army, I began my work on a new Empire army, inspired by the artwork of the recently released Heraldry of the Empire, specifically the Company of Honour out of Altdorf.

I attempted to replicate this color scheme in my troops. Admittedly, my skills back then were… not great, consisting solely of base coat and wash, maybe a highlight or two. I did spend a lot of time on my greatswords and steam tank though, which I have taken pictures of here.


I played a ton of games with these guys, including several large event battles, like the Battle of Miragliano, which was a ton of fun. But, as I got married and then had a kid, I no longer had time to play large games, so I sold the army off. Unlike my first Bretonnians, who are now lost to the Winds of Chaos, I sold this army to my brother, who was at that time sans kids and had the ability and interest in playing large games.
Fast forward to 2024 – The Old World has been released, and Empire along with it. I am getting the itch to get some games in, as well as painting armies. In a reversal of roles, my brother was now newly married and with a newborn, and I was able to have some free time, so I offered to buy back my army, which he graciously accepted.
However, in the intervening years, he had had all the miniatures rebased for Age of Sigmar, reasonably assuming that that was going to be the future of Warhammer Fantasy from now on. So, my first task was to re-rebase all of the troops onto square bases (and magnetize them). While this was a time-consuming task to be sure, this was not terribly creative, so I won’t bore you with details here. Suffice to say, here is the end result.


Empire State Troops
Even though this is already a ton of troops, I still have several more that my brother obtained that were not painted, so I’ve made it my goal for the next few weeks to paint them to display. These will… not be as good as my Bretonnians. There are a lot of miniatures, and I am mainly painting them to tabletop standard, if even that. I have fleshed out my Swordsmen, Halberdiers, and Crossbowmen this month.

Even still, I’ve been able to speed up the process immensely with some nice application of contrast. I am looking forward to getting a full army on the field before the end of the year, perhaps even by the end of summer! It also helps that I am getting Jerry to paint my Flagellants and Free Company infantry as well, which will be immensely helpful.
Empire War Wagon
The last bit of hobbying I was able to complete is going to be a bit of a treat for me, the last Empire piece I will work on before calling the army complete. I picked up the Empire War Wagon when it went on sale with the release of the Empire for The Old World, but I have been putting off assembling it until now.

It was a difficult piece to assemble, but boy oh boy, these miniatures look phenomenal. Unlike the rest of my Empire miniatures, I will be spending a long time painting this project. I am looking forward to it.
For next month, I am looking to paint my Pistoliers and (old pewter) Hellblaster with crew, and then getting through an ungentlemanly number of handgunners. Finally, I have some characters which I hopefully will be able to share next month.
Until then!


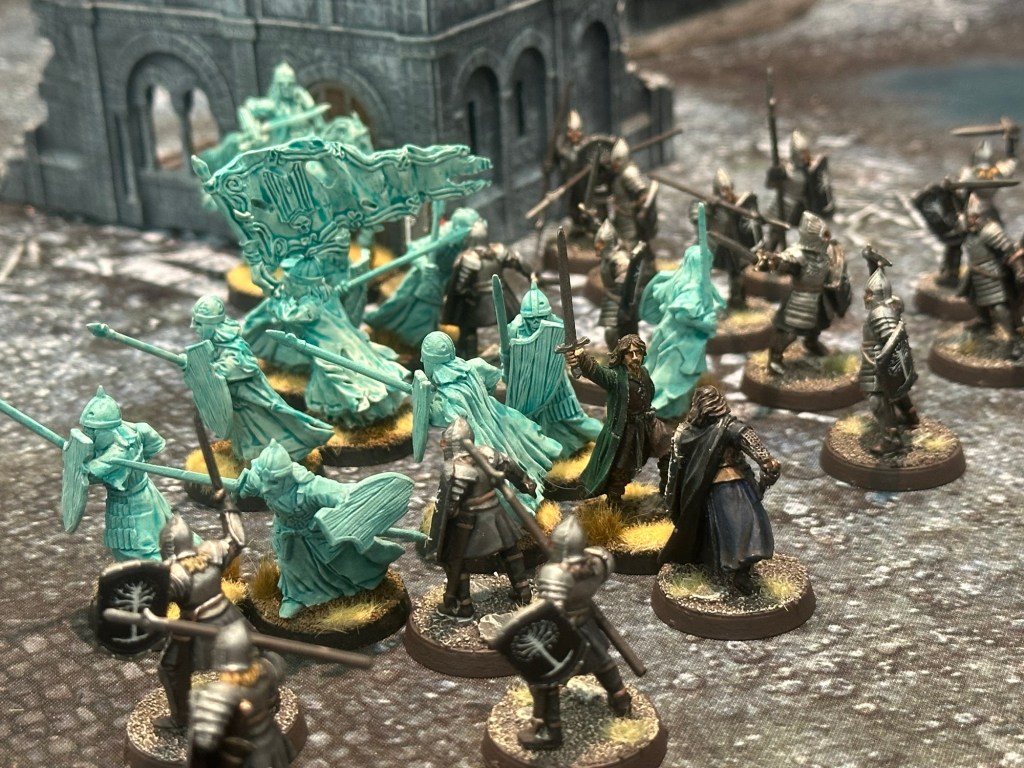


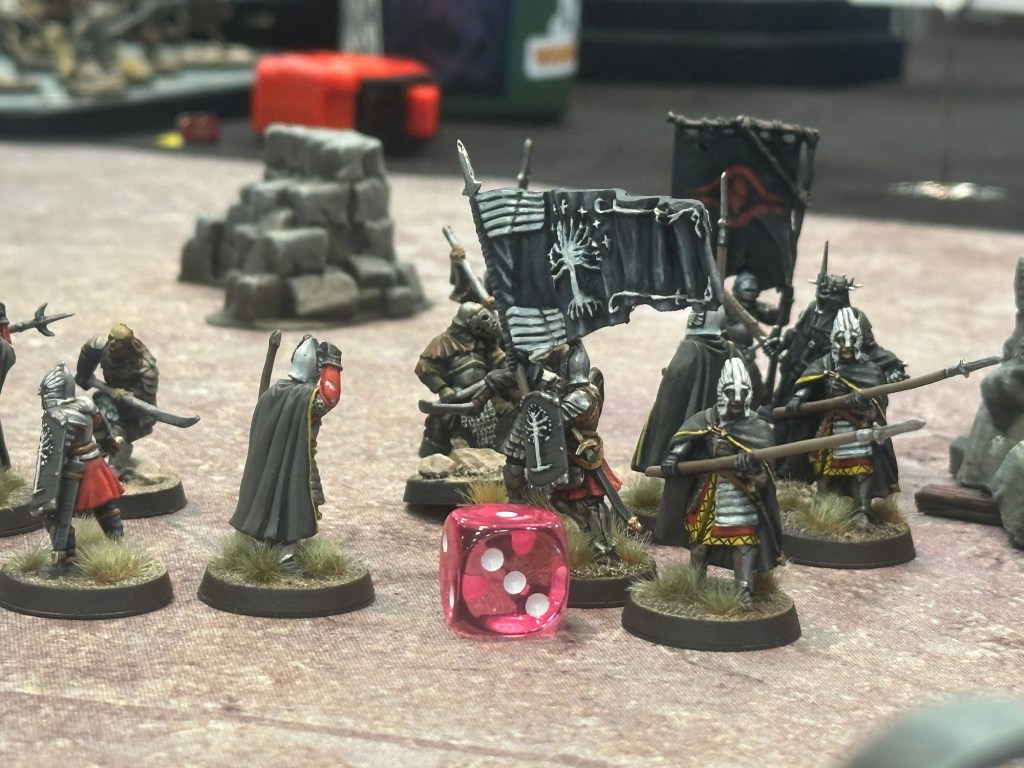


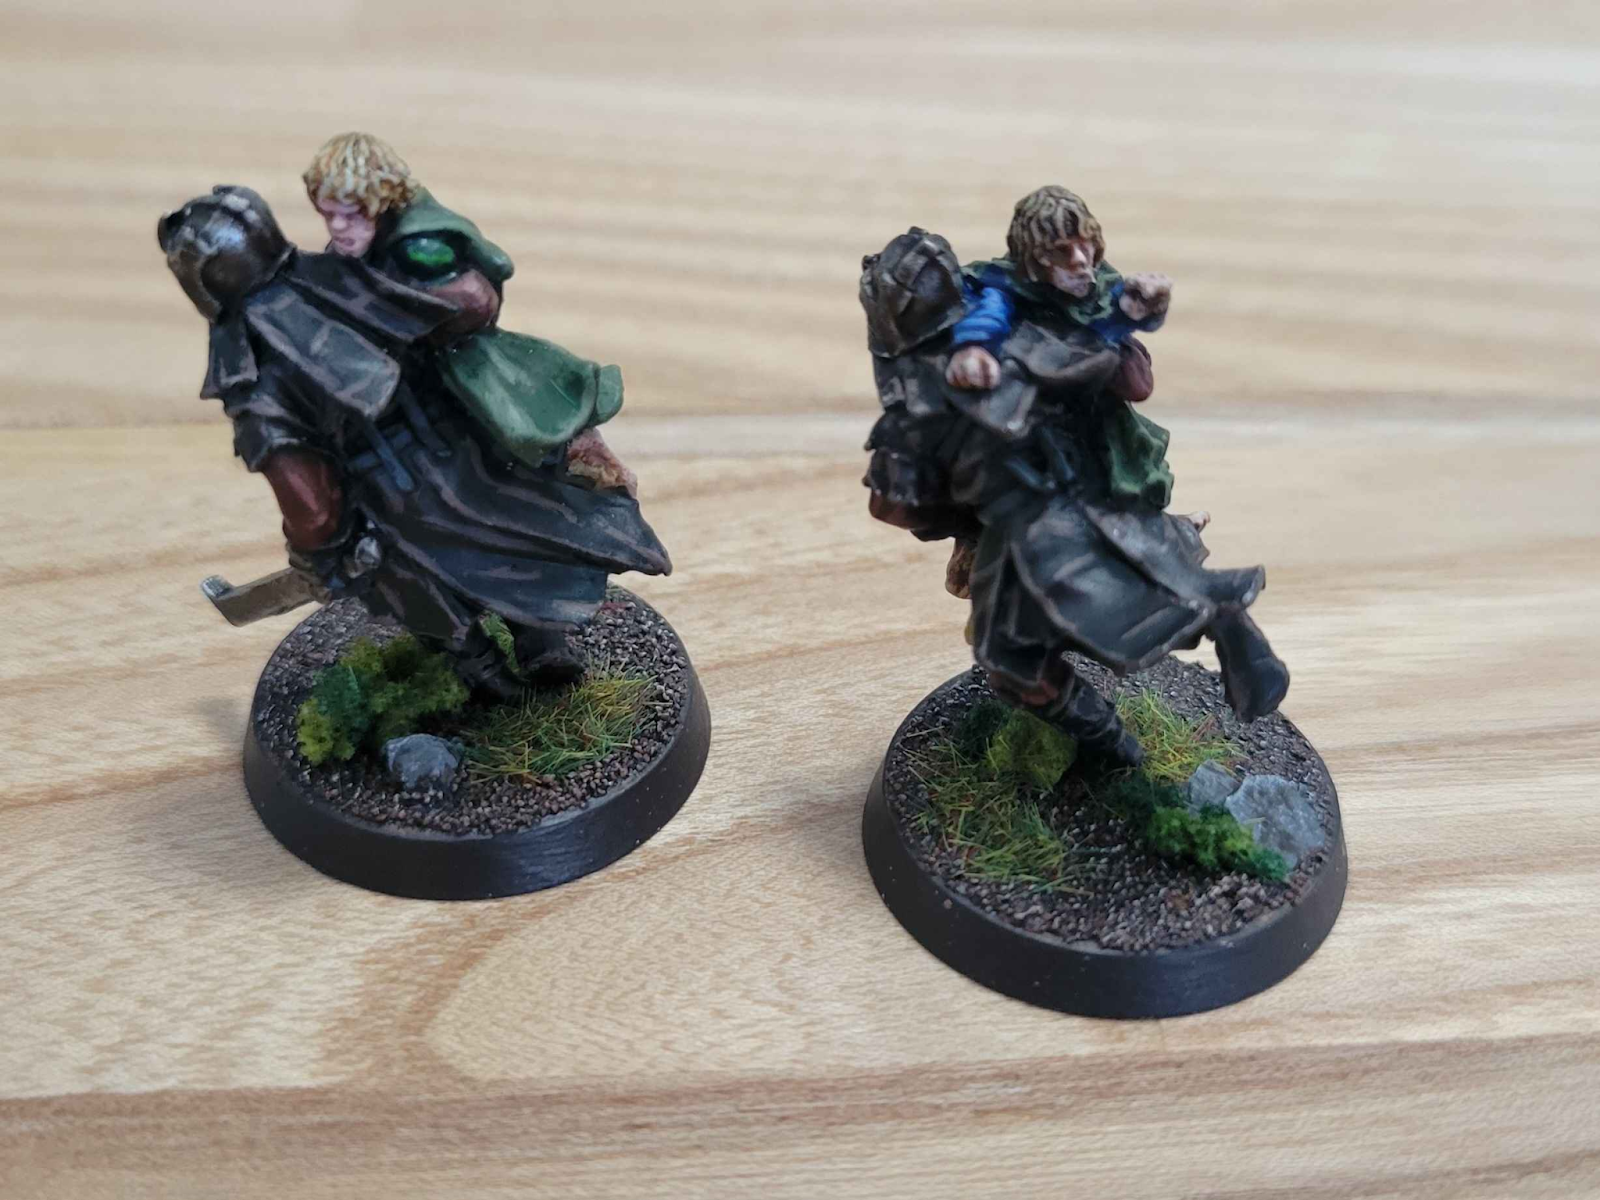


 The metals were Iron Hands Steel and Retributor Armor, both washed with Agrax Earthshade, and highlighted with Stormhost Silver and Liberator Gold respectively. I decided not to go with Chrome on these miniatures. While I love Chrome, and it makes everything pop, I felt as though it would’ve taken away from the more earthy tones of the Rohirrim. Maybe if/when I do Minas Tirith…


